Blog

  • 10 Vegan Snack Ideas for a Plant-Based Boost

    Looking for tasty vegan snacks to energize your day? Try spicy roasted chickpeas, nut butter energy balls, or veggie sticks with hummus. For some sweetness, homemade granola bars and chia seed pudding are easy to make. Don't forget about avocado toast variations, baked sweet potato fries, and vegan popcorn with nutritional yeast for savory cravings. Coconut yogurt parfaits can satisfy your sweet tooth too. Keep exploring to discover even more delicious plant-based ideas!

    Spicy Roasted Chickpeas

    crispy flavorful roasted snacks

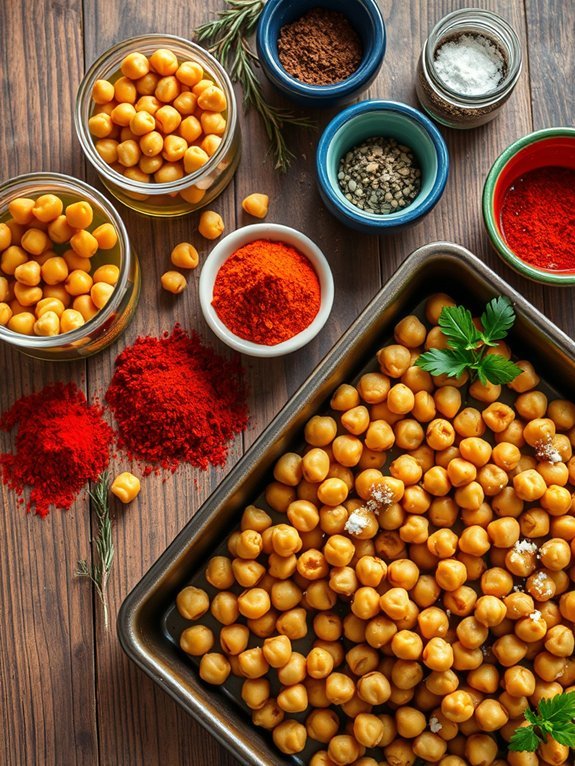
    Spicy roasted chickpeas are a delightful and nutritious snack that packs a punch of flavor and crunch. Perfect for satisfying your cravings between meals, these little legumes aren't only delicious but also loaded with protein and fiber. Preparing them is simple, making it easy to enjoy a wholesome and satisfying treat that aligns with a vegan lifestyle.

    Roasting chickpeas enhances their natural nuttiness while the spices add a bold kick. This snack can be customized with various seasonings depending on your taste preferences; whether you prefer a classic chili powder kick, a zesty garlic and herb blend, or a smoky paprika finish, the possibilities are endless. Serve them at your next gathering, or keep them on hand for a midday pick-me-up.

    • 1 can (15 oz) chickpeas, drained and rinsed
    • 2 tablespoons olive oil
    • 1 teaspoon garlic powder
    • 1 teaspoon smoked paprika
    • ½ teaspoon cayenne pepper (adjust to taste)
    • ½ teaspoon sea salt
    • ¼ teaspoon black pepper

    Preheat your oven to 400°F (200°C). After rinsing and draining the chickpeas, pat them dry with a paper towel to remove excess moisture. In a mixing bowl, combine the chickpeas with olive oil, garlic powder, smoked paprika, cayenne pepper, sea salt, and black pepper. Toss until the chickpeas are well-coated.

    Spread them in a single layer on a baking sheet and roast in the preheated oven for 25-30 minutes, shaking the pan halfway through, until they're golden and crispy. For an even better crunch, allow the roasted chickpeas to cool completely before storing them in an airtight container.

    Be careful not to overcrowd them on the baking sheet during roasting, as this can lead to uneven cooking. If you'd like to experiment with flavors, consider adding your favorite herbs or spices, such as cumin or an Italian seasoning blend, to make the snacking experience even more exciting! Enjoy your spicy roasted chickpeas as is, or use them as a topping for salads and grain bowls for an added touch of flavor and texture.

    Nut Butter Energy Balls

    nutty wholesome snack bites

    Nut Butter Energy Balls are a delicious and nutritious snack that requires minimal effort to prepare. Perfect for a midday pick-me-up or a post-workout boost, these energy balls are packed with healthy fats, protein, and fiber, making them an excellent choice for vegans and anyone looking for a wholesome snack.

    The combination of nut butter, oats, and sweetener creates a chewy texture, while the addition of mix-ins like chocolate chips or dried fruit adds a burst of flavor. Best of all, you can customize these energy balls to suit your taste. Use your favorite nut butter, whether it's almond, peanut, or cashew.

    You can also switch up the flavors by incorporating cocoa powder, cinnamon, or even a sprinkle of sea salt for a little extra zing. These bites aren't only satisfying but also easy to make ahead of time, ensuring that you always have a tasty treat on hand whenever cravings strike.

    • 1 cup nut butter (peanut, almond, or cashew)
    • 1 cup rolled oats
    • 1/3 cup maple syrup or agave nectar
    • 1/2 cup ground flaxseed or chia seeds
    • 1/2 cup chocolate chips (optional)
    • 1/2 cup dried fruit (raisins, cranberries, or apricots) or nuts (optional)
    • 1 tsp vanilla extract
    • A pinch of salt

    In a large mixing bowl, combine all the ingredients and stir until well mixed. If the mixture is too dry, add a little more nut butter or syrup; if it's too wet, add oats or ground flaxseed.

    Once everything is combined, use your hands to roll the mixture into small balls, about 1 inch in diameter. Place the energy balls on a parchment-lined baking sheet and refrigerate for at least 30 minutes to firm them up before transferring them to an airtight container for storage.

    When making Nut Butter Energy Balls, feel free to experiment with different mix-ins such as seeds, coconut flakes, or even spices like cinnamon or nutmeg to create your ideal flavor profile. Additionally, you can adjust the sweetness according to your taste and even roll the balls in desiccated coconut or crushed nuts for an extra touch.

    Store the energy balls in the fridge for up to a week, or freeze them for longer shelf life, making them a convenient grab-and-go option anytime.

    Avocado Toast Variations

    creative avocado toast ideas

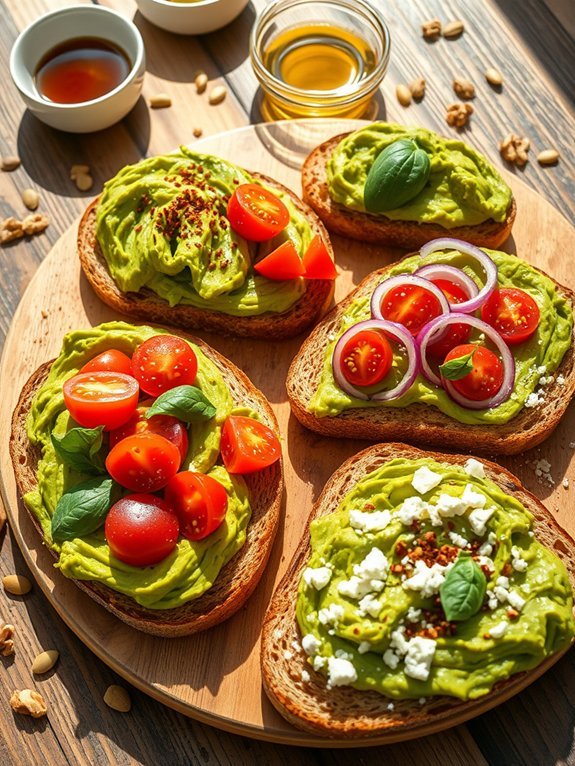
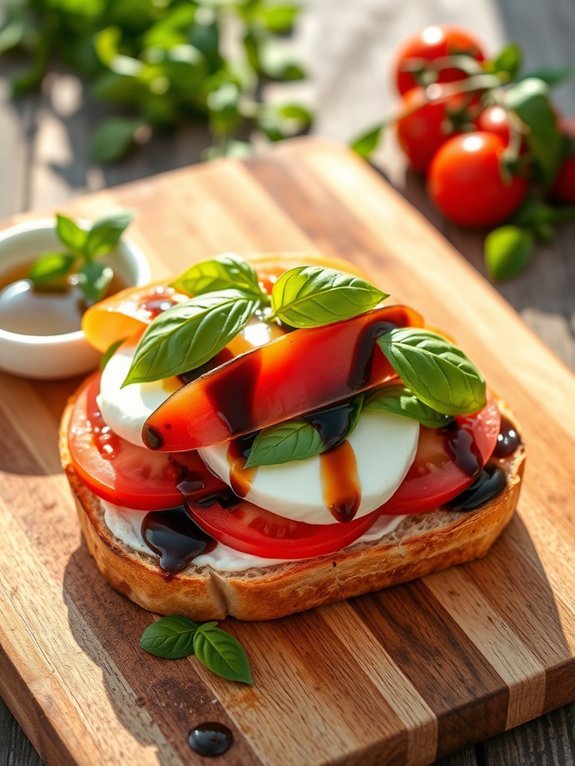
    Avocado toast is a versatile and delicious snack that not only satisfies hunger but also packs in a wealth of nutrients. The creamy texture of avocado paired with a crispy slice of toasted bread makes for a perfect base to layer a variety of toppings. Whether you prefer something spicy, sweet, or savory, the possibilities are endless when it comes to dressing up this simple dish. With just a few ingredients, avocado toast can easily be transformed into an eye-catching and flavorful snack that's bound to impress.

    This recipe will guide you through several variations of avocado toast, allowing you to tailor each version to your taste. You can experiment with different breads, toppings, and seasonings to find your perfect combination. So, gather your ingredients and get ready to elevate your snacking game with these inspired avocado toast options.

    • Ripe avocados (2)
    • Whole grain or sourdough bread (4 slices)
    • Cherry tomatoes (1 cup, halved)
    • Red onion (1 small, thinly sliced)
    • Fresh basil leaves (1/4 cup, chopped)
    • Feta cheese (1/2 cup, optional)
    • Red pepper flakes (1 teaspoon)
    • Olive oil (1 tablespoon)
    • Lemon juice (1 tablespoon)
    • Salt and pepper, to taste

    Start by toasting the slices of bread to your desired level of crispness. While the bread is toasting, scoop the ripe avocados into a bowl and mash them with a fork. Add in the lemon juice, olive oil, salt, and pepper, mixing until you have a creamy consistency.

    Once the bread is ready, spread the mashed avocado evenly across all slices. Top with your choice of halved cherry tomatoes, sliced red onion, fresh basil, and crumbled feta cheese, sprinkling red pepper flakes over the top for an added kick.

    For a delicious twist on your toast, feel free to customize your toppings according to the season or your cravings. Adding a drizzle of balsamic glaze or a sprinkle of nutritional yeast can introduce new flavors. If you're looking for added texture, consider incorporating seeds or nuts, like sunflower seeds or crushed walnuts.

    And remember, the quality of your bread and avocados will greatly impact the overall taste, so opt for fresh, high-quality ingredients for the best results. Enjoy experimenting with different variations until you discover your perfect avocado toast!

    Homemade Granola Bars

    delicious homemade granola bars

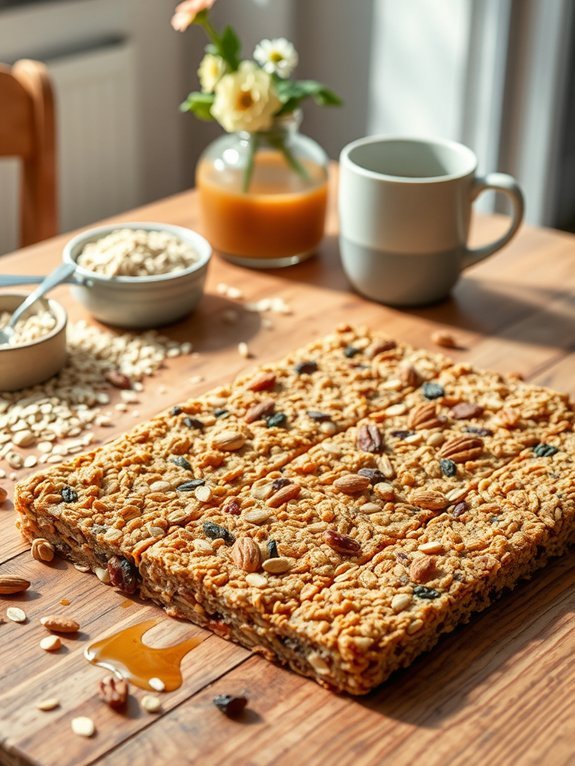
    Homemade granola bars are a delicious and nourishing snack, perfect for a mid-afternoon pick-me-up or a quick breakfast on the go. The beauty of making your own granola bars lies in the ability to customize the ingredients to suit your taste preferences and dietary needs. Whether you like your bars chewy or crunchy, packed with nuts and seeds or adorned with dried fruits, these bars can easily be adapted to fit any flavor profile you desire.

    This simple recipe uses basic pantry staples and is incredibly easy to prepare. In just a short amount of time, you can create a batch of energy-packed granola bars that are both healthy and satisfying.

    Additionally, making your own snacks can save you money and allow you to avoid unnecessary additives often found in store-bought varieties.

    • 2 cups rolled oats
    • 1 cup nut butter (such as almond or peanut butter)
    • 1/2 cup maple syrup or agave syrup
    • 1 cup mixed nuts (chopped)
    • 1/2 cup dried fruit (raisins, cranberries, or apricots)
    • 1/4 cup seeds (such as pumpkin or sunflower seeds)
    • 1 teaspoon vanilla extract
    • 1/2 teaspoon salt
    • Optional: 1/2 teaspoon cinnamon or chocolate chips for extra flavor

    In a large mixing bowl, combine the rolled oats, nut butter, maple syrup, mixed nuts, dried fruit, seeds, vanilla extract, salt, and optional spices or chocolate chips.

    Stir until all ingredients are well combined and stick together. Line a baking pan with parchment paper and pour the mixture into the pan, pressing it down firmly to create an even layer.

    Refrigerate for at least an hour to set and firm up before cutting into bars.

    When making these homemade granola bars, feel free to experiment with different ingredient combinations to find what you love best. You can swap out the nuts for your favorites, use different types of nut butter, or even add spices like cinnamon or nutmeg for flavor enhancement.

    Additionally, if you prefer a sweeter bar, increase the amount of maple syrup slightly or add a drizzle of melted dark chocolate on top once cooled.

    Storing your granola bars in an airtight container will keep them fresh for up to a week, making them a convenient and healthy option for snacking throughout the week.

    Vegetable Sticks With Hummus

    healthy snack with dip

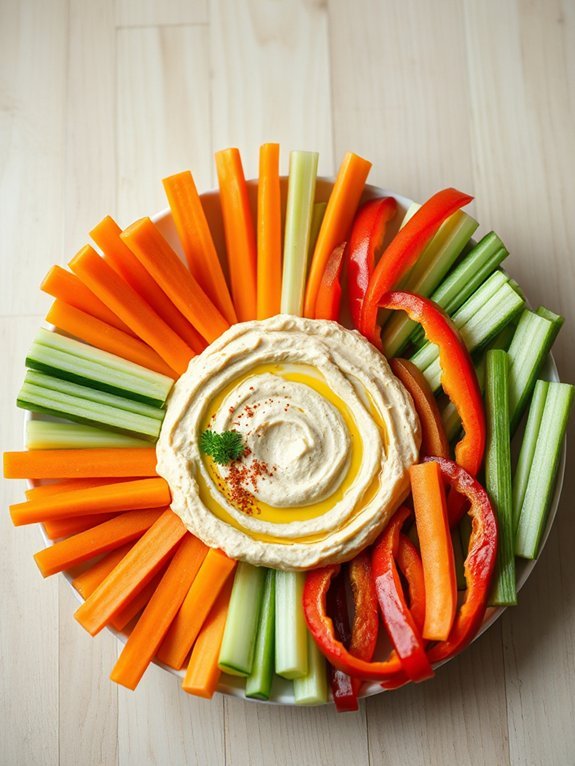
    Vegetable sticks with hummus are a delightful and nutritious snack that can be enjoyed at any time of the day. This versatile dish isn't only easy to make but also adds a crunchy texture and vibrant color to your snacking routine.

    The combination of fresh vegetables paired with creamy hummus provides a perfect balance of flavors and essential nutrients, making it an ideal choice for both adults and kids alike. Whether you're hosting a gathering, packing lunch for work, or in need of a quick afternoon snack, vegetable sticks with hummus are sure to please.

    The beauty of this dish lies in its simplicity and adaptability. You can use any vegetables you like, from carrots and celery to bell peppers and cucumbers, allowing you to customize your snack based on seasonal availability or personal preferences.

    Hummus, which can be store-bought or homemade, adds a rich and savory element, while the freshness of the veggies offers a satisfying crunch. Incorporating this snack into your routine not only helps satisfy cravings but also contributes to your daily vegetable intake.

    Ingredients:

    • 2 large carrots, cut into sticks
    • 2 celery stalks, cut into sticks
    • 1 bell pepper (any color), cut into strips
    • 1 cucumber, cut into sticks
    • 1 cup of hummus (store-bought or homemade)
    • Optional: cherry tomatoes, radishes, or any other preferred vegetables

    To prepare the vegetable sticks with hummus, start by washing and slicing your chosen vegetables into uniform sticks or strips. Lay them out on a serving platter or a large plate for an inviting presentation.

    In a small bowl, add your hummus in the center of the platter, making it easy for everyone to dip the vegetable sticks as they munch away.

    When preparing this dish, choose fresh, crisp vegetables for the best taste and texture. Feel free to experiment with different types of hummus, such as garlic or roasted red pepper flavors, to add variety.

    Additionally, you can refrigerate your prepped vegetable sticks in an airtight container, making them a convenient grab-and-go option throughout the week.

    Keep in mind that adding a sprinkle of herbs or a dash of lemon juice to your hummus can elevate the flavor and make the experience even more enjoyable!

    Fruit and Nut Trail Mix

    healthy snack combination mix

    When you're on the go or simply looking for a healthy snack, Fruit and Nut Trail Mix can be a satisfying and energizing option. This delightful combination of dried fruits, nuts, and seeds isn't just quick and easy to make; it's also tailored to your taste. You can mix and match your favorite ingredients to create a trail mix that embodies your unique flavor profile, making each handful a nourishing treat.

    This snack works wonderfully for hiking trips, family road trips, or even a post-workout boost. Plus, it's naturally vegan and gluten-free, allowing you to enjoy a delicious snack without worrying about dietary restrictions. With just a few simple ingredients, you can whip up a batch that will keep you fueled throughout your busy day.

    • 1 cup mixed nuts (almonds, walnuts, cashews, etc.)
    • 1 cup dried fruit (raisins, cranberries, apricots, etc.)
    • 1/2 cup seeds (pumpkin or sunflower seeds)
    • 1/2 cup dark chocolate chips (optional)
    • Pinch of sea salt (optional)
    • 1 teaspoon cinnamon (optional)

    In a large mixing bowl, combine the mixed nuts, dried fruit, seeds, and dark chocolate chips if using. Toss the ingredients together until evenly mixed. If desired, you can sprinkle a pinch of sea salt and cinnamon for extra flavor before combining.

    Once everything is well-blended, transfer the trail mix into an airtight container to maintain freshness.

    When preparing Fruit and Nut Trail Mix, feel free to experiment with different types of nuts and dried fruits based on your personal preferences. You can also adjust the proportions to your liking—add in more of what you love!

    For an added crunch, consider toasting the nuts in a dry skillet for a few minutes before mixing. Always store the trail mix in a cool, dry place for longevity, ensuring it stays fresh for your next adventure.

    Baked Sweet Potato Fries

    crispy baked sweet potato fries

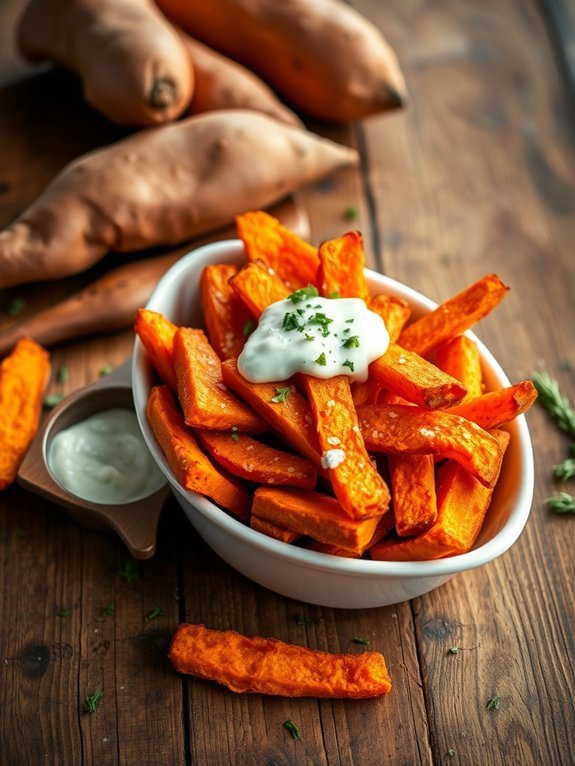
    Baked sweet potato fries are a delicious and nutritious snack that can satisfy your cravings without compromising your healthy diet. Sweet potatoes are naturally sweet, packed with fiber, vitamins, and minerals, making them an excellent alternative to traditional fries.

    The natural sweetness of the sweet potatoes, combined with the crispiness achieved by baking, turns this snack into a favorite for both vegans and non-vegans alike. Plus, they're incredibly easy to prepare and can be seasoned to your liking.

    To elevate the dish, you can experiment with various spices and toppings. From smoked paprika to garlic powder, the options are endless. You can also serve them with your favorite dipping sauces, such as vegan ranch, ketchup, or a spicy tahini sauce, to complement the flavors of the sweet potato fries. These fries are perfect for parties, movie nights, or as a simple side to any meal.

    Ingredients:

    • 2 large sweet potatoes
    • 2 tablespoons olive oil
    • 1 teaspoon paprika
    • 1 teaspoon garlic powder
    • ½ teaspoon salt
    • ¼ teaspoon black pepper
    • Optional: chili powder or cayenne pepper for spice

    Preheat your oven to 425°F (220°C). Wash and peel the sweet potatoes, then cut them into fries or wedges, making sure they're about ½ inch thick for even cooking.

    In a large bowl, toss the sweet potato fries with olive oil, paprika, garlic powder, salt, and black pepper until evenly coated. Spread the fries in a single layer on a baking sheet lined with parchment paper, making sure not to overcrowd the pan.

    Bake for 20-25 minutes, flipping halfway through, until the fries are golden brown and crispy. When making baked sweet potato fries, it's crucial to confirm they've enough space on the baking sheet for ideal crispiness.

    Overcrowding the fries can cause them to steam rather than bake, resulting in a less desirable texture. To achieve that perfect crunch, consider using a wire rack placed over your baking sheet, allowing air circulation around the fries.

    Also, be sure to keep an eye on them towards the end of the baking time to prevent overcooking. Enjoy your delicious, guilt-free snack!

    Chia Seed Pudding

    healthy chia seed dessert

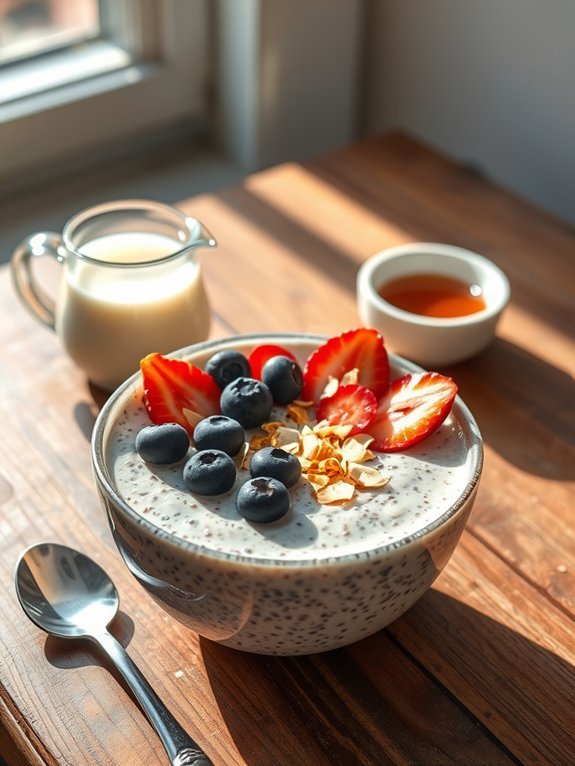
    Chia seed pudding is a delightful and nutritious vegan snack that's incredibly easy to whip up. Packed with omega-3 fatty acids, protein, and fiber, chia seeds expand and create a creamy pudding-like texture when soaked in liquid. This versatile treat can be tailored to suit your preferences with a variety of flavors and toppings, making it a perfect addition to your breakfast or dessert repertoire. Best of all, it requires minimal prep time and can be made ahead of time, ensuring a healthy snack is always at your fingertips.

    To make chia seed pudding, you'll need to combine chia seeds with your choice of liquid, typically plant-based milk such as almond, coconut, or soy milk. Sweeten the mixture with natural sweeteners like maple syrup or agave nectar, and add vanilla extract or cocoa powder for extra flavor. Allow the mixture to sit for a few hours, or preferably overnight, which allows the chia seeds to fully absorb the liquid and develop that signature pudding consistency.

    Ingredients:

    • 1/2 cup chia seeds
    • 2 cups plant-based milk (almond, coconut, soy, etc.)
    • 2 tablespoons maple syrup or agave nectar
    • 1 teaspoon vanilla extract
    • A pinch of salt
    • Optional toppings: fresh fruit, nuts, granola, or shredded coconut

    In a medium bowl, combine the chia seeds, plant-based milk, maple syrup, vanilla extract, and a pinch of salt. Whisk the ingredients together until well combined, ensuring no clumps of chia seeds remain. Let the mixture sit for about 5-10 minutes, then whisk again to prevent clumping.

    Pour the mixture into individual serving containers and refrigerate for at least 2 hours, or overnight. Before serving, stir well and top with your favorite toppings.

    For best results, make sure to give your chia seed pudding sufficient time to chill and set in the refrigerator. Experiment with different flavors by adding ingredients like cocoa powder for chocolate pudding, or blending in fruit puree for a fruity twist.

    Also, feel free to adjust the sweetness and milk ratios based on your personal preference; the pudding's texture will retain its creaminess as long as the seeds have enough liquid to absorb.

    Enjoy experimenting with various toppings and flavors to keep your chia seed pudding exciting!

    Vegan Popcorn With Nutritional Yeast

    vegan popcorn nutritional yeast

    Popcorn is a versatile and satisfying snack that can easily be made vegan and elevates to gourmet status with the addition of nutritional yeast. This ingredient not only brings a cheesy flavor but also infuses the popcorn with a nutritious boost of vitamins and minerals, particularly B vitamins and protein.

    Whether you're enjoying a movie night at home or need a quick snack on the go, this vegan popcorn is quick to prepare and endlessly customizable.

    Making vegan popcorn with nutritional yeast isn't only simple but also allows for creativity in flavoring. You can adjust the amount of nutritional yeast based on your taste preferences, and feel free to add extra spices or herbs to enhance the flavor even further.

    This recipe guarantees a satisfying crunch while offering a guilt-free, plant-based snack that everyone can enjoy.

    • 1/2 cup popcorn kernels
    • 2 tablespoons coconut oil (or any preferred oil)
    • 1/4 cup nutritional yeast
    • 1 teaspoon garlic powder (optional)
    • 1 teaspoon smoked paprika (optional)
    • Salt to taste

    In a large pot with a lid, heat the coconut oil over medium heat until melted. Add a few popcorn kernels and cover the pot. Once they pop, add the rest of the popcorn kernels in an even layer, cover again, and shake the pot gently to guarantee even heat distribution.

    Allow the popcorn to pop until the popping slows down, then remove the pot from heat. Transfer the popcorn to a large bowl and generously sprinkle it with nutritional yeast, garlic powder, smoked paprika, and salt. Toss well to coat.

    When making vegan popcorn, keep in mind that the oil temperature is essential—if it's too low, the kernels won't pop efficiently, and if it's too high, you risk burning the popcorn.

    Additionally, experiment with different spices and flavors to find the perfect combination that suits your taste. For a fun twist, you can also drizzle some melted vegan butter or add a squeeze of lemon juice for extra zest before serving.

    Coconut Yogurt Parfaits

    creamy coconut yogurt layers

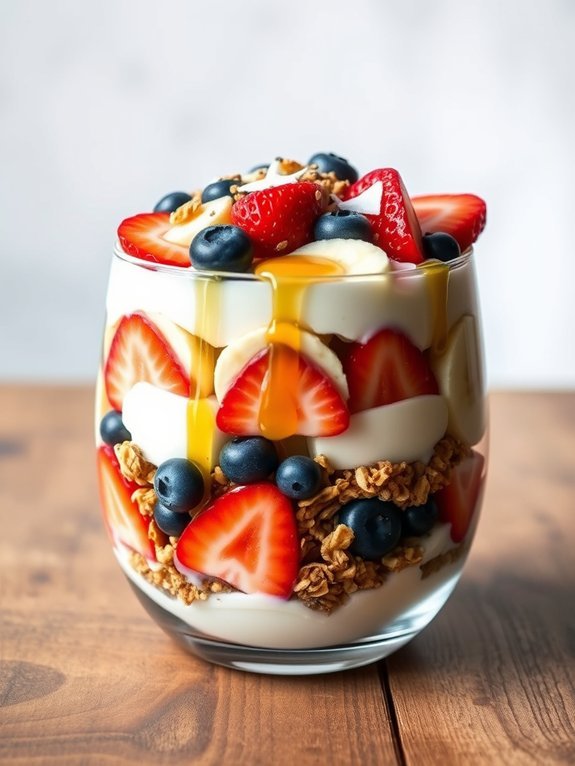
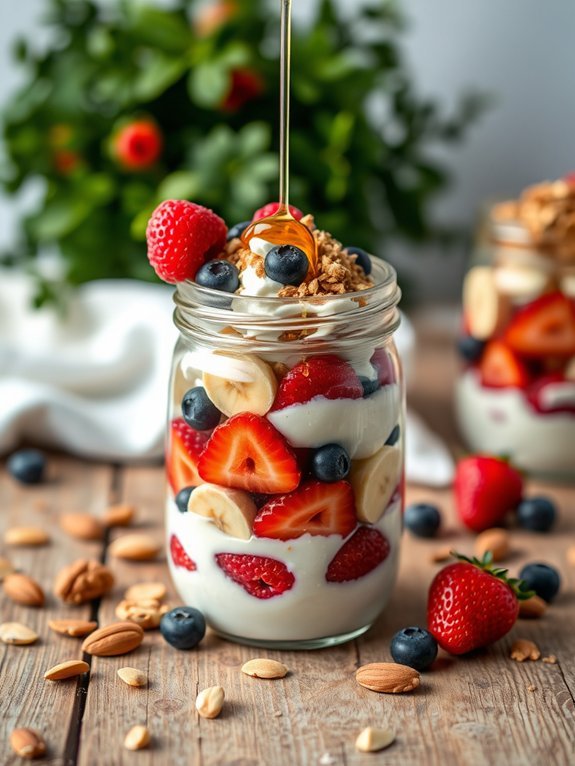
    Coconut yogurt parfaits are a delicious and healthy vegan snack that can be whipped up quickly for breakfast or as a tasty dessert. With just a few simple ingredients, you can create layers of creamy coconut yogurt, fresh fruits, and crunchy granola that will tantalize your taste buds and fuel your body.

    The beauty of this parfait lies in its versatility; you can customize it to your liking by incorporating different fruits, sweeteners, or toppings. Making a parfait isn't only easy, but it also allows you to showcase seasonal fruits and experiment with flavors.

    Consider using berries, bananas, or even diced mango to enhance the tropical note of the coconut yogurt. This colorful and satisfying dish is perfect for those busy mornings or as a revitalizing bite during the day. Grab your glass or bowl, and let's get started on crafting your coconut yogurt parfait!

    • 1 cup coconut yogurt
    • 1 cup granola (preferably gluten-free)
    • 1 cup mixed fresh fruits (such as berries, bananas, or mango)
    • 2 tablespoons maple syrup or agave nectar (optional)
    • Chia seeds or shredded coconut for topping (optional)

    In a glass or bowl, start by layering half of the coconut yogurt at the bottom. Follow this with a layer of granola and then a layer of fresh mixed fruits.

    Repeat the layers with the remaining yogurt, granola, and fruit. Drizzle some maple syrup or agave nectar on top if desired, and finish off with a sprinkle of chia seeds or shredded coconut for added crunch and texture.

    When assembling your parfait, feel free to experiment with the proportions of each layer according to your taste preferences. If you prefer thicker layers, use a little less fruit or granola between each yogurt layer.

    Additionally, make sure to choose ripe, flavorful fruits for the best taste, and consider letting the parfait sit for a bit to allow the flavors to blend. If preparing in advance, store each layer separately to maintain the crunch of the granola. Enjoy your colorful and nutritious coconut yogurt parfait!

  • 12 Vegan Protein Shakes for a Nutrient Boost

    If you're looking for a nutrient boost, vegan protein shakes are an excellent choice. Consider options like the Chocolate Peanut Butter Shake or Berry Almond Bliss, which blend delicious flavors with plant-based nutrients. Green shakes like the Green Monster and Spinach Avocado offer an extra health kick. You can also indulge in flavors like Pumpkin Spice or Chocolate Mint. These shakes not only provide protein but are easy to customize. Discover more tasty combinations that fit your lifestyle.

    Chocolate Peanut Butter Protein Shake

    delicious chocolate peanut butter shake

    For a delicious and energizing start to your day, the Chocolate Peanut Butter Protein Shake is the perfect choice. This vegan shake combines rich chocolate flavors with the creamy goodness of peanut butter, providing a decadent treat that doesn't compromise your dietary preferences. Packed with plant-based protein, this shake isn't only satisfying but also helps to fuel your workouts or serve as a nutritious snack whenever you need it.

    Making this shake is simply a matter of blending a few key ingredients together to create a smooth and creamy texture. It's ideal for those who love the combination of chocolate and peanut butter, and it can be customized to your favorite taste. Whether you're recovering from a workout or just seeking a delicious way to get your protein, this Chocolate Peanut Butter Protein Shake will hit the spot.

    Ingredients:

    • 1 cup almond milk (or any plant-based milk)
    • 1 frozen banana
    • 2 tablespoons peanut butter (natural, unsweetened)
    • 1 scoop vegan chocolate protein powder
    • 1 tablespoon cocoa powder
    • 1 tablespoon maple syrup (optional, for sweetness)
    • Ice cubes (optional, for thickness)

    To prepare the shake, add all the ingredients into a high-speed blender. Blend on high until you achieve a smooth and creamy consistency, making sure there are no lumps.

    If you prefer a thicker consistency, you can add ice cubes before blending. Taste and adjust the sweetness if necessary, then pour into a glass and enjoy!

    For extra creaminess, try using a frozen banana, as it will enhance the shake's texture without the need for additional ice. If you want to boost the nutritional content, consider adding a handful of spinach or kale; the flavor won't be noticeable, but you'll be packing in more vitamins and minerals.

    Finally, feel free to experiment by adding other ingredients like chia seeds or ground flaxseed, which can give your shake an extra health kick!

    Berry Almond Bliss Protein Shake

    berry almond protein shake

    For those seeking a nutritious and delectable way to fuel their day, the Berry Almond Bliss Protein Shake is an absolute winner. This shake not only provides a delightful burst of berry flavor but also packs in the protein and healthy fats that support energy and muscle recovery.

    With the perfect blend of almond butter, almond milk, and a variety of berries, it creates a creamy texture that's both satisfying and invigorating, making it an ideal choice for breakfast on the go or a post-workout snack.

    What makes this shake even more appealing is its simplicity and versatility. You can customize it with your favorite berries, whether using fresh strawberries, blueberries, or raspberries.

    In addition, integrating a vegan protein powder enhances its nutritional profile, making it a well-rounded drink that aligns perfectly with a plant-based lifestyle.

    • 1 cup unsweetened almond milk
    • 1 banana, frozen
    • 1 cup mixed berries (strawberries, blueberries, and raspberries)
    • 2 tablespoons almond butter
    • 1 scoop vanilla vegan protein powder
    • 1 teaspoon chia seeds (optional)
    • Ice cubes (optional, for desired thickness)

    In a blender, combine the almond milk, frozen banana, mixed berries, almond butter, vegan protein powder, and chia seeds if using. Blend on high until smooth and creamy, adding ice cubes to reach your desired consistency.

    Pour into a glass and enjoy immediately for the best flavor and texture.

    For an even more delicious experience, try adding a dash of cinnamon or a spoonful of maple syrup to enhance the sweetness if you prefer a more indulgent shake.

    You can also swap out the almond butter for peanut or cashew butter for a different flavor profile. Additionally, if you prepare this shake in advance, keep it in the refrigerator, but note that it may separate slightly; just give it a good shake or stir before drinking.

    Green Monster Protein Shake

    healthy green smoothie recipe

    The Green Monster Protein Shake is a delicious and nutritious way to kickstart your day or refuel after a workout. Packed with plant-based protein and vibrant greens, this shake isn't only satisfying but also helps boost your energy levels.

    With a perfect blend of fruits, leafy greens, and creamy nut butter, it's designed to nourish your body while tantalizing your taste buds.

    Making this shake is a quick and easy process. You can prepare it in just a few minutes, making it ideal for a busy lifestyle. Plus, it's a great way to sneak in some vegetables, especially for those who may not always get their daily greens.

    The combination of flavors creates a rejuvenating treat that you can customize based on your taste preferences and dietary needs.

    • 1 cup spinach or kale
    • 1 ripe banana
    • 1/2 cup frozen mango or pineapple
    • 1 scoop vegan protein powder (vanilla or unflavored)
    • 1 tablespoon almond butter or peanut butter
    • 1 cup unsweetened almond milk or other plant-based milk
    • 1 tablespoon chia seeds or flaxseeds (optional)
    • Ice cubes (optional, for a thicker consistency)

    In a blender, combine all the ingredients and blend until smooth and creamy. If you find the consistency too thick, you can add more almond milk to reach your desired texture.

    Pour the shake into a glass and enjoy immediately for the best flavor and freshness.

    For an extra boost of nutrients, you can add protein-rich toppings such as hemp seeds or a sprinkle of granola. If you're looking for a sweeter shake, consider adding a drizzle of maple syrup or agave nectar.

    Feel free to experiment with different fruits and greens, as this recipe is versatile and can easily adapt to include whatever you have on hand.

    Tropical Mango Coconut Protein Shake

    mango coconut protein shake

    Indulge in a revitalizing Tropical Mango Coconut Protein Shake that transports your taste buds straight to a sunny beach. This delightful shake isn't only delicious but also packed with plant-based protein, making it a perfect choice for post-workout recovery or a midday snack.

    The combination of ripe mango and creamy coconut provides a luscious sweetness, while the addition of protein powder guarantees you stay fueled and satisfied. Plus, it's quick and easy to whip up, fitting seamlessly into any busy lifestyle.

    To enhance the tropical experience, you can use fresh or frozen ingredients based on what you have on hand. If you prefer a thicker shake, go for frozen mango chunks. For a lighter version, fresh mango combined with coconut water can create a more invigorating drink.

    This shake is versatile and can easily be customized by adding other fruits or greens according to your preference, making it a staple in your vegan recipe collection.

    • 1 cup frozen mango chunks
    • 1 ripe banana
    • 1 cup coconut milk (or coconut water)
    • 1 scoop vegan protein powder (vanilla flavor works best)
    • 1 tablespoon shredded coconut (optional)
    • Ice cubes (optional, for a thicker consistency)
    • Fresh mint leaves (for garnish, optional)

    Begin by placing all ingredients into a high-speed blender. Blend until smooth and creamy, adjusting the consistency by adding more coconut milk or ice cubes as needed.

    Once the shake is blended to your desired texture, pour it into a glass and enjoy immediately.

    For the best flavor, try using very ripe mango, as it will add natural sweetness to your shake. If you want to boost the nutritional value, consider adding a handful of spinach or kale for extra greens without altering the taste noticeably.

    Finally, garnishing your shake with fresh mint adds a beautiful touch and a revitalizing aroma, making your Tropical Mango Coconut Protein Shake not just a treat for the taste buds, but also for the eyes!

    Creamy Coffee Protein Shake

    delicious creamy protein shake

    If you're looking for a delicious way to boost your energy in the morning or post-workout, a creamy coffee protein shake could be the perfect addition to your routine. Combining rich flavors of coffee and plant-based protein, this shake isn't only nutritious but also incredibly satisfying.

    Whether you're a coffee lover or just seeking a revitalizing drink that keeps you fueled throughout the day, this shake can be whipped up in no time.

    The beauty of the creamy coffee protein shake lies in its versatility. It can easily be adjusted to suit your taste preferences or dietary needs.

    Feel free to experiment with different types of non-dairy milk, protein powders, or sweeteners to create your ideal blend. Enjoy it cold, or as a warm treat on a cooler day; this shake is bound to keep you energized and ready to take on the world.

    Ingredients:

    • 1 cup brewed coffee (chilled or warm)
    • 1 scoop plant-based protein powder (vanilla or chocolate flavor)
    • 1 medium banana (frozen for creaminess)
    • 1 cup unsweetened almond milk (or any non-dairy milk)
    • 1 tablespoon almond butter (or peanut butter)
    • 1 tablespoon maple syrup (optional, for sweetness)
    • ½ teaspoon vanilla extract
    • Ice cubes (optional, for a colder shake)

    Combine the brewed coffee, plant-based protein powder, banana, almond milk, almond butter, maple syrup (if using), and vanilla extract in a blender. Blend on high speed until smooth and creamy. If you prefer a colder shake, add ice cubes and blend again until you achieve your desired consistency.

    When making your creamy coffee protein shake, don't hesitate to tailor the ingredients to your liking. Adjust the type of milk or nut butter for different flavors, and consider adding a dash of cinnamon or cocoa powder for an extra kick.

    Additionally, if you'd like a thicker texture, simply add more frozen banana or a handful of oats. Enjoy experimenting to find your personal favorite version!

    Spinach Avocado Protein Shake

    healthy green smoothie recipe

    A Spinach Avocado Protein Shake is a delightful way to pack a nutrition punch while enjoying a creamy and invigorating treat. This shake isn't only vegan but also a powerhouse of nutrients, thanks to the combination of spinach and avocado.

    Spinach is loaded with vitamins, minerals, and antioxidants, while avocados provide healthy fats that promote satiety and enhance the nutrient absorption from the spinach. Together, they create a smooth, luscious blend that's both satisfying and energizing.

    This shake is perfect for breakfast, a post-workout recovery drink, or as a nutritious snack throughout the day. It's customizable too; you can add your favorite plant-based protein powder or experiment with different fruits and nut butters to suit your taste. Whip this up in just a few minutes, and you'll have a delicious and nourishing shake that keeps you fueled and ready to conquer your day.

    • 1 cup fresh spinach leaves
    • 1 ripe avocado
    • 1 medium banana (frozen, if preferred)
    • 1 tablespoon chia seeds (optional)
    • 1 cup almond milk (or any plant-based milk)
    • 1 tablespoon maple syrup or agave nectar (optional)
    • A handful of ice cubes (optional, for a colder shake)

    In a blender, combine the fresh spinach leaves, ripe avocado, medium banana, chia seeds (if using), almond milk, and maple syrup (if using). Blend on high speed until the mixture is smooth and creamy.

    If you prefer a colder texture, add a handful of ice cubes and blend again until well incorporated.

    When making this Spinach Avocado Protein Shake, feel free to adjust the ingredient quantities based on your preferences. If you like it sweeter, add more banana or a splash of agave nectar.

    For a protein boost, try adding your favorite plant-based protein powder or a tablespoon of nut butter. Experiment with additional ingredients like cacao powder for a chocolatey twist or a teaspoon of vanilla extract for enhanced flavor.

    Finally, serving it in a fun glass or topping it with seeds or nuts can add a nice visual appeal!

    Cinnamon Oatmeal Cookie Protein Shake

    cinnamon oatmeal cookie shake

    If you're in the mood for a delicious and nutritious treat, search no further than the Cinnamon Oatmeal Cookie Protein Shake. This shake isn't only vegan but also packed with protein and flavor, making it a perfect post-workout snack or a soothing breakfast option. The combination of oats, nutty flavors, and warm cinnamon make it reminiscent of fresh-baked oatmeal cookies, providing both comfort and satisfaction in a glass. It's the ideal way to start your day or refuel after a workout while keeping your dietary preferences in mind.

    Making this delectable shake isn't only easy but also allows you to customize it to your taste. You can adjust the sweetness, add extra spices, or even throw in your favorite fruits. Whether you enjoy it for breakfast, as a mid-afternoon snack, or as a dessert, the Cinnamon Oatmeal Cookie Protein Shake is a delightful choice that's sure to please. So grab your blender and let's get started!

    • 1 cup almond milk (or any plant-based milk)
    • 1 banana (frozen for creaminess)
    • 1/2 cup rolled oats
    • 2 tablespoons vegan protein powder (vanilla or unflavored)
    • 1 teaspoon ground cinnamon
    • 1 tablespoon almond butter (or any nut butter)
    • 1 tablespoon maple syrup (optional)
    • 1/2 teaspoon vanilla extract
    • A pinch of salt
    • Ice cubes (optional, for a colder shake)

    In a blender, combine all of the ingredients—almond milk, banana, rolled oats, vegan protein powder, cinnamon, almond butter, maple syrup, vanilla extract, and salt. Blend on high until smooth and creamy, adding ice cubes if you'd like a thicker texture.

    Taste and adjust the sweetness or spice levels if necessary, then pour into a glass and enjoy your shake immediately.

    When making the Cinnamon Oatmeal Cookie Protein Shake, feel free to experiment with additional ingredients to enhance its flavor and nutritional value. You might consider adding a scoop of chia seeds or flaxseeds for extra omega-3 fatty acids, or mix in some ground ginger or nutmeg for a spicy twist.

    Storing any leftovers in the refrigerator will keep them fresh for a short time, although it's best enjoyed immediately for best texture and flavor. Enjoy personalizing your shake by trying different plant-based milks or nut butters to find your perfect combination!

    Vanilla Chia Seed Protein Shake

    creamy vanilla chia shake

    A Vanilla Chia Seed Protein Shake is a delightful way to fuel your day with plant-based nutrition. This shake combines the smooth, creamy texture of vanilla with the added health benefits of chia seeds, which are packed with omega-3 fatty acids, fiber, and protein.

    It's not only delicious but also incredibly easy to prepare, making it a perfect breakfast, post-workout snack, or midday pick-me-up.

    To whip up this invigorating shake, you'll need a few simple ingredients that blend together to create a nutritious powerhouse. The subtle sweetness of vanilla paired with the nutty flavor of chia seeds makes for a satisfying drink that's both filling and energizing.

    Whether you're a vegan athlete or simply looking to increase your daily protein intake, this shake is sure to meet your needs while keeping your taste buds happy.

    • 1 cup almond milk (or any non-dairy milk)
    • 2 tablespoons chia seeds
    • 1 scoop vanilla plant-based protein powder
    • 1 medium banana, sliced
    • 1 teaspoon pure vanilla extract
    • 1 tablespoon maple syrup (optional for sweetness)
    • Ice cubes (optional)

    In a blender, combine the almond milk, chia seeds, vanilla protein powder, banana, vanilla extract, and maple syrup if using.

    Blend on high until smooth and creamy, adding ice cubes for a chilled shake if desired. Let the shake sit for a few minutes to allow the chia seeds to expand and thicken the mixture, then blend again briefly before serving.

    Pour into a glass and enjoy!

    For the best flavor and texture, make sure to let the chia seeds sit for at least 5 minutes before drinking, as this allows them to swell and create a pudding-like consistency.

    You can also customize your shake by adding other ingredients like spinach for a boost of greens or a tablespoon of nut butter for extra creaminess. Feel free to adjust the sweetness with more or less maple syrup according to your personal preference!

    Chocolate Mint Protein Shake

    chocolate mint protein drink

    Indulging in a Chocolate Mint Protein Shake is a delightful way to satisfy your chocolate cravings while also fueling your body with nutritious plant-based protein. This invigorating shake marries the rich flavors of cocoa with the coolness of mint, creating a perfectly balanced treat that's both energizing and revitalizing.

    Whether you need a post-workout replenishment, a wholesome breakfast option, or a delicious midday snack, this shake hits the spot and can even be customized to fit your taste preferences.

    Preparing a Chocolate Mint Protein Shake isn't just quick and easy—it's also a fun opportunity to experiment with flavors and ingredients that suit your lifestyle. Using simple, whole-food ingredients, you can whip up this shake in minutes. With the right blend, it becomes a creamy and satisfying drink that will leave you feeling nourished.

    Plus, it can be made in a blender or even shaken up in a jar for those on the go!

    Ingredients:

    • 1 cup unsweetened almond milk (or any plant-based milk)
    • 1 scoop chocolate vegan protein powder
    • 1 tablespoon unsweetened cocoa powder
    • 1 banana (fresh or frozen)
    • 1/4 teaspoon peppermint extract
    • 1 tablespoon maple syrup (or to taste)
    • Handful of ice cubes
    • Fresh mint leaves for garnish (optional)

    To make your Chocolate Mint Protein Shake, start by adding the almond milk, chocolate protein powder, cocoa powder, banana, peppermint extract, maple syrup, and ice cubes to a blender. Blend on high speed until smooth and creamy. Adjust the sweetness if needed by adding more maple syrup.

    Pour into a glass, and if desired, garnish with fresh mint leaves for an extra touch of zest.

    When making your Chocolate Mint Protein Shake, feel free to explore varying levels of sweetness or mint flavor according to your personal preference. If you prefer a thicker consistency, add more frozen banana or ice cubes.

    You can also substitute the banana with other fruits such as avocado for creaminess or spinach for added nutrition. Experiment with different plant-based milk options like coconut or oat milk to find the perfect match for your taste buds.

    Enjoy your shake immediately for the best flavor and texture!

    Pumpkin Spice Protein Shake

    fall flavored protein beverage

    Embrace the cozy flavors of fall with this delicious Pumpkin Spice Protein Shake. Not only is it packed with protein, making it a perfect post-workout treat or nutritious breakfast option, but it also brings a delightful mix of warm spices that celebrate the season. The combination of pumpkin puree and spices intertwines with creamy plant-based milk to create a rejuvenating yet comforting drink that you can enjoy any time of the year.

    This shake isn't just about the flavors; it's also nutritionally rich. Pumpkin is a great source of vitamins A and C, while the added protein powder helps build muscle and keeps you feeling full longer. With its delightful taste and health benefits, this Pumpkin Spice Protein Shake is sure to become a favorite in your recipe repertoire.

    • 1 cup unsweetened almond milk (or any plant-based milk)
    • 1/2 cup pumpkin puree
    • 1 scoop vanilla vegan protein powder
    • 1 tablespoon maple syrup (or to taste)
    • 1/2 teaspoon pumpkin pie spice
    • 1/4 teaspoon cinnamon
    • A pinch of nutmeg
    • Ice cubes (optional for thickness)

    In a blender, combine all the ingredients and blend until smooth and creamy. If you prefer a thicker shake, add ice cubes and blend again until you reach your desired consistency. Taste and adjust sweetness by adding more maple syrup if preferred. Pour into a glass and enjoy!

    For an extra layer of flavor, feel free to top your shake with a sprinkle of cinnamon or additional pumpkin pie spice. You can also add in other healthy ingredients like a tablespoon of chia seeds for added fiber or a banana for a creamier texture. This shake can be prepped in advance and stored in the refrigerator for a quick grab-and-go meal or snack!

    Strawberry Banana Protein Shake

    strawberry banana protein shake

    Indulging in a Strawberry Banana Protein Shake is a delightful way to boost your energy levels and celebrate the tangy sweetness of fresh fruits. This vegan protein shake isn't only a fabulous post-workout refreshment but also a perfect breakfast option or a satisfying snack.

    Combining the vibrant flavors of ripe strawberries and creamy bananas, this shake is packed with nutrients, fiber, and protein, making it an excellent choice for anyone looking to maintain a healthy diet.

    To elevate the nutritional value of your shake, you can incorporate a scoop of your favorite vegan protein powder or opt for natural peanut butter or almond butter for an added protein kick. The combination of strawberries and bananas offers a fantastic taste while delivering essential vitamins and minerals.

    Simple to prepare, this protein shake can be enjoyed by all—from fitness enthusiasts to busy professionals.

    • 1 cup fresh or frozen strawberries
    • 1 ripe banana
    • 1 cup almond milk (or any plant-based milk)
    • 1 scoop vegan protein powder
    • 1 tablespoon almond butter (optional)
    • 1 teaspoon chia seeds (optional)
    • Ice cubes (optional, for a thicker shake)

    In a blender, combine all the ingredients, starting with the almond milk, followed by the strawberries, banana, vegan protein powder, and optional almond butter or chia seeds. Blend until smooth and creamy, adjusting the consistency with more almond milk or ice cubes as needed.

    Once well-blended, taste and adjust sweetness or flavors to your liking before pouring into a glass.

    For the best results, use ripe bananas and fresh strawberries to guarantee the shake tastes naturally sweet and creamy. If you're making a larger batch or want to meal prep, you can store the shake in an airtight container for up to 24 hours in the refrigerator; however, it's best enjoyed fresh for prime texture and flavor.

    Feel free to customize your shake by adding other ingredients like spinach for extra nutrients or a splash of vanilla extract for added sweetness!

    Matcha Coconut Protein Shake

    green tea coconut smoothie

    The Matcha Coconut Protein Shake is an invigorating and nutritious beverage that combines the earthy notes of matcha with the creamy richness of coconut. This vibrant green shake isn't only visually appealing but also packed with health benefits.

    Matcha is renowned for its high antioxidant content, supporting metabolism and providing a sustained energy boost without the jitters often associated with caffeine. Coupled with the hydrating properties of coconut, this shake is perfect for post-workout recovery or a mid-afternoon energy boost.

    Ideal for those with a plant-based lifestyle or anyone looking to incorporate more nutritious options into their diet, the Matcha Coconut Protein Shake is incredibly simple to prepare. With just a few wholesome ingredients blended together, you'll have a delicious drink ready in no time. Feel free to customize the sweetness to your taste, and enjoy a treat that takes your health to the next level!

    • 1 cup unsweetened coconut milk
    • 1 tablespoon matcha green tea powder
    • 1 scoop plant-based protein powder (vanilla or unflavored)
    • 1 banana (frozen for a creamier texture)
    • 1 tablespoon maple syrup or agave nectar (to taste)
    • 1/2 cup ice (optional)

    In a blender, combine the unsweetened coconut milk, matcha powder, plant-based protein powder, frozen banana, and maple syrup. Blend until smooth and creamy, adding ice if you prefer a colder, thicker shake.

    Taste and adjust sweetness if necessary before serving.

    For an extra twist, consider adding a tablespoon of chia seeds or flaxseeds for added fiber and omega-3 fatty acids. Garnishing your shake with shredded coconut, a sprinkle of matcha, or a few slices of banana can enhance its presentation and flavor.

    Keep in mind that adjusting the amount of coconut milk can change the thickness of your shake, so feel free to experiment based on your preferred consistency.

  • 10 Authentic Chinese Recipes You Can Make at Home

    You can reveal the flavors of authentic Chinese cuisine right in your kitchen with these ten delicious recipes. From the tender Classic Beef and Broccoli Stir-Fry to the irresistible Sweet and Sour Chicken, each dish is packed with vibrant tastes and textures. Don't miss out on savory Homemade Pork Dumplings, Fragrant Kung Pao Chicken, and more. With simple techniques and fresh ingredients, you'll impress your family and friends. Keep exploring for more delightful recipes and cooking tips!

    Classic Beef and Broccoli Stir-Fry

    beef and broccoli dish

    Beef and Broccoli Stir-Fry is a classic dish found in many Chinese restaurants, beloved for its tender beef and vibrant green vegetables. This hearty meal brings together the rich umami flavors of soy sauce and beef with the invigorating crunch of broccoli, making it a healthy and satisfying option for dinner.

    With its quick cooking time, this stir-fry is perfect for busy weeknights when you want to whip up something delicious without spending hours in the kitchen.

    While the recipe may seem simple, it relies heavily on the quality of the ingredients and the technique used to achieve that perfect stir-fried texture. Thinly sliced beef, marinated for just the right amount of time, becomes succulent and flavorful, while the broccoli retains its crispness.

    Served over steamed rice or noodles, this dish isn't only aesthetically pleasing but also packed with nutrients, making it a favorite in many households.

    Ingredients:

    • 1 lb flank steak, thinly sliced against the grain
    • 2 cups broccoli florets
    • 2 tablespoons vegetable oil
    • 3 cloves garlic, minced
    • 1 tablespoon ginger, minced
    • 1/4 cup soy sauce
    • 2 tablespoons oyster sauce
    • 1 tablespoon cornstarch
    • 1 tablespoon water
    • Salt and pepper to taste
    • Cooked rice or noodles for serving

    In a large skillet or wok, heat the vegetable oil over medium-high heat. Add the sliced beef and cook for 2-3 minutes until browned. Toss in the minced garlic and ginger, stirring quickly to prevent burning.

    Add the broccoli florets and stir-fry for an additional 3-4 minutes until they turn bright green. In a small bowl, mix the soy sauce, oyster sauce, cornstarch, and water, then pour the mixture over the stir-fry.

    Stir well to combine and cook for another couple of minutes until the sauce thickens and evenly coats the beef and broccoli. Season with salt and pepper to taste before serving over rice or noodles.

    For an even more flavorful dish, consider marinating the beef in the soy sauce and a bit of cornstarch for at least 15 minutes before you start cooking. This not only adds depth to the flavor but also helps tenderize the meat.

    Additionally, you can customize your stir-fry by adding other vegetables such as bell peppers or snap peas for extra color and crunch. Remember to have all your ingredients prepped and ready to go before you start cooking, as stir-frying is a quick process that requires constant attention.

    Simple Sweet and Sour Chicken

    quick and easy recipe

    Sweet and sour chicken is a classic dish that brings together an irresistible combination of flavors. It's loved for its balance of tanginess and sweetness, making it a delightful option for family dinners or special occasions. The dish typically features crispy chicken pieces tossed in a vibrant sauce made from vinegar, sugar, and a splash of soy sauce, along with colorful vegetables like bell peppers and onions for added texture and nutrients.

    Making sweet and sour chicken at home can be simple and rewarding. This recipe allows you to customize the sweetness and acidity to suit your taste preference. Serve it over a bed of fluffy steamed rice or with fried rice for a truly satisfying meal that evokes the flavors of a restaurant experience right in your kitchen.

    • 1 lb boneless chicken breast, cut into bite-sized pieces
    • 1 cup cornstarch
    • 2 eggs, beaten
    • 1/2 cup vegetable oil
    • 1 bell pepper, chopped
    • 1 onion, chopped
    • 1 can (pineapple chunks, drained)
    • 1/2 cup sugar
    • 1/2 cup vinegar
    • 1/4 cup ketchup
    • 1/4 cup soy sauce
    • 1 tablespoon cornstarch (for sauce thickening)
    • 1 tablespoon water

    In a large bowl, coat the chicken pieces in cornstarch, then dip them into the beaten eggs, ensuring they're fully covered. In a large skillet or wok, heat the vegetable oil over medium-high heat. Add the chicken pieces to the hot oil in batches, frying them until golden brown and cooked through, about 4-5 minutes on each side. Remove the chicken from the skillet and drain on paper towels.

    In the same skillet, stir-fry the bell pepper and onion until tender, then add the pineapple chunks. In a separate bowl, mix the sugar, vinegar, ketchup, and soy sauce. Pour this sauce over the cooked vegetables and stir in the dissolved cornstarch and water to thicken the sauce. Finally, add the fried chicken back to the skillet, tossing everything together until the chicken is evenly coated in the sauce.

    For the best results, make sure not to overcrowd the pan while frying the chicken, as this can prevent it from becoming crispy. If you prefer a healthier version, consider using chicken thighs instead of breasts, which tend to remain juicier. Additionally, feel free to adjust the ingredients, such as decreasing the sugar for a less sweet dish or adding in other vegetables like snap peas or carrots for more color and crunch.

    Homemade Pork Dumplings

    delicious homemade pork dumplings

    Pork dumplings are a beloved dish in Chinese cuisine, known for their deliciously savory filling wrapped in tender dough. They can be served steamed, boiled, or pan-fried, making them versatile for any occasion. Making pork dumplings at home isn't only a fun activity, but it also allows you to customize the flavors to suit your taste. With fresh ingredients and a few simple techniques, you can create a delightful dish that's perfect for family gatherings or a cozy dinner at home.

    To begin your journey in making homemade pork dumplings, it's important to prepare your filling first. A combination of ground pork, ginger, garlic, and leafy greens like bok choy or napa cabbage creates a rich and flavorful stuffing. The process can seem a little intimidating at first, but with practice, you'll find it easy to fold the dumplings and achieve that signature pleated edge.

    Plus, these dumplings can be made in large batches, then frozen for a quick meal later on!

    Ingredients:

    • 1 pound ground pork
    • 1 cup finely chopped napa cabbage
    • 2 green onions, finely chopped
    • 2 cloves garlic, minced
    • 1 tablespoon ginger, grated
    • 2 tablespoons soy sauce
    • 1 tablespoon sesame oil
    • 1 teaspoon salt
    • 1/2 teaspoon pepper
    • Dumpling wrappers (store-bought or homemade)
    • Water (for sealing dumplings)
    • Optional: dipping sauce (soy sauce, vinegar, chili oil)

    In a mixing bowl, combine the ground pork, napa cabbage, green onions, garlic, ginger, soy sauce, sesame oil, salt, and pepper until well mixed. To assemble the dumplings, place a wrapper in one hand and scoop about a tablespoon of filling into the center. Moisten the edges of the wrapper with water, fold it over to create a half-moon shape, and pinch the edges to seal it tightly, forming pleats if desired.

    After you've filled and sealed your dumplings, you can cook them immediately by steaming, boiling, or pan-frying them until golden and cooked through. For the best results, make sure that you don't overfill the dumplings to avoid bursting during cooking.

    When pan-frying, allow the bottom to get crispy before adding water to steam them. If you want to make a large batch, consider freezing any extras before cooking — just lay them out on a baking sheet to freeze individually, and then transfer them to a sealed bag for later use.

    Enjoy your homemade dumplings with a delicious dipping sauce to enhance the flavors!

    Fragrant Kung Pao Chicken

    spicy stir fried chicken dish

    Kung Pao Chicken is a classic dish recognized for its vibrant flavors and bold spices. Originating from the Sichuan province, this stir-fry showcases tender chicken, crunchy peanuts, and a medley of vegetables, all coated in a rich and savory sauce. The blend of heat from Sichuan peppercorns and the sweetness of soy sauce create a tantalizing profile that brings out the best of each ingredient. Making this dish at home allows you to customize the heat level and ingredients according to your preference.

    Cooking Kung Pao Chicken requires minimal preparation, making it a great weeknight meal. With just a few simple ingredients and a quick cooking method, you can have a restaurant-quality dish in less than 30 minutes. The combination of marinated chicken and fresh vegetables stir-fried to perfection results in a colorful and appetizing plate that will please both family and friends alike.

    Let's plunge into the recipe and get cooking!

    • 1 lb boneless, skinless chicken breast, diced
    • 3 tablespoons soy sauce
    • 2 tablespoons Chinese rice wine or Shaoxing wine
    • 1 tablespoon cornstarch
    • 2 tablespoons vegetable oil
    • 1 red bell pepper, diced
    • 1 green bell pepper, diced
    • 4-5 dried red chilies
    • 1 tablespoon Sichuan peppercorns
    • 3 garlic cloves, minced
    • 1-inch piece of ginger, minced
    • 1/2 cup roasted peanuts
    • 2 tablespoons hoisin sauce
    • 1 tablespoon sugar
    • 1 tablespoon rice vinegar
    • 2 green onions, sliced for garnish

    To cook the Kung Pao Chicken, first, marinate the diced chicken in a mixture of soy sauce, rice wine, and cornstarch for about 15 minutes.

    In a large wok or skillet, heat the vegetable oil over high heat and stir-fry the dried red chilies and Sichuan peppercorns until fragrant. Add the marinated chicken and cook until browned and cooked through.

    Then, toss in the diced bell peppers, garlic, and ginger, stir-frying for an additional couple of minutes. Ultimately, mix in the roasted peanuts, hoisin sauce, sugar, and rice vinegar, and give everything a good toss to combine thoroughly.

    Garnish with sliced green onions before serving.

    When preparing Kung Pao Chicken, feel free to adjust the heat level to your liking by adding more or fewer dried chilies. For additional crunch, you can substitute or add other vegetables like zucchini or carrots.

    It's important to keep the heat high throughout cooking to guarantee the ingredients stir-fry quickly and retain their texture.

    Finally, if you want to save time, you can use pre-cut chicken or ready-made Kung Pao sauce from the store, although making it from scratch allows for a fresher and more flavorful dish that brings out the best of authentic Chinese cuisine.

    Savory Mapo Tofu

    spicy flavorful tofu dish

    Mapo Tofu is a classic Chinese dish, hailing from the Sichuan province, known for its bold flavors and delightful textures. This dish features silken tofu cooked in a rich, spicy, and aromatic sauce, typically made with minced meat, doubanjiang (fermented broad bean paste), and Sichuan peppercorns. The combination of spicy, savory, and slightly numbing flavors creates a unique and unforgettable meal that's beloved by many worldwide.

    Making Mapo Tofu at home allows you to control the spice levels and ingredient quality, ensuring that you can adapt it to your taste preferences. This dish isn't only hearty and satisfying but also quick to prepare, making it a perfect option for a weeknight dinner or an impressive dish for entertaining. With just a few basic ingredients and easy-to-follow steps, you can enjoy a taste of Sichuan cuisine in the comfort of your kitchen.

    Ingredients:

    • 14 oz (400g) silken tofu
    • 1/2 lb (225g) ground pork or beef
    • 2 tablespoons vegetable oil
    • 3 tablespoons doubanjiang (Sichuan chili bean paste)
    • 1 tablespoon fermented black beans, rinsed and chopped
    • 2 cloves garlic, minced
    • 1 inch piece of ginger, minced
    • 1/2 teaspoon Sichuan peppercorns
    • 1 cup chicken or vegetable broth
    • 2 tablespoons soy sauce
    • 1 tablespoon cornstarch mixed with 2 tablespoons water
    • Green onions, for garnish
    • Cooked rice, for serving

    Start by pressing the silken tofu gently with paper towels to remove excess moisture, then cut it into cubes. In a pan or wok, heat the vegetable oil over medium heat. Add the ground meat and stir-fry until it's browned.

    Then, add the doubanjiang, fermented black beans, garlic, ginger, and Sichuan peppercorns, stirring for about a minute until fragrant. Pour in the chicken or vegetable broth and soy sauce, bringing it to a simmer.

    Gently add the cubed tofu, allowing it to soak in the flavors. Finally, stir in the cornstarch mixture to thicken the sauce, and let it cook for another minute until the sauce is glossy.

    When cooking Mapo Tofu, be mindful of the balance between spice and flavor. If you're sensitive to heat, start with less doubanjiang and add more to suit your taste. Using fresh ingredients, especially the ginger and garlic, enhances the overall flavor profile of the dish.

    Pair it with steamed rice to tone down the spice, and enjoy the vibrant flavors of this exquisite Sichuan classic!

    Authentic Fried Rice

    flavorful fried rice recipe

    Fried rice is a beloved dish that has its roots in Chinese cuisine, making it a staple in many households across the globe. The beauty of fried rice lies in its versatility; you can customize it based on what you have on hand, making it an excellent dish for using up leftover vegetables and proteins. With just a few basic ingredients, you can create a hearty meal that's packed with flavor and texture, ensuring that every bite is satisfying.

    Traditionally, fried rice is best made with day-old rice, as it tends to be drier and less sticky than freshly cooked rice, which can lead to a better texture in the final dish. The key to achieving that irresistible fried rice quality lies in high heat, quick cooking, and the use of fragrant seasonings and sauces that bring out the inherent flavors of your ingredients.

    Whether you prefer your fried rice vegetarian or packed with meat and seafood, mastering this dish can elevate your home cooking considerably.

    • 2 cups of day-old cooked rice
    • 2 tablespoons vegetable oil
    • 2 large eggs, lightly beaten
    • 1 cup mixed vegetables (such as peas, carrots, and corn)
    • 1 cup cooked protein (chicken, shrimp, or tofu)
    • 3 green onions, chopped
    • 3 tablespoons soy sauce
    • 1 tablespoon oyster sauce (optional)
    • 1 teaspoon sesame oil
    • Salt and pepper, to taste

    Heat a wok or large skillet over high heat and add the vegetable oil. Once the oil is hot, pour in the beaten eggs, scrambling them quickly until fully cooked. Add the mixed vegetables and cooked protein to the pan, stirring to combine.

    Next, add the rice, breaking up any clumps and allowing it to fry for a few minutes until heated through. Pour in the soy sauce and oyster sauce (if using), mixing everything well. Finish with sesame oil, chopped green onions, and season with salt and pepper to taste before serving.

    When making fried rice, it's crucial to prepare all your ingredients beforehand since the cooking process moves quickly. To elevate your dish even further, consider adding aromatics like minced garlic or ginger for an extra layer of flavor.

    Additionally, if you're looking to create a crispy texture, push the rice to the side of the pan and let it sit for a minute before stirring, allowing it to fry a bit longer. Enjoy your homemade fried rice as a side or a main dish, and don't hesitate to experiment with different ingredients to make it your own!

    Tasty General Tso's Chicken

    delicious spicy chicken dish

    General Tso's Chicken is a beloved dish that has gained popularity worldwide, particularly in Western Chinese restaurants. Known for its sweet and spicy flavor profile, this dish features crispy chicken pieces coated in a delicious sauce made with sesame oil, soy sauce, vinegar, and a hint of sugar. Named after a famous Chinese military leader, this recipe isn't only a crowd-pleaser but also perfect for making at home to enjoy with family and friends.

    Cooking General Tso's Chicken at home is simpler than you might think. With a few key ingredients and some techniques to guarantee that the chicken is crispy, you can recreate this takeout classic in your own kitchen. The combination of frying the chicken, tossing it in a flavorful sauce, and garnishing it with green onions will lead to a dish that rivals any restaurant version. Serve it over steamed rice and you've got a satisfying meal that everyone will love.

    Ingredients:

    • 1 pound boneless, skinless chicken thighs
    • 1/2 cup cornstarch
    • 1/4 cup soy sauce
    • 1/4 cup rice vinegar
    • 1/4 cup sugar
    • 2 tablespoons sesame oil
    • 2 tablespoons vegetable oil
    • 3-4 dried red chilies
    • 3 cloves garlic, minced
    • 1 tablespoon ginger, minced
    • 2 green onions, chopped
    • Salt and pepper to taste

    Cut the chicken thighs into bite-sized pieces, then season with salt and pepper. Dredge the chicken pieces in cornstarch and shake off the excess. In a large skillet or wok, heat vegetable oil over medium-high heat. Fry the chicken until golden and crispy, about 4-5 minutes per side. Remove the chicken and set aside.

    In the same pan, add the dried red chilies, garlic, and ginger, cooking for about 30 seconds until fragrant. Stir in soy sauce, rice vinegar, and sugar, bringing it to a simmer. Return the chicken to the pan, coating it in the sauce. Cook for another 2-3 minutes, then garnish with green onions before serving.

    When making General Tso's Chicken, it's important to achieve that perfect crispy texture. Let the fried chicken pieces drain on a paper towel after frying to reduce excess oil. Additionally, you can adjust the level of spiciness by varying the number of dried chilies you use, or you can skip them altogether if you prefer a milder flavor.

    Consider marinating the chicken in soy sauce for about 30 minutes before dredging it in cornstarch for added flavor. Enjoy this dish fresh and hot for the best taste experience!

    Spicy Szechuan Noodles

    szechuan spice noodle dish

    Spicy Szechuan Noodles are a tantalizing dish that showcases the bold and vibrant flavors of Szechuan cuisine. This dish combines chewy noodles with a spicy and tangy sauce, typically made from a mix of Szechuan peppercorns, soy sauce, sesame oil, and chili paste. Perfect for a quick weeknight meal or as a party dish, these noodles will surely impress anyone who takes a bite.

    The intricate balance of heat, savory notes, and aromatic herbs creates a dish that's both satisfying and unforgettable.

    Making Spicy Szechuan Noodles at home is simpler than it seems, and you can easily customize the spice level to suit your preference. With just a handful of ingredients, you can whip up a delicious platter of noodles that will warm your soul and excite your taste buds.

    Pair the noodles with your choice of protein or keep it vegetarian by adding in a medley of colorful vegetables for added nutrition and crunch.

    • 8 oz. of fresh or dried noodles (egg noodles or wheat noodles)
    • 2 tablespoons vegetable oil
    • 2 cloves garlic, minced
    • 1 tablespoon ginger, minced
    • 2 tablespoons Szechuan peppercorns
    • 3 tablespoons soy sauce
    • 2 tablespoons chili paste or sauce (adjust to taste)
    • 1 tablespoon rice vinegar
    • 1 tablespoon sesame oil
    • Chopped scallions, for garnish
    • Crushed peanuts, for garnish (optional)

    Cook the noodles according to package instructions until al dente, rinsing them under cold water afterward to stop the cooking process.

    In a large pan or wok, heat vegetable oil over medium heat, adding garlic, ginger, and Szechuan peppercorns. Stir-fry for about a minute until fragrant, then add cooked noodles, soy sauce, chili paste, rice vinegar, and sesame oil. Toss the noodles and sauce together until well combined and heated through, about 2 to 3 minutes.

    To enhance the flavor of your Szechuan Noodles, feel free to experiment with different types of vegetables, such as bell peppers, carrots, or snap peas for a fresher finish.

    If you're not a huge fan of the Szechuan peppercorns, you can reduce their quantity for less numbing heat or omit them altogether.

    Adjust the spices according to your palate, keeping the balance of flavors in check, and remember that this dish is all about finding your ideal levels of heat and tanginess!

    Mouthwatering Char Siu (BBQ Pork)

    savory bbq pork delight

    Char Siu, also known as Chinese BBQ pork, is a beloved dish that features succulent, marinated pork shoulder or loin, roasted to perfection, and glazed with a deliciously sweet sauce. This dish is popular in Chinese cuisine and is often found hanging in windows of restaurants around the world, characterized by its deep red color and mouthwatering aroma.

    The combination of flavors in the marinade—including hoisin sauce, soy sauce, honey, and five-spice powder—creates a unique taste that transports your taste buds straight to the streets of Hong Kong.

    Making Char Siu at home might seem intimidating, but it's surprisingly straightforward and incredibly rewarding. With a few simple ingredients and a bit of time, you can create a tender and flavorful BBQ pork dish that will impress your family and friends.

    Once you master the art of Char Siu, you can use it for various dishes, from stir-fries and rice bowls to bao buns and more. Let's immerse ourselves in the recipe so you can enjoy this delicious dish right in your own kitchen!

    • 2 pounds pork shoulder or pork loin
    • 3 tablespoons hoisin sauce
    • 3 tablespoons soy sauce
    • 2 tablespoons honey
    • 1 tablespoon Chinese rice wine or Sherry
    • 1 teaspoon five-spice powder
    • 2 cloves garlic, minced
    • 1 tablespoon red food coloring (optional)
    • 2 tablespoons sesame oil (for basting)

    To cook the Char Siu, first, slice the pork into long strips about 1-inch thick. In a bowl, combine hoisin sauce, soy sauce, honey, rice wine, five-spice powder, garlic, and food coloring (if using), then marinate the pork in this mixture for at least 4 hours, preferably overnight in the refrigerator.

    Preheat your oven to 375°F (190°C). Place the marinated pork on a baking rack over a roasting pan or lined baking sheet, and roast for about 25-30 minutes. Pour some of the marinade over the pork every 10 minutes to glaze it until it reaches a nice caramelization.

    Once done, let it rest for a few minutes before slicing it thinly to serve. For an extra flavor boost, consider grilling the Char Siu after baking for an additional smoky element. This method adds a lovely char and enhances the caramelization from the marinade.

    Additionally, using a meat thermometer can help you check for doneness—look for an internal temperature of about 145°F (63°C). If you're short on time, you can also cook the pork in a pressure cooker, but allow time to marinate for the best flavor. Enjoy your homemade Char Siu with steamed rice or in a stir-fry!

    Traditional Wonton Soup

    classic chinese dumpling soup

    Wonton soup is a beloved staple in Chinese cuisine, known for its delicate flavors and comforting warmth. The star of this dish is, of course, the wontons, which are little dumplings typically filled with a mixture of ground meat, seafood, and aromatic seasonings. These dumplings, when combined with a rich broth and fresh greens, create a satisfying meal that can easily be prepared at home, bringing the essence of a traditional Chinese family dinner right to your kitchen.

    Making wonton soup allows you to customize the filling to your taste preference. Some may prefer the classic combination of pork and shrimp, while others might enjoy a vegetarian option filled with mushrooms and greens. The broth, flavored with ginger, garlic, and scallions, serves as the perfect backdrop for the wontons to shine. Enjoy a warm bowl of homemade wonton soup not just as a meal, but as a warm embrace during chilly nights or a quick lunch option that delights.

    Ingredients:

    • 1 package of wonton wrappers
    • 1/2 pound ground pork
    • 1/4 pound shrimp, peeled and chopped
    • 2 tablespoons soy sauce
    • 1 tablespoon sesame oil
    • 2 green onions, finely chopped
    • 1 teaspoon fresh ginger, minced
    • 1 garlic clove, minced
    • 4 cups chicken or vegetable broth
    • 2 cups water
    • 1 cup bok choy or spinach
    • Salt and pepper, to taste

    In a mixing bowl, combine the ground pork, chopped shrimp, soy sauce, sesame oil, green onions, ginger, garlic, salt, and pepper.

    Lay a wonton wrapper on a clean surface and place a small spoonful of the filling in the center. Wet the edges with water, fold the wrapper into a triangle, and press to seal, ensuring there are no air pockets. Repeat until all filling is used.

    In a pot, bring the chicken or vegetable broth and water to a boil, then add the wontons and cook for about 5 minutes, or until they float. Add the bok choy or spinach and cook for an additional minute. Serve hot.

    To enhance your wonton soup, consider making your own broth from scratch using chicken bones, aromatic vegetables, and spices for deeper flavor.

    Experiment with different fillings—add herbs like cilantro or spices for a bit of kick. Always remember to adjust the seasoning to your personal taste.

    Finally, you can customize your soup with toppings like sliced chili peppers, extra green onions, or a drizzle of chili oil for added flair and flavor. Enjoy your homemade wonton soup!

  • 12 Healthy Seafood Dishes That Are Packed With Flavor

    If you're looking for healthy seafood dishes packed with flavor, you've got great options! Try Grilled Lemon Herb Salmon or Spicy Garlic Shrimp Tacos for a delicious kick. Baked Cod With Tomato Basil Salsa and Cilantro Lime Shrimp with Quinoa are both fresh and nutritious. Explore Teriyaki Glazed Mahi-Mahi or indulge in Seafood Paella with Brown Rice for a satisfying meal. With so many vibrant flavors to savor, you'll discover even more exciting recipes ahead!

    Grilled Lemon Herb Salmon

    lemon herb salmon recipe

    Grilled Lemon Herb Salmon is a delicious and nutritious option for seafood lovers looking to create a healthy meal without sacrificing flavor. Rich in omega-3 fatty acids, salmon is known for its heart-healthy benefits and is a fantastic source of protein. By grilling this succulent fish and pairing it with a zesty lemon herb marinade, you can enhance its natural taste while also adding a revitalizing twist.

    The simplicity of this recipe makes it perfect for both busy weeknights and weekend gatherings. With just a few fresh ingredients and minimal prep time, you'll have a mouthwatering dish that pairs well with various sides, such as a crisp salad or roasted vegetables. This grilled salmon isn't only a feast for the palate, but it's also a visual delight with its vibrant colors and appetizing aroma.

    Ingredients:

    • 4 salmon fillets
    • 2 tablespoons olive oil
    • 2 tablespoons fresh lemon juice
    • 2 teaspoons lemon zest
    • 2 garlic cloves, minced
    • 2 teaspoons fresh dill or parsley, chopped
    • Salt and pepper to taste
    • Lemon slices (for garnish)

    To prepare the Grilled Lemon Herb Salmon, begin by mixing the olive oil, lemon juice, lemon zest, minced garlic, chopped dill or parsley, salt, and pepper in a small bowl to create the marinade. Place the salmon fillets in a shallow dish or zip-top bag and pour the marinade over them, making sure they're well-coated.

    Let the salmon marinate for at least 30 minutes to absorb the flavors. Preheat the grill to medium-high heat. Once ready, place the salmon fillets skin-side down on the grill grates for about 6-8 minutes, then carefully flip and grill for an additional 4-5 minutes, or until the salmon flakes easily with a fork.

    When cooking Grilled Lemon Herb Salmon, confirm that the grill is well-oiled to prevent sticking. If you prefer extra flavor, you can add a pinch of smoked paprika or a drizzle of honey to the marinade for a touch of sweetness.

    Always check for doneness by using a meat thermometer; the internal temperature should reach 145°F (63°C). Finally, letting the salmon rest for a few minutes before serving will help seal in the juices, resulting in an even more tender and flavorful dish. Enjoy!

    Spicy Garlic Shrimp Tacos

    zesty shrimp filled tacos

    Spicy garlic shrimp tacos are a delicious and vibrant dish that perfectly balance heat and flavor. These tacos aren't only quick and easy to prepare but also packed with protein and essential nutrients from the succulent shrimp.

    With the addition of fresh vegetables and a zingy sauce, they make for an exciting meal that can be enjoyed any day of the week.

    The beauty of spicy garlic shrimp tacos lies in their versatility. You can customize the toppings and fillings to suit your taste, whether you prefer a creamy avocado sauce, zesty lime wedges, or crunchy cabbage slaw.

    This dish is perfect for a casual weeknight dinner or for impressing guests at your next gathering, as it brings a touch of coastal flair right to your kitchen table.

    • 1 pound large shrimp, peeled and deveined
    • 2 tablespoons olive oil
    • 4 cloves garlic, minced
    • 1 teaspoon red pepper flakes (adjust for desired spice level)
    • 1 teaspoon smoked paprika
    • Salt and pepper to taste
    • 8 small corn or flour tortillas
    • 1 cup shredded cabbage (green or purple)
    • 1 ripe avocado, sliced
    • Lime wedges for serving
    • Fresh cilantro for garnish

    In a large skillet, heat the olive oil over medium-high heat. Add the minced garlic and red pepper flakes, sautéing for about 30 seconds until fragrant. Toss in the shrimp, smoking paprika, salt, and pepper, and cook for about 3-5 minutes or until the shrimp turn pink and are cooked through.

    Remove from heat and set aside. Warm the tortillas in a separate pan or microwave, then assemble the tacos by adding the spicy shrimp mixture, topped with shredded cabbage, sliced avocado, and a squeeze of fresh lime juice.

    Garnish with cilantro before serving.

    For an added kick, consider marinating the shrimp in the spice mixture for 15-30 minutes before cooking to really bring out the flavors.

    Additionally, feel free to experiment with other toppings such as pico de gallo, salsa, or a drizzle of chipotle crema for an extra layer of deliciousness.

    Don't forget to warm your tortillas properly, as this enhances their texture and taste, making your tacos even more delightful!

    Baked Cod With Tomato Basil Salsa

    cod topped with salsa

    Baked Cod with Tomato Basil Salsa is a delightful seafood dish that combines the mild flavor of cod with the fresh and vibrant taste of a tomato basil salsa. Cod isn't only low in calories but also an excellent source of protein and omega-3 fatty acids, making it a nutritious option for any meal. This dish is perfect for busy weeknights, as it's quick to prepare, easy to cook, and bursting with flavor, making it a favorite among seafood lovers.

    The combination of baked cod and the zesty tomato basil salsa brings a revitalizing twist to the classic baked fish recipe. The salsa, made with ripe tomatoes, fresh basil, and a hint of garlic, enhances the tenderness of the fish and adds a beautiful contrast in both flavor and texture. Pair this dish with a side of steamed vegetables or a light salad for a complete, healthy meal that's sure to please everyone at the table.

    Ingredients:

    • 2 cod fillets
    • 2 tablespoons olive oil
    • Salt and pepper to taste
    • 1 cup cherry tomatoes, diced
    • 1/4 cup fresh basil, chopped
    • 1 clove garlic, minced
    • 1 tablespoon balsamic vinegar
    • 1 teaspoon lemon juice
    • Optional: lemon wedges for serving

    Preheat your oven to 400°F (200°C). Place the cod fillets on a baking sheet lined with parchment paper and drizzle with olive oil, followed by a sprinkle of salt and pepper. Bake the cod for about 12-15 minutes, or until the fish flakes easily with a fork.

    Meanwhile, in a mixing bowl, combine the diced cherry tomatoes, chopped basil, minced garlic, balsamic vinegar, and lemon juice to create the salsa. Once the cod is cooked, top each fillet generously with the tomato basil salsa and serve, garnished with lemon wedges if desired.

    When preparing this dish, make sure to choose fresh, high-quality cod for the best flavor. You can customize the salsa to your taste by adding your favorite herbs or spices, such as chopped red onion or a pinch of red pepper flakes for extra heat.

    If fresh basil is unavailable, you can substitute it with dried basil, but use less, as dried herbs are more concentrated. Additionally, avoid overcooking the cod to maintain its moistness and tenderness – it should only be cooked until opaque and flaky. Enjoy your healthy meal!

    Cilantro Lime Shrimp and Quinoa

    shrimp cooked with quinoa

    Cilantro Lime Shrimp and Quinoa is a vibrant dish bursting with flavors and nutrients, perfect for a quick weeknight dinner or a meal prep option. The combination of succulent shrimp marinated in zesty lime juice and fresh cilantro, served over fluffy quinoa, provides a delightful balance of protein and healthy carbohydrates.

    This recipe isn't only easy to whip up but also showcases the freshness of the ingredients, making it a fantastic choice for seafood lovers. To elevate the dish, you can incorporate various vegetables such as bell peppers, avocado, or corn, adding color and additional nutrients to your plate.

    The simplicity of this dish allows it to be customized based on personal preferences; you can adjust the heat by adding jalapeños or spices according to your taste. With its invigorating flavors and hearty components, Cilantro Lime Shrimp and Quinoa will surely become a favorite in your household.

    Ingredients:

    • 1 pound shrimp, peeled and deveined
    • 1 cup quinoa
    • 2 cups vegetable or chicken broth
    • 1/4 cup fresh lime juice
    • 1/4 cup fresh cilantro, chopped
    • 2 cloves garlic, minced
    • 1 teaspoon cumin
    • 1/2 teaspoon salt
    • 1/4 teaspoon black pepper
    • Olive oil
    • Optional toppings: diced avocado, chopped green onions, lime wedges

    In a medium saucepan, rinse the quinoa under cold water and then combine it with the broth; bring to a boil, then reduce the heat to low, cover, and simmer for 15 minutes or until the liquid is absorbed.

    Meanwhile, in a bowl, mix the shrimp with lime juice, cilantro, garlic, cumin, salt, and black pepper. Heat a splash of olive oil in a skillet over medium heat, and sauté the marinated shrimp until they turn pink and opaque, about 2-3 minutes per side.

    Serve the cooked shrimp over the fluffy quinoa and add your choice of optional toppings. When cooking this dish, consider marinating the shrimp for at least 20-30 minutes to enhance the flavors, but avoid letting them sit too long as the acidity from the lime can start to "cook" the shrimp.

    Confirm that the quinoa is cooked properly by following the rice-to-liquid ratio closely. Feel free to experiment with additional herbs and spices to personalize the dish to your taste!

    Teriyaki Glazed Mahi-Mahi

    mahi mahi with teriyaki glaze

    Teriyaki glazed mahi-mahi is a delightful seafood dish that combines the rich, buttery texture of mahi-mahi with the sweet and savory flavors of teriyaki sauce. Mahi-mahi, a firm and flaky fish, is an excellent choice for grilling or pan-searing and pairs wonderfully with the caramelized finish that the teriyaki glaze provides.

    This dish isn't only tasty but also packed with essential nutrients, making it a healthy option for those looking to enjoy seafood that's both delicious and nutritious.

    To elevate the flavors of this dish, marinating the fish in a homemade or store-bought teriyaki sauce can enhance the overall experience. The marination time can vary, but even a brief soak will impart a wonderful flavor to the fish. Serve teriyaki glazed mahi-mahi with a side of steamed vegetables or fluffy rice to complete a meal that's as wholesome as it's satisfying.

    • 2 mahi-mahi fillets
    • 1/4 cup teriyaki sauce (store-bought or homemade)
    • 1 tablespoon olive oil
    • 1 tablespoon honey (optional, for added sweetness)
    • 1 teaspoon sesame oil
    • 2 cloves garlic, minced
    • 1 teaspoon fresh ginger, grated
    • Salt and pepper to taste
    • Sesame seeds and sliced green onions for garnish

    To cook the dish, first prepare a marinade by mixing the teriyaki sauce, olive oil, honey, sesame oil, garlic, and ginger in a bowl.

    Place the mahi-mahi fillets in a shallow dish and pour the marinade over them. Allow the fish to marinate for at least 15 minutes, or up to an hour for deeper flavor. Heat a grill or a skillet over medium-high heat and cook the fillets for about 4-5 minutes on each side, brushing with additional marinade as they cook, until the fish is opaque and flakes easily with a fork.

    Garnish with sesame seeds and sliced green onions before serving. For best results, make sure not to overcook the mahi-mahi, as it can become dry.

    If using store-bought teriyaki sauce, check for added sugars or preservatives and consider using a natural or low-sodium version. Additionally, if you desire a slightly thicker glaze, simmer the remaining marinade in a saucepan until it reduces to your liking before drizzling over the cooked fish.

    Experiment with pairing different sides or adding extra veggies for a complete, wholesome meal!

    Creamy Tuscan Garlic Salmon

    creamy garlic salmon recipe

    Creamy Tuscan Garlic Salmon is a delectable dish that combines the rich flavors of salmon with a luscious creamy sauce infused with garlic, sun-dried tomatoes, and fresh spinach. This vibrant meal not only pleases the palate but also provides a healthy dose of omega-3 fatty acids, making it a fantastic choice for a nutritious dinner. Served over pasta or with a side of vegetables, it's perfect for both family meals and special occasions.

    The beauty of this dish lies in its simplicity and speed. In just under 30 minutes, you can create a restaurant-quality meal that will impress anyone at the dining table. The creamy sauce is a harmonious mix of savory and slightly tangy flavors, elevating the salmon's natural richness while also being light and satisfying. Pair it with a glass of white wine or a crisp salad for a complete experience.

    • 4 salmon fillets
    • 2 tablespoons olive oil
    • 4 cloves garlic, minced
    • 1 cup heavy cream
    • 1 cup chicken broth
    • 1 cup baby spinach
    • 1/2 cup sun-dried tomatoes, chopped
    • 1 teaspoon Italian seasoning
    • Salt and pepper to taste
    • Grated Parmesan cheese (for garnish)

    In a large skillet, heat the olive oil over medium heat. Season the salmon fillets with salt and pepper, then add them to the skillet, skin-side down. Cook for about 4-5 minutes on each side until golden and cooked through. Remove the salmon from the skillet and set aside.

    In the same skillet, add the garlic and sauté for about 30 seconds until fragrant. Then, pour in the heavy cream and chicken broth, and bring it to a simmer. Stir in the Italian seasoning, sun-dried tomatoes, and baby spinach. Cook for a few minutes until the spinach wilts. Finally, return the salmon to the skillet, spooning some sauce over the top; let it heat through before serving.

    To enhance the flavor of your Creamy Tuscan Garlic Salmon, consider marinating the salmon in lemon juice and a bit of garlic before cooking, as this adds a delightful zest. Additionally, if you prefer a lighter version, you can substitute the heavy cream with Greek yogurt or a dairy-free alternative while still enjoying a creamy texture.

    This dish also pairs beautifully with various sides, so don't hesitate to get creative with your accompaniments!

    Blackened Tilapia With Avocado Salsa

    cajun fish topped salsa

    Blackened Tilapia with Avocado Salsa is a flavorful dish that combines the smoky, spiced flavors of blackened tilapia with a fresh, creamy avocado salsa. The tilapia is a mild, flaky fish that readily absorbs the bold spices, making it the perfect canvas for the delicious combination of seasonings. With its rich protein content and omega-3 fatty acids, tilapia isn't only a tasty choice but also a healthy one.

    The bright and zesty avocado salsa adds a revitalizing contrast, brightening up the dish and providing a satisfying texture. This dish isn't only easy to prepare but also a feast for the senses, making it ideal for a weeknight meal or a special occasion. The preparation requires minimal ingredients while still delivering maximum flavor. Serve it alongside a simple salad or over a bed of quinoa for a wholesome dinner that leaves you feeling nourished and satisfied.

    Ingredients:

    • 4 tilapia fillets
    • 2 tablespoons olive oil
    • 2 teaspoons paprika
    • 1 teaspoon garlic powder
    • 1 teaspoon onion powder
    • 1 teaspoon cayenne pepper
    • 1 teaspoon dried thyme
    • Salt and pepper to taste
    • 1 ripe avocado, diced
    • 1 medium tomato, diced
    • ¼ cup red onion, finely chopped
    • Juice of 1 lime
    • Fresh cilantro, chopped

    Season both sides of the tilapia fillets with a mixture of paprika, garlic powder, onion powder, cayenne pepper, thyme, salt, and pepper. Heat olive oil in a cast-iron skillet over high heat until shimmering. Place the seasoned fillets in the skillet, cooking for 3-4 minutes on each side or until the fish is cooked through and has a crispy blackened crust.

    While the fish is cooking, combine the diced avocado, tomato, red onion, lime juice, cilantro, and a pinch of salt in a bowl to create the salsa. When preparing Blackened Tilapia with Avocado Salsa, make sure to monitor the cooking temperature closely; if the skillet is too hot, the spices may burn, giving a bitter taste.

    Also, for an extra kick, you can adjust the level of cayenne pepper according to your preference. Finally, serve the dish immediately for the best texture and flavor; the tilapia is best enjoyed when it's hot and fresh off the skillet.

    Mediterranean Shrimp Pasta

    delicious shrimp pasta dish

    Mediterranean shrimp pasta is a delightful and healthy dish that beautifully combines the flavors of the Mediterranean with the comforting texture of pasta. This dish features succulent shrimp sautéed in olive oil, infused with garlic, white wine, and a medley of fresh vegetables, all tossed with al dente pasta.

    It's not only a flavorful meal but also packed with nutritious ingredients that make it a perfect choice for a quick weeknight dinner or a special occasion. Rich in healthy fats, protein, and an array of vitamins and minerals from the vegetables, Mediterranean shrimp pasta offers a satisfying way to enjoy seafood while also nourishing your body.

    The bright notes of lemon juice and the earthy flavors of fresh herbs elevate the dish, making it perfect for seafood lovers. Simple yet elegant, this recipe is sure to impress both family and guests alike.

    Ingredients

    • 8 ounces whole grain pasta (e.g., linguine or spaghetti)
    • 1 pound large shrimp, peeled and deveined
    • 2 tablespoons olive oil
    • 3 cloves garlic, minced
    • 1 cup cherry tomatoes, halved
    • 1 medium zucchini, diced
    • 1 bell pepper, diced (any color)
    • 1/2 cup dry white wine (or vegetable broth)
    • Juice of 1 lemon
    • 1/4 cup fresh parsley, chopped
    • Salt and pepper to taste
    • Optional: red pepper flakes for heat

    Cook the pasta according to package instructions until al dente, then drain and set aside. In a large skillet over medium heat, heat the olive oil and sauté the garlic until fragrant. Add the shrimp and cook until they turn pink, about 2-3 minutes per side.

    Toss in the zucchini, bell pepper, and cherry tomatoes, cooking for another 4-5 minutes until the vegetables are tender. Deglaze the pan with white wine (or broth) and stir in the lemon juice. Finally, combine the cooked pasta with the sautéed mixture, season with salt, pepper, and red pepper flakes if desired, and toss to combine. Serve hot, garnished with fresh parsley.

    To elevate your Mediterranean shrimp pasta, feel free to customize it with your favorite vegetables or even add a handful of spinach for extra nutrition. Using whole grain pasta not only enhances the dish's health benefits but also adds a wonderful nuttiness.

    Be mindful not to overcook the shrimp; they should be just cooked through to retain their moisture and tenderness. For an extra touch of flavor, consider adding a sprinkle of grated Parmesan cheese just before serving, but keep in mind that it will add additional calories.

    Seafood Paella With Brown Rice

    seafood paella with brown rice

    Seafood paella is a vibrant dish that hails from the coastal regions of Spain, known for its rich flavors and colorful presentation. This healthy version uses brown rice instead of traditional white rice, adding a nutty flavor and increased fiber content. Packed with a variety of seafood, vegetables, and spices, this dish not only satisfies the palate but also nourishes the body.

    Cooking seafood paella with brown rice is a delightful way to incorporate nutritious ingredients into a hearty meal. The brown rice takes a bit longer to cook, allowing it to absorb the flavorful broth, which infuses every bite with a burst of Mediterranean flavor. Whether you're serving it for a special occasion or a casual family dinner, this dish is sure to impress.

    Ingredients:

    • 1 cup brown rice
    • 2 tablespoons olive oil
    • 1 onion, diced
    • 3 cloves garlic, minced
    • 1 bell pepper, diced
    • 1 cup green peas
    • 1 tomato, diced
    • 2 cups vegetable or seafood broth
    • 1 teaspoon smoked paprika
    • 1/2 teaspoon saffron threads
    • 1 cup shrimp, peeled and deveined
    • 1 cup mussels, cleaned
    • 1 cup squid, sliced into rings
    • Salt and pepper to taste
    • Lemon wedges, for serving
    • Fresh parsley, chopped, for garnish

    In a large skillet or paella pan, heat the olive oil over medium heat. Sauté the onion and garlic until softened, then add the bell pepper and cook for a few more minutes.

    Stir in the brown rice, smoked paprika, saffron, and diced tomato, ensuring the rice is well-coated. Gradually add the broth, bringing the mixture to a gentle simmer. Cover and let cook for about 30-40 minutes, or until the rice is tender and has absorbed the broth.

    Add the shrimp, mussels, and squid in the final 10 minutes of cooking, ensuring that the seafood is evenly distributed and cooked through. Once done, fluff the paella with a fork and garnish with chopped parsley and serve with lemon wedges.

    For the best results, allow the paella to rest for a few minutes before serving, as this will help the flavors meld together. If you're up for a little experimentation, feel free to add other seafood options like clams or scallops.

    Pairing the dish with a light salad or crusty whole-grain bread can enhance the meal even further. Remember, patience is key when letting the rice absorb the broth, so avoid stirring it too often to maintain that delightful texture!

    Lemon Butter Scallops and Asparagus

    lemon butter scallops recipe

    Lemon Butter Scallops and Asparagus is a delightful seafood dish that brings together the delicate sweetness of scallops with the bright flavors of lemon and the earthy crunch of asparagus. This recipe is quick to prepare, making it a perfect option for a busy weeknight dinner or a special occasion.

    Paired with a side of whole grain rice or quinoa, this meal not only satisfies your taste buds but also offers a nutritious boost filled with protein and vitamins.

    Cooking scallops can sometimes be intimidating, but they're quite simple to prepare once you understand the basics. The key to perfectly seared scallops is to cook them at a high temperature for a short period, creating a beautiful golden crust while keeping the inside tender and juicy.

    The asparagus adds a pop of color and nutrients, making this dish not just delicious but visually appealing as well.

    Ingredients:

    • 1 pound sea scallops
    • 1 bunch asparagus, trimmed
    • 3 tablespoons butter
    • 2 tablespoons olive oil
    • 2 garlic cloves, minced
    • 1 lemon, juiced and zested
    • Salt and pepper to taste
    • Fresh parsley for garnish (optional)

    Heat a large skillet over medium-high heat and add 2 tablespoons of olive oil. Season the scallops with salt and pepper, and once the oil is hot, add the scallops to the pan. Cook for about 2-3 minutes on each side until they develop a golden crust.

    Remove the scallops from the pan and set aside. In the same skillet, add the butter, minced garlic, and asparagus. Sauté the asparagus for about 5-7 minutes until tender-crisp, then add the lemon juice and zest.

    Return the scallops to the pan, gently toss everything together, and cook for an additional minute to warm through. Serve hot, garnished with fresh parsley if desired.

    When cooking scallops, make certain that they're patted dry before seasoning to achieve that lovely sear. Also, avoid overcrowding the pan, as this can cause them to steam instead of brown.

    For an added touch, experiment with different herbs or a splash of white wine to balance the flavors. Enjoy your beautifully cooked Lemon Butter Scallops and Asparagus!

    Fish Tacos With Mango Salsa

    mango salsa fish tacos

    Fish tacos with mango salsa are a vibrant and flavorful dish that perfectly encapsulates the taste of summer. The combination of tender fish, crunchy tortillas, and fresh, zesty salsa makes for a delightful meal that's both healthy and satisfying. With the addition of mango, which brings a sweet and juicy element, these tacos are sure to become a favorite in your household.

    The beauty of fish tacos lies not only in their taste but also in their versatility. You can use a variety of white fish, such as cod, tilapia, or mahi-mahi, and the mango salsa can be customized based on your preferences. Whether you want to spice things up with jalapeños or keep it simple with onions and cilantro, these tacos can cater to your every craving.

    Plus, they're quick to prepare, making them a perfect option for busy weeknights or casual gatherings with friends and family.

    Ingredients:

    • 1 pound white fish (cod, tilapia, or mahi-mahi)
    • 1 tablespoon olive oil
    • 1 teaspoon chili powder
    • 1 teaspoon cumin
    • Salt and pepper, to taste
    • 8 small corn or flour tortillas
    • 1 ripe mango, diced
    • 1/2 red onion, finely chopped
    • 1 jalapeño, seeded and minced (optional)
    • 1/4 cup fresh cilantro, chopped
    • Juice of 1 lime
    • Sliced avocado, for serving
    • Lime wedges, for serving

    Start by preheating your grill or stovetop pan over medium-high heat. Season the fish fillets with olive oil, chili powder, cumin, salt, and pepper. Grill the fish for about 4-5 minutes on each side or until cooked through and flaky.

    While the fish is cooking, prepare the mango salsa by combining the diced mango, red onion, jalapeño, cilantro, and lime juice in a bowl. Once the fish is cooked, warm the tortillas briefly on the grill or in a pan, then assemble the tacos by placing a piece of fish in each tortilla, topping with mango salsa, and adding slices of avocado. Serve with lime wedges on the side.

    For the best flavor, let the fish marinate in the spices for at least 15 minutes before cooking to enhance the taste. Also, feel free to make the mango salsa ahead of time to allow the flavors to meld together, which will elevate the dish.

    Don't be afraid to adjust the level of spice in the salsa based on your preference, and experiment with additional toppings like shredded cabbage or a creamy sauce to further enhance your fish tacos.

    Coconut Crusted Shrimp With Mango Dipping Sauce

    shrimp with mango sauce

    Coconut crusted shrimp with mango dipping sauce is a delightful and tropical dish that transports you straight to a beachside paradise with every bite. The crunchy, golden coconut crust adds a satisfying texture to succulent shrimp, while the sweet and tangy mango dipping sauce balances the flavors beautifully.

    Whether you're preparing a casual dinner at home or hosting friends for a fun soirée, this dish is sure to impress. This recipe isn't only easy to make but also quick, making it a perfect option for busy weeknights or last-minute gatherings. The combination of coconut and mango provides a fantastic flavor profile that pairs beautifully with the natural sweetness of shrimp.

    If you're looking to impress without spending hours in the kitchen, this coconut crusted shrimp is your go-to recipe that delivers both taste and visual appeal.

    • 1 pound large shrimp, peeled and deveined
    • 1 cup shredded coconut
    • 1 cup panko bread crumbs
    • 1/2 cup all-purpose flour
    • 2 large eggs, beaten
    • Salt and pepper to taste
    • Vegetable oil for frying
    • 1 ripe mango, diced
    • 1 tablespoon lime juice
    • 1 tablespoon honey (optional)

    To prepare the coconut crusted shrimp, start by setting up your breading station with three separate bowls: one with flour seasoned with salt and pepper, one with the beaten eggs, and the last with a mix of shredded coconut and panko breadcrumbs.

    Dip each shrimp first in the flour, shaking off excess, then in the egg, and finally coat it well with the coconut-panko mixture. Heat vegetable oil in a frying pan over medium-high heat and fry the shrimp in batches until they're golden brown and cooked through, about 3-4 minutes per side.

    For the mango dipping sauce, blend the diced mango, lime juice, and honey in a food processor until smooth. When cooking coconut crusted shrimp, keep an eye on the oil temperature to guarantee a perfect fry without burning the breadcrumbs.

    If you're preparing a large batch, consider using a shallow baking sheet lined with parchment paper to keep the cooked shrimp warm in a low oven while you finish frying the rest. Additionally, feel free to experiment with adding spices to the coconut mixture, such as paprika or garlic powder, to elevate the flavor even further.

    Enjoy your tropical treat!

  • 12 Keto Beef Recipes for a Low-Carb Protein Boost

    If you're looking for delicious keto beef recipes to boost your low-carb lifestyle, you're in luck! Enjoy tender savory beef stew and cheesy keto cheeseburger casserole for comfort food. Spice it up with beef taco lettuce wraps or savor quick beef stir-fry with low-carb veggies. Indulge in garlic butter steak bites or comforting slow cooker beef and mushroom soup. These dishes are packed with flavor and healthy fats. Keep exploring to discover even more mouthwatering options!

    Savory Beef Stew

    hearty flavorful beef stew

    When it comes to comforting meals, a savory beef stew stands out as an ideal option, especially on colder days. This delicious dish is designed to fit perfectly within a ketogenic diet, allowing you to enjoy rich flavors without the carbs.

    Packed with tender chunks of beef and an assortment of low-carb vegetables, this stew is both hearty and satisfying. The slow-cooking process melds the flavors beautifully, resulting in a mouthwatering dish that warms the soul.

    In addition to its comfort food credentials, this savory beef stew is highly versatile. You can easily customize the vegetables used, adapting the recipe to suit your preferences or what you have on hand. Plus, it's a great make-ahead meal; you can store leftovers in the refrigerator for several days or freeze portions for later use.

    Follow this simple recipe to create your own savory keto beef stew that will impress your family and friends.

    • 2 pounds of beef chuck, cut into 1-inch cubes
    • 2 tablespoons olive oil
    • 1 medium onion, diced
    • 3 cloves garlic, minced
    • 2 cups beef broth (ensure it's low-carb)
    • 2 cups cauliflower florets
    • 1 cup sliced mushrooms
    • 1 cup chopped celery
    • 1 cup chopped green beans
    • 2 teaspoons dried thyme
    • 1 teaspoon dried rosemary
    • Salt and pepper to taste

    In a large pot or Dutch oven, heat the olive oil over medium-high heat. Sear the beef cubes until browned on all sides, about 5-7 minutes. Remove the beef and set aside.

    In the same pot, add the diced onion and minced garlic, sautéing until the onion is translucent. Return the beef to the pot and add the beef broth, thyme, rosemary, salt, and pepper. Bring the mixture to a boil, reduce the heat to low, and let it simmer for about 1 hour.

    Add the cauliflower, mushrooms, celery, and green beans, and continue simmering for an additional 30 minutes or until the vegetables and beef are tender.

    For the best flavor experience, let the stew sit for a while before serving. This allows the flavors to meld together even more. Additionally, if you have time, consider refrigerating the stew overnight; it often tastes even better the next day as the flavors deepen.

    Don't shy away from experimenting with different herbs and spices to put your unique twist on the dish. For a bit of heat, you might consider adding a pinch of red pepper flakes or a dash of hot sauce.

    Keto Cheeseburger Casserole

    keto friendly cheeseburger dish

    Keto Cheeseburger Casserole is a delicious and satisfying dish that brings together the flavors of a classic cheeseburger without the carbs. This casserole is perfect for weeknight dinners, meal prep, or even as a hearty dish for entertaining. Packed with ground beef, cheese, and keto-friendly ingredients, it delivers all the cheeseburger goodness in a convenient, one-pan meal that's sure to please the whole family.

    The great thing about this recipe is its versatility. You can easily add your favorite low-carb vegetables such as bell peppers or mushrooms, and feel free to mix up the cheese based on your preferences—cheddar, mozzarella, or even pepper jack can all work wonderfully.

    With just a few simple steps, you'll have a comforting casserole dish that isn't only keto-friendly but also rich in flavor and texture.

    Ingredients:

    • 1 lb ground beef
    • 1 cup chopped onion
    • 2 cloves garlic, minced
    • 1 cup cauliflower rice
    • 1 cup sugar-free ketchup
    • 1 tsp mustard
    • 1 tsp Worcestershire sauce
    • 1 tsp salt
    • 1/2 tsp black pepper
    • 1 cup shredded cheddar cheese
    • 3 large eggs
    • 1/2 cup heavy cream

    In a large skillet over medium heat, brown the ground beef with the chopped onion and minced garlic until the meat is cooked through.

    Drain excess fat, then stir in cauliflower rice, sugar-free ketchup, mustard, Worcestershire sauce, salt, and pepper.

    In a separate bowl, whisk together the eggs and heavy cream, then pour the mixture over the meat and stir until well combined.

    Transfer the mixture to a greased casserole dish, sprinkle shredded cheddar cheese on top, and bake at 350°F (175°C) for 25-30 minutes or until the cheese is bubbly and golden.

    For the best results, let the casserole cool for a few minutes before serving; this will help the layers set nicely.

    You can easily store leftovers in an airtight container in the refrigerator for up to four days, making it perfect for meal prepping.

    Additionally, feel free to customize the toppings—sliced pickles or diced tomatoes can add that extra burst of flavor reminiscent of a true cheeseburger!

    Spicy Beef Taco Lettuce Wraps

    spicy beef taco wraps

    Spicy Beef Taco Lettuce Wraps are a delicious and healthy alternative to traditional tacos, perfect for those following a keto diet. Using sturdy lettuce leaves as a base instead of tortillas not only cuts down on carbs but also adds a revitalizing crunch. This dish is packed with flavor and can be customized with your favorite toppings, making it a versatile option for lunch or dinner.

    These wraps can easily satisfy your taco cravings without the added guilt of high-carbohydrate ingredients. Rich in protein from seasoned ground beef and loaded with fresh vegetables, they offer a balanced meal that's both satisfying and delicious. Plus, they're quick to prepare, making it an ideal weeknight dinner.

    Ingredients:

    • 1 pound ground beef (80/20)
    • 1 tablespoon olive oil
    • 1 small onion, diced
    • 2 cloves garlic, minced
    • 1 teaspoon chili powder
    • 1 teaspoon cumin
    • ½ teaspoon paprika
    • ½ teaspoon cayenne pepper (adjust for spice preference)
    • Salt and pepper to taste
    • 1 head of romaine or butter lettuce, leaves separated
    • 1 cup cherry tomatoes, halved
    • ½ cup shredded cheddar cheese
    • ½ cup sour cream
    • Fresh cilantro, chopped (for garnish)
    • Lime wedges (for serving)

    In a large skillet over medium heat, add the olive oil and sauté the diced onion until translucent, about 3-4 minutes. Add the minced garlic and cook for another minute before adding the ground beef.

    Break the beef apart with a spatula, and season it with chili powder, cumin, paprika, cayenne pepper, salt, and pepper. Cook the beef until browned and fully cooked through, about 6-8 minutes. Once cooked, remove from heat and prepare the lettuce leaves for wrapping.

    For an extra touch, feel free to experiment with additional toppings like diced avocados, diced jalapeños, or hot sauce. If you're preparing these wraps for a gathering, set up a taco bar so everyone can customize their wraps with their favorite toppings.

    Finally, consider using ground turkey or chicken as a leaner protein option, and don't forget to enjoy these wraps fresh for maximum crunch!

    Beef Stir-Fry With Low-Carb Vegetables

    healthy beef vegetable stir fry

    Beef stir-fry with low-carb vegetables is a vibrant and flavorful dish that fits perfectly into a ketogenic lifestyle. This quick and easy recipe allows you to whip up a satisfying meal in just a matter of minutes, making it ideal for busy weeknights or meal prep. By incorporating tender cuts of beef alongside a variety of low-carb vegetables, you'll enjoy a delicious, nutritious dinner that aligns with your dietary goals without compromising on taste.

    Not only does this recipe showcase the natural flavors of the ingredients, but it also offers endless variations depending on what you have on hand or prefer. You can modify the spice level, utilize different protein options, or swap in vegetables based on your mood. The combination of savory beef and crisp veggies guarantees satisfaction while keeping your carb count in check.

    Ingredients:

    • 1 pound beef sirloin or flank steak, sliced thinly
    • 2 tablespoons soy sauce or tamari (for gluten-free)
    • 2 tablespoons olive oil or sesame oil
    • 1 bell pepper, sliced
    • 1 zucchini, sliced
    • 1 cup broccoli florets
    • 3 cloves garlic, minced
    • 1 teaspoon ginger, minced
    • Salt and pepper to taste
    • Optional: sesame seeds and green onions for garnish

    Heat a large skillet or wok over medium-high heat, then add the olive or sesame oil. Once hot, add the sliced beef and stir-fry for about 2-3 minutes until browned. Remove the beef from the pan and set aside.

    In the same skillet, add another drizzle of oil if needed and toss in the minced garlic and ginger, cooking for about 30 seconds. Next, add the low-carb vegetables, cooking until just tender, approximately 3-4 minutes.

    Return the beef to the pan, pour in the soy sauce or tamari, and stir everything together, cooking for an additional 2 minutes until heated through. Season with salt and pepper, and serve hot.

    When cooking this dish, it's important to have all your ingredients prepped and ready to go before starting, as the cooking process happens quickly. Keep the heat high for a proper stir-fry and avoid overcrowding the pan, which can cause the ingredients to steam instead of sear.

    Feel free to adjust the vegetable quantities or types based on your preference, and don't hesitate to add a splash of chili sauce or red pepper flakes if you prefer a spicy kick!

    Garlic Butter Steak Bites

    savory garlic butter bites

    Garlic butter steak bites are a mouthwatering and simple dish that can elevate any weeknight dinner or special occasion. These tender, juicy pieces of steak are coated in a rich garlic butter sauce that brings out the fantastic flavors of the beef. Perfect for a keto diet, they're low in carbs and high in fats, making them a delicious option for anyone looking to enjoy a hearty meal without compromising their dietary preferences.

    Cooking garlic butter steak bites is straightforward and requires minimal ingredients. The beauty of this dish lies in its simplicity, allowing the natural flavors of the steak to shine through. Whether you serve them as an appetizer, main dish, or even toss them into a salad, these steak bites are bound to impress your guests and delight your taste buds.

    • 1 lb sirloin steak, cut into bite-sized pieces
    • 4 tablespoons unsalted butter
    • 4 cloves garlic, minced
    • Salt, to taste
    • Black pepper, to taste
    • 1 tablespoon fresh parsley, chopped (for garnish)

    To cook the garlic butter steak bites, start by seasoning the steak pieces with salt and black pepper. In a large skillet over medium-high heat, melt 2 tablespoons of butter. Add the seasoned steak pieces to the skillet in a single layer and cook for about 2-3 minutes on each side (or until browned and cooked to your preferred doneness). Remove the steak bites from the skillet and set them aside.

    In the same skillet, add the remaining butter and minced garlic, cooking for about 1 minute until fragrant. Toss the steak bites back into the skillet, stirring to coat them with the garlic butter, and cook for another minute before serving.

    When cooking garlic butter steak bites, be careful not to overcrowd the pan, as this can prevent the steak from searing properly and lead to a less flavorful result. If necessary, cook the steak in batches to guarantee even cooking.

    Additionally, letting the steak rest for a few minutes after cooking will help retain its juices, making each bite tender and delicious. Don't hesitate to customize the dish by adding other herbs or spices to suit your taste!

    Italian Beef Zucchini Boats

    delicious italian zucchini boats

    Italian Beef Zucchini Boats are a delicious low-carb twist on traditional stuffed peppers, perfect for anyone following a keto diet. This dish combines flavorful ground beef with Italian seasoning, savory tomato sauce, and fresh vegetables, all nestled inside tender zucchini halves.

    It's an easy, one-pan meal that's packed with protein and nutrients while being satisfying and full of flavor. Not only is it a great way to incorporate more veggies into your diet, but the presentation also makes it a fantastic option for entertaining guests or family dinners.

    To make these delightful zucchini boats, you start off by hollowing out the zucchini to create the perfect vessel for a hearty Italian meat filling. With a mix of classic ingredients and seasonings, such as oregano, basil, and garlic, the filling will bring all the comfort of Italian cuisine right to your table.

    These boats are then topped with a generous sprinkling of cheese, which melts beautifully as they bake. They're sure to impress even those who aren't following a keto lifestyle!

    • 4 medium zucchinis
    • 1 pound ground beef (or Italian sausage)
    • 1 cup marinara sauce (sugar-free if needed)
    • 1 cup shredded mozzarella cheese
    • 1/2 cup diced onion
    • 2 cloves garlic, minced
    • 1 teaspoon dried oregano
    • 1 teaspoon dried basil
    • Salt and pepper to taste
    • Olive oil for drizzling
    • Fresh parsley for garnish (optional)

    Preheat your oven to 375°F (190°C). Cut the zucchinis in half lengthwise and scoop out the seeds to create boats.

    In a skillet over medium heat, sauté the diced onion and minced garlic in olive oil until softened, then add the ground beef. Cook until browned, stirring in the marinara sauce, oregano, basil, salt, and pepper.

    Once mixed, fill the zucchini boats with the beef mixture and place them in a baking dish. Top each boat with shredded mozzarella cheese. Cover the dish with foil, bake for 25 minutes, then remove the foil and bake for an additional 10 minutes until the cheese is bubbly and golden.

    When making Italian Beef Zucchini Boats, it's important to choose zucchinis that are firm and of a medium size, as larger ones can become watery.

    Make sure to drain any excess liquid from the filling before loading the boats to prevent sogginess. Feel free to customize the filling by adding your favorite vegetables or spices.

    These boats can also be prepared ahead of time; just assemble them and store them in the refrigerator until you're ready to bake. Enjoy your delicious, healthy meal!

    Beef and Broccoli in Teriyaki Sauce

    beef and broccoli stir fry

    Beef and Broccoli in Teriyaki Sauce is a delicious way to enjoy a classic dish while staying true to keto principles. This recipe combines tender strips of beef with crisp broccoli, all enveloped in a rich, homemade teriyaki sauce that's low in carbs. The result is a satisfying meal that delivers on both flavor and nutritional value, making it perfect for a weeknight dinner or meal prep.

    The key to a successful Beef and Broccoli dish is in the quality of the beef and the balance of flavors in the teriyaki sauce. Opt for flank steak or sirloin for the best tenderness, and make sure your broccoli is fresh and vibrant for that delightful crunch. Embracing keto-friendly sweeteners and soy alternatives allows for a traditional taste without the sugar and excessive carbs typically found in teriyaki sauce.

    • 1 lb flank steak or sirloin, thinly sliced
    • 4 cups broccoli florets
    • 3 tablespoons soy sauce or coconut aminos
    • 1 tablespoon sesame oil
    • 1 tablespoon apple cider vinegar
    • 1 tablespoon sugar-free sweetener (like erythritol)
    • 2 cloves garlic, minced
    • 1 teaspoon fresh ginger, minced
    • 2 tablespoons water
    • Sesame seeds for garnish
    • Green onions, chopped for garnish

    In a large skillet over medium-high heat, add the sesame oil and sauté the sliced beef until browned and cooked through, about 5-7 minutes. Remove the beef from the skillet and set aside.

    In the same skillet, add the broccoli and a couple of tablespoons of water, cooking until the broccoli is tender, around 4-5 minutes.

    In a small bowl, whisk together the soy sauce, apple cider vinegar, sweetener, garlic, and ginger; return the beef to the pan, pour the sauce over the mixture, and cook for an additional 2 minutes until heated through and everything is coated.

    When cooking Beef and Broccoli in Teriyaki Sauce, it's important to slice the beef against the grain for maximum tenderness. If you want to enhance the flavor profile, you may add some chili flakes for a spicy kick to the sauce.

    Additionally, consider serving this dish over cauliflower rice for a complete meal without the carbs, allowing you to enjoy the textures and flavors of traditional teriyaki without compromising your keto goals.

    Keto Meatballs With Marinara Sauce

    keto meatballs with sauce

    Keto Meatballs with Marinara Sauce are a delicious and satisfying dish that fits perfectly into a low-carb lifestyle. By combining ground beef with flavorful herbs and spices, these meatballs deliver an incredible taste while keeping carbohydrates to a minimum.

    Paired with a rich and tangy marinara sauce, they make for an excellent meal option for anyone following a ketogenic diet or simply looking for a hearty dinner. Making these meatballs isn't only easy but also a great way to incorporate healthy fats and protein into your diet.

    This dish can be served over zoodles (zucchini noodles) or with a side of sautéed vegetables for a complete meal. The combination of textures and flavors will leave you craving more, whether you're a seasoned keto enthusiast or a novice.

    Ingredients:

    • 1 lb ground beef
    • 1/2 cup almond flour
    • 1/4 cup grated Parmesan cheese
    • 1 large egg
    • 2 cloves garlic, minced
    • 1 tsp dried oregano
    • 1 tsp dried basil
    • 1/2 tsp salt
    • 1/4 tsp black pepper
    • 1/4 cup fresh parsley, chopped (optional)
    • 2 cups marinara sauce (sugar-free)

    In a large mixing bowl, combine the ground beef, almond flour, grated Parmesan cheese, egg, minced garlic, oregano, basil, salt, black pepper, and parsley (if using). Mix well until all ingredients are evenly incorporated.

    Preheat your oven to 400°F (200°C) and form the mixture into meatballs, about 1 inch in diameter. Place the meatballs on a baking sheet lined with parchment paper and bake for about 20 minutes, or until they're cooked through.

    Meanwhile, heat the marinara sauce in a saucepan over medium heat. Once the meatballs are done, add them to the marinara sauce and let them simmer for an additional 5-10 minutes before serving.

    When making Keto Meatballs with Marinara, be mindful to choose a sugar-free marinara sauce to keep the dish low-carb. You can also customize the meatballs by adding your favorite herbs or spices to suit your taste.

    If you want a bit of kick, consider adding red pepper flakes. For storage, leftovers can be kept in an airtight container in the fridge for up to three days, making this a great meal prep option.

    Slow Cooker Beef and Mushroom Soup

    hearty mushroom beef soup

    Slow cooker beef and mushroom soup is a delightful and hearty dish that's perfect for those busy days when you want a nourishing meal waiting for you at home. Utilizing the slow cooker allows the flavors of the beef, mushrooms, and seasonings to meld beautifully, resulting in a rich and savory soup that's filled with umami goodness.

    This dish isn't only keto-friendly but also incredibly easy to prepare, making it an excellent choice for anyone looking for a meal that fits their low-carb lifestyle. The soup is versatile and can be customized to your liking. Feel free to add or substitute other vegetables that you enjoy, such as spinach or zucchini, and experiment with different herbs and spices to enhance the flavor.

    This slow cooker beef and mushroom soup is sure to become a family favorite, offering warmth and satisfaction in every spoonful.

    Ingredients:

    • 1.5 lbs beef chuck, cut into bite-sized pieces
    • 8 oz mushrooms, sliced
    • 1 medium onion, diced
    • 3 cloves garlic, minced
    • 4 cups beef broth (low sodium)
    • 2 tbsp soy sauce (or coconut aminos for a soy-free option)
    • 1 tsp dried thyme
    • 1 tsp dried rosemary
    • Salt and pepper to taste
    • Optional: Fresh parsley for garnish

    To prepare the soup, start by placing the beef chuck, sliced mushrooms, diced onion, and minced garlic into the slow cooker. Pour in the beef broth and soy sauce, and sprinkle in the thyme, rosemary, salt, and pepper.

    Stir the ingredients to combine, cover the slow cooker, and set it on low for 6-8 hours or high for 3-4 hours, until the beef is tender and the flavors have blended beautifully.

    For the best results, sear the beef chunks before adding them to the slow cooker. This step enhances the beef's depth of flavor and adds an appealing texture to the final dish.

    Additionally, if you prefer a thicker soup, consider adding a tablespoon of xanthan gum or a keto-friendly thickening agent towards the end of cooking. Enjoy your soup with a side salad or keto-friendly bread for a complete meal!

    Beef Enchiladas With Cauliflower Tortillas

    beef enchiladas with cauliflower

    Beef enchiladas are a flavorful and satisfying dish that can easily be adapted to fit a ketogenic diet by using cauliflower tortillas instead of traditional wheat or corn options. This not only lowers the carbohydrate content but also adds an extra serving of veggies into your meal.

    Cauliflower-based tortillas are surprisingly durable and can hold a hearty filling, making them perfect for delicious enchiladas loaded with seasoned beef and topped with a rich sauce.

    In this recipe, we'll make a savory filling using ground beef seasoned with traditional enchilada spices, combined with cheese and other flavorful ingredients. Then, we'll wrap this delicious mixture in our homemade cauliflower tortillas and finish with a drizzle of enchilada sauce and more cheese.

    The final result is a comforting dish that's just as satisfying as its high-carb counterpart, guaranteeing you can enjoy your favorite flavors while adhering to your low-carb lifestyle.

    Ingredients:

    • 1 medium head of cauliflower
    • 1 lb ground beef
    • 1 cup shredded cheese (cheddar or Mexican blend)
    • 1 small onion, diced
    • 2 cloves garlic, minced
    • 1 tablespoon chili powder
    • 1 teaspoon cumin
    • 1 teaspoon smoked paprika
    • Salt and pepper, to taste
    • 1 cup enchilada sauce (store-bought or homemade)
    • Oil for cooking (olive or avocado)

    Preheat your oven to 350°F (175°C).

    Begin by making the cauliflower tortillas: remove the leaves and core from the cauliflower, then steam until tender and let cool. Once cool, pulse in a food processor until rice-sized, and then place in a clean kitchen towel to squeeze out excess moisture.

    In a large skillet over medium heat, cook the ground beef with the diced onion and minced garlic until browned. Add in the chili powder, cumin, smoked paprika, salt, and pepper. Combine thoroughly and set aside.

    Mix the riced cauliflower with a beaten egg, then form into flat tortilla shapes and bake at 400°F (200°C) for about 10 minutes until slightly crispy.

    Assemble the enchiladas by placing the beef mixture and a sprinkle of cheese on the cauliflower tortillas, roll them up, place in a baking dish, and cover with enchilada sauce and more cheese. Bake for another 15-20 minutes until cheese is bubbly and golden.

    For best results, make certain that your cauliflower tortillas are thoroughly dried after processing. If they're too wet, they may become soggy while baking.

    Additionally, although this recipe uses ground beef, you can easily substitute with ground turkey or chicken, and feel free to customize the spices per your personal taste.

    Serving these enchiladas with a dollop of sour cream or a sprinkle of fresh cilantro can elevate the dish even more!

    Chipotle Beef Bowls

    spicy beef rice bowls

    Keto Chipotle Beef Bowls are a flavorful and satisfying meal that fits perfectly within a low-carb lifestyle. This recipe features tender, spicy beef, served over a bed of cauliflower rice, and topped with colorful vegetables and creamy avocado. The layered flavors and textures create a delicious experience, making it an excellent choice for lunch or dinner.

    Preparing these beef bowls is a breeze, and they can be customized to suit your taste preferences or dietary needs. You can adjust the level of spiciness by tweaking the seasoning, or add extra toppings such as cheese or sour cream for additional richness.

    These bowls aren't only delicious but also packed with nutrients, keeping you feeling full and satisfied.

    Ingredients:

    • 1 lb ground beef (preferably grass-fed)
    • 1 tablespoon olive oil
    • 1 tablespoon chipotle powder
    • 1 teaspoon garlic powder
    • 1 teaspoon onion powder
    • 1 teaspoon cumin
    • 1 teaspoon paprika
    • Salt and pepper to taste
    • 2 cups cauliflower rice
    • 1 cup bell peppers, diced
    • 1/2 cup red onion, diced
    • 1 avocado, sliced
    • Fresh cilantro for garnish (optional)

    In a large skillet over medium heat, add olive oil and seasoned ground beef. Cook until the beef is browned, breaking it up with a spatula. Stir in chipotle powder, garlic powder, onion powder, cumin, paprika, salt, and pepper, ensuring the meat is evenly coated with spices.

    Meanwhile, in another skillet, sauté cauliflower rice until tender. Serve the seasoned beef over cauliflower rice, topped with diced bell peppers, red onion, and slices of avocado, garnished with cilantro if desired.

    When making Chipotle Beef Bowls, feel free to play around with the toppings to make it your own. Consider adding shredded cheese or a dollop of sour cream for additional richness, or even some fresh lime juice for extra brightness.

    Also, using fresh, high-quality ingredients will result in a more flavorful dish, so keep that in mind when selecting your produce and spices.

    Classic Beef Burgers With Avocado

    beef burgers topped with avocado

    Classic Beef Burgers with Avocado is a delicious and satisfying meal that fits perfectly into a ketogenic diet. The combination of juicy beef patties and creamy avocado creates a rich, flavorful experience that will leave you feeling full and content. Not only is this dish low in carbs, making it an ideal choice for anyone tracking their carbohydrate intake, but it's also packed with healthy fats and proteins, making it a nutritional powerhouse.

    Creating classic beef burgers at home allows you to have full control over the ingredients, ensuring you craft the perfect burger to your own taste. This recipe highlights the delightful union of beef and avocado, which eliminates the need for high-carb toppings like bread or sauces. Instead, you'll enjoy the freshness of lettuce or other greens as the perfect accompaniment to your juicy burgers, elevating the dish with added texture and flavor.

    • 1 pound ground beef (85% lean)
    • 1 ripe avocado, sliced
    • 1 tablespoon Worcestershire sauce
    • 1 teaspoon garlic powder
    • Salt and pepper to taste
    • Lettuce leaves (for wrapping)
    • Optional toppings: sliced tomatoes, onions, cheese

    In a mixing bowl, combine the ground beef, Worcestershire sauce, garlic powder, salt, and pepper. Form the mixture into burger patties, about 1 inch thick.

    Preheat your grill or skillet over medium-high heat, then cook the patties for about 4-5 minutes on each side, or until they reach your desired level of doneness. Once cooked, remove the patties from heat and let them rest for a couple of minutes.

    Assemble your burgers by placing a beef patty on a lettuce leaf, adding slices of avocado, and any additional toppings you prefer.

    When cooking beef burgers, make sure not to press down on the patties with a spatula during cooking, as this can cause them to lose their juiciness. Additionally, consider using an instant-read thermometer to check for doneness; ideally, ground beef should reach an internal temperature of at least 160°F for safety purposes.

    Feel free to customize your burgers with different seasoning blends or toppings to suit your taste preferences, ensuring a delightful and unique experience every time.

  • 10 Easy Homemade Lemonade Recipes to Cool Off

    Looking to cool off? You've got to try these 10 easy homemade lemonade recipes! From the classic revitalizing lemonade to the unique Strawberry Basil Lemonade, there's something for everyone. Enjoy the fizz of Sparkling Lavender Lemonade or the sweetness of Watermelon Mint Lemonade. Spice things up with a Spicy Ginger Lemonade, or savor the tropical vibes of Tropical Pineapple Lemonade. Each recipe is designed to deliver a burst of flavor that'll rejuvenate on hot days—stick around for more ideas!

    Classic Refreshing Lemonade

    refreshing classic lemon drink

    When the sun is shining bright, there's nothing quite as revitalizing as a glass of classic lemonade. This timeless beverage combines the tartness of fresh lemons with the sweetness of sugar, creating a perfect balance that quenches your thirst on hot summer days.

    Whether you're hosting a backyard barbecue or enjoying a quiet afternoon on your porch, this homemade lemonade recipe will prove to be a delightful treat.

    Making classic lemonade from scratch is simple and requires just a few basic ingredients. Nothing beats the flavor of freshly squeezed lemons, and when you combine that with water and sugar, you'll end up with a drink that's not only delicious but also customizable.

    Adjust the sweetness or tartness to your liking, and watch as your friends and family fall in love with this easy-to-make beverage.

    • 1 cup freshly squeezed lemon juice (about 4-6 lemons)
    • 1 cup granulated sugar
    • 4 cups cold water
    • Ice cubes
    • Lemon slices (for garnish, optional)
    • Fresh mint leaves (for garnish, optional)

    In a pitcher, combine the freshly squeezed lemon juice and granulated sugar, stirring until the sugar dissolves completely.

    Then, add the cold water and mix well. Taste the lemonade and adjust the sweetness or tartness by adding more sugar or lemon juice if desired. Serve over ice in chilled glasses, and if you like, garnish with lemon slices or fresh mint leaves.

    For an extra revitalizing twist, consider adding a splash of sparkling water for a fizzy lemonade or infusing the drink with herbs like rosemary or basil.

    Using different citrus fruits, such as limes or oranges, can also add a unique flavor. Don't forget to chill your serving glasses beforehand for an even cooler experience!

    Strawberry Basil Lemonade

    strawberry basil infused lemonade

    Strawberry Basil Lemonade is a delightful twist on the classic lemonade, combining the sweetness of strawberries with the aromatic freshness of basil. This revitalizing drink is perfect for summer gatherings, picnics, or simply to enjoy on a warm afternoon.

    The bright pink hue and the incredible flavor profile will surely impress your guests and keep you cool through the hottest days.

    Making your own Strawberry Basil Lemonade is easy and requires just a few ingredients. The balance of tart lemon juice, sweet strawberries, and fragrant basil creates a harmonious drink that's both delicious and visually appealing.

    The freshness of the basil elevates the lemonade, adding a unique touch that brings a garden essence to every sip.

    • 1 cup fresh strawberries, hulled and sliced
    • 1/4 cup fresh basil leaves
    • 1 cup granulated sugar
    • 1 cup water
    • 1 cup fresh lemon juice
    • 4 cups cold water
    • Ice cubes
    • Lemon slices and basil sprigs for garnish

    In a blender, combine the sliced strawberries and fresh basil leaves, blending until smooth. In a saucepan, heat 1 cup of water and dissolve the sugar to create a simple syrup.

    Once it's cooled, mix the simple syrup with the strawberry-basil puree, freshly squeezed lemon juice, and the remaining cold water in a pitcher. Stir well and serve over ice, garnished with lemon slices and basil sprigs.

    For the best flavor, use ripe strawberries and fresh basil leaves since they greatly enhance the taste of your lemonade.

    Feel free to adjust the sweetness by adding more or less sugar according to your preference. If you want a more intense basil flavor, let the mixture sit in the refrigerator for a couple of hours before serving, allowing the flavors to meld beautifully.

    Enjoy your revitalizing drink!

    Sparkling Lavender Lemonade

    refreshing lavender lemonade recipe

    Sparkling lavender lemonade is a revitalizing beverage that combines the tartness of lemons with the delicate floral notes of lavender. Perfect for warm sunny days or elegant gatherings, this drink not only tantalizes your taste buds but also adds a touch of sophistication to any occasion.

    The subtle fragrance of lavender makes it a unique twist on traditional lemonade, inviting you to sip and savor every drop. To prepare this delightful beverage, you'll need to infuse the lavender into simple syrup, which gives it a beautiful flavor and aroma.

    Once combined with fresh lemon juice and sparkling water, this lemony drink transforms into a fizzing, aromatic refreshment that's sure to impress your guests. Ideal for parties, picnics, or just a relaxing afternoon at home, sparkling lavender lemonade is both enjoyable and easy to make.

    • 1 cup water
    • 1 cup granulated sugar
    • 2 tablespoons dried culinary lavender
    • 1 cup fresh lemon juice (about 6 lemons)
    • 4 cups sparkling water
    • Fresh lavender sprigs for garnish
    • Lemon slices for garnish

    In a small saucepan, combine water, sugar, and dried lavender, bringing it to a simmer over medium heat. Stir until the sugar dissolves completely, then remove from heat and let the lavender steep for about 15 minutes.

    Strain the syrup into a pitcher to remove the lavender, then add fresh lemon juice and stir well. Finally, mix in the sparkling water just before serving for a revitalizing fizz.

    When making sparkling lavender lemonade, it's crucial to use culinary-grade lavender to guarantee it's safe for consumption. You can adjust the sweetness by adding more or less simple syrup, depending on your taste preferences.

    Additionally, for an extra flavor twist, consider infusing the lemonade with other herbs like mint or adding a splash of gin for an adult version. Be sure to serve it chilled, and feel free to experiment with garnishes such as lemon wheels or additional sprigs of lavender for a lovely presentation.

    Watermelon Mint Lemonade

    refreshing fruity summer drink

    Watermelon Mint Lemonade is a rejuvenating twist on the classic lemonade that will awaken your senses and provide a perfect thirst-quencher for hot summer days. This concoction combines the sweetness of watermelon with the invigorating flavor of fresh mint, creating an exquisite blend that will delight your taste buds.

    It's perfect for backyard parties, picnics, or simply enjoying at home after a long day's work.

    Making Watermelon Mint Lemonade is a breeze! All you need are some fresh ingredients and a little bit of time to prepare this tantalizing drink. With vibrant colors and a balanced flavor profile, this lemonade won't only look beautiful in a glass but also impress your guests with its unique taste.

    So gather your ingredients, and let's get started on making this delicious summertime beverage.

    Ingredients:

    • 4 cups watermelon, diced and seeded
    • 1 cup fresh lemon juice (about 4-6 lemons)
    • 1/2 cup sugar (adjust to taste)
    • 1/2 cup fresh mint leaves
    • 4 cups cold water
    • Ice cubes
    • Mint sprigs and lemon slices for garnish (optional)

    To prepare the Watermelon Mint Lemonade, start by blending the diced watermelon in a blender until smooth. Strain the pureed watermelon through a fine mesh sieve into a large pitcher to remove any pulp.

    Add the freshly squeezed lemon juice, sugar, and cold water to the pitcher, stirring until the sugar is fully dissolved. Finally, muddle the fresh mint leaves and add them to the pitcher, allowing the flavors to infuse for about 15-20 minutes.

    Serve the lemonade over ice and garnish with mint sprigs and lemon slices if desired.

    When making your Watermelon Mint Lemonade, feel free to adjust the sweetness by varying the amount of sugar based on the natural sweetness of your watermelon.

    If you prefer a more intense mint flavor, you can add extra mint leaves or even blend some into the watermelon for a stronger infusion. For a fun variation, try adding a splash of soda water for fizz or substituting the sugar with honey or agave syrup for a healthier option.

    Enjoy experimenting with flavors and find the perfect balance for your taste!

    Spicy Ginger Lemonade

    spicy ginger lemonade recipe

    Spicy Ginger Lemonade is a rejuvenating and invigorating twist on classic lemonade. With a spicy kick from fresh ginger and a zesty burst of lemon, this drink is perfect for hot summer days or as a unique beverage for gatherings.

    The combination of sweet, tangy, and spicy flavors creates a delightful symphony that tantalizes the taste buds, making it a favorite for both young and old alike.

    To make this homemade lemonade, you'll need fresh lemons for their juice and ginger to provide that warming spice. By using simple ingredients and a little creativity, you can elevate traditional lemonade to something extraordinary.

    This drink can be adjusted to your liking—whether you prefer less spice or more sweetness, you can customize it to suit your palate.

    Ingredients:

    • 1 cup freshly squeezed lemon juice (about 6-8 lemons)
    • 1/2 cup granulated sugar
    • 2 cups water (for the simple syrup)
    • 1 tablespoon fresh ginger, grated
    • 4 cups cold water (for dilution)
    • Ice cubes
    • Lemon slices, for garnish
    • Fresh mint, for garnish (optional)

    To prepare the Spicy Ginger Lemonade, start by making a ginger-infused simple syrup. In a small saucepan, combine the sugar, 2 cups of water, and grated ginger.

    Heat over medium heat until the sugar dissolves completely, then remove from heat and let it steep for about 30 minutes.

    After steeping, strain the syrup through a fine-mesh sieve into a mixing bowl, discarding the ginger solids.

    In a large pitcher, combine the freshly squeezed lemon juice, ginger simple syrup, and the remaining 4 cups of cold water. Stir well and adjust sweetness or spiciness to taste.

    Serve over ice and garnish with lemon slices and mint if desired.

    For the best flavor, use freshly squeezed lemon juice rather than bottled juice to capture the bright acidity and aroma of lemons.

    If you want to enhance the spice, you can add a sprinkle of cayenne pepper to the mixture, or even a few slices of fresh jalapeño during the infusion stage.

    This lemonade can be prepared in advance and stored in the refrigerator for up to 3 days, keeping the flavors fresh and zesty.

    Be sure to serve it cold, as it tastes best when chilled!

    Raspberry Lemonade Fizz

    refreshing raspberry citrus drink

    Invigorating and vibrant, Raspberry Lemonade Fizz is an ideal drink for hot summer days or any festive occasion. The combination of zesty lemon and sweet, juicy raspberries creates a revitalizing taste that's sure to please. The sparkling water adds a delightful fizz, making this lemonade not just a drink but an experience to enjoy. This recipe is incredibly simple yet results in a beverage that feels fancy and special.

    Whether you're hosting a backyard barbecue, a picnic in the park, or just looking to indulge yourself at home, this Raspberry Lemonade Fizz will be a hit. It's perfect for both kids and adults, and you can even make it a little more adult-friendly with a splash of your favorite spirit, such as vodka or gin. So gather your ingredients and get ready to sip on this deliciously effervescent beverage!

    Ingredients:

    • 1 cup fresh raspberries
    • 1 cup freshly squeezed lemon juice (about 4-6 lemons)
    • 1 cup granulated sugar
    • 4 cups cold water
    • 2 cups sparkling water
    • Lemon slices, for garnish
    • Fresh mint leaves, for garnish (optional)

    Combine the raspberries and sugar in a bowl, and gently mash them together with a fork or muddler until the raspberries release their juices and the mixture becomes syrupy.

    In a large pitcher, mix the raspberry-sugar mixture with the freshly squeezed lemon juice and cold water. Stir well until the sugar dissolves completely, then chill in the refrigerator for about an hour.

    When ready to serve, add the sparkling water to the pitcher and stir gently. Pour into glasses filled with ice and garnish with lemon slices and mint leaves.

    For a fun twist, feel free to experiment with different berries, such as strawberries or blackberries, or even mix in some cucumber slices for a rejuvenating touch. If you prefer a less sweet drink, adjust the amount of sugar to your liking.

    This Raspberry Lemonade Fizz can also be made ahead of time—just add the sparkling water right before serving to maintain that fizzy goodness! Enjoy your homemade lemonade with friends and family, and don't forget to capture those invigorating moments!

    Tropical Pineapple Lemonade

    refreshing tropical citrus drink

    Tropical Pineapple Lemonade is a revitalizing twist on the classic lemonade, perfect for those hot summer days or tropical-themed gatherings. The sweet and tangy combination of fresh lemons and ripe pineapple not only tastes amazing but also provides a vibrant color and aroma that can brighten any occasion.

    This delightful drink is simple to make, requiring just a few ingredients, making it an excellent choice for both novice and seasoned home chefs.

    To elevate your lemonade, consider using freshly squeezed lemon juice and ripe, juicy pineapples for the best flavor. You can serve it over ice with a garnish of fresh mint or a slice of pineapple for that extra touch. This Tropical Pineapple Lemonade isn't just a drink; it's an experience—bringing a taste of the tropics to your home.

    • 1 cup fresh lemon juice (about 4-6 lemons)
    • 1 cup fresh pineapple (diced)
    • 4 cups cold water
    • 1 cup granulated sugar (adjust to taste)
    • Ice cubes
    • Lemon and pineapple slices for garnish
    • Fresh mint leaves (optional)

    In a blender, combine the diced pineapple and 1 cup of cold water, blending until smooth. Strain the pineapple juice into a pitcher, discarding the pulp.

    Add the fresh lemon juice, sugar, and the remaining water to the pitcher, stirring until the sugar dissolves. Serve over ice and garnish with lemon and pineapple slices, or mint leaves for an extra tropical touch.

    When making Tropical Pineapple Lemonade, feel free to adjust the sweetness according to your taste preferences. If you prefer a less sugary drink, you can reduce the amount of sugar or substitute it with honey or a sugar alternative.

    Additionally, you can add sparkling water for a fizzy version or experiment with other fruits, such as mango or coconut, to create your signature tropical drink. Enjoy!

    Blueberry Lemonade With Thyme

    thyme infused blueberry lemonade recipe

    Blueberry Lemonade with Thyme is a revitalizing twist on the classic lemonade that combines the tartness of lemons with the sweetness of blueberries and a hint of earthy thyme. This delightful beverage not only quenches your thirst but also showcases the vibrant colors and flavors of summer.

    Perfect for backyard gatherings or a relaxing afternoon, it brings a touch of sophistication with its unique blend of ingredients.

    To make Blueberry Lemonade with Thyme, you'll need fresh blueberries, lemon juice, sugar, and thyme. This mix guarantees an explosion of flavor with every sip. The bright notes of lemon are beautifully complemented by the sweet, juicy blueberries and aromatic thyme, making this drink a standout choice for any warm day or special occasion.

    With just a few simple steps, you'll have a delicious homemade lemonade that impresses family and friends alike.

    • 1 cup fresh blueberries
    • 1 cup freshly squeezed lemon juice
    • 1 cup granulated sugar
    • 4 cups water
    • 5 sprigs fresh thyme
    • Ice
    • Lemon slices and extra blueberries for garnish

    In a small saucepan, combine 1 cup of water, blueberries, sugar, and fresh thyme. Bring this mixture to a boil, then reduce the heat and simmer for about 10 minutes until the blueberries have broken down and the syrup has thickened slightly.

    Strain the mixture through a fine-mesh sieve into a large pitcher to remove the solids. Add the remaining 3 cups of cold water and the freshly squeezed lemon juice to the pitcher, stirring well.

    Taste and adjust the sweetness if necessary before chilling in the refrigerator. Serve over ice and garnish with lemon slices and a few whole blueberries.

    When making Blueberry Lemonade with Thyme, using fresh ingredients will yield the best flavor. If fresh blueberries are unavailable, frozen blueberries can be used—just be sure to thaw them before cooking.

    You can adjust the sweetness by adding more sugar or using a sugar substitute. For an adult twist, feel free to incorporate a splash of your favorite spirit, like vodka or gin, for a delightful cocktail. Enjoy your revitalizing drink!

    Cucumber Lemonade Cooler

    refreshing cucumber lemonade drink

    Cucumber Lemonade Cooler is a revitalizing and unique twist on the classic lemonade that will surely become a favorite during warm weather. Combining the crisp flavor of cucumbers with the zesty tartness of lemons creates a drink that's both hydrating and invigorating.

    This cooler is perfect for picnics, barbecues, or just a leisurely afternoon at home. Not only is it delicious, but it's also simple to make, requiring just a few fresh ingredients.

    To elevate its appeal, consider garnishing your Cucumber Lemonade Cooler with mint leaves or a slice of cucumber for a beautiful presentation. This drink isn't only enjoyable to sip on, but it also serves as a stunning centerpiece at any gathering.

    Whether you're lounging by the pool or hosting a summer party, this lemonade variation will impress guests and help you stay cool in the heat.

    • 1 large cucumber, peeled and diced
    • 1 cup freshly squeezed lemon juice (about 4-6 lemons)
    • 1 cup granulated sugar
    • 6 cups cold water
    • Ice cubes
    • Mint leaves (optional, for garnish)
    • Lemon slices (optional, for garnish)

    In a blender, combine the diced cucumber and half of the lemon juice with 1 cup of water and blend until smooth. Strain the mixture through a fine mesh sieve into a pitcher to remove the pulp.

    Add the remaining lemon juice, sugar, and the rest of the cold water to the pitcher. Stir well until the sugar dissolves completely. Serve the Cucumber Lemonade Cooler over ice cubes and garnish with mint leaves and lemon slices if desired.

    For best flavor, allow the Cucumber Lemonade Cooler to chill in the refrigerator for at least an hour before serving. This allows the flavors to meld perfectly.

    Additionally, you can adjust the sweetness by either increasing or decreasing the amount of sugar based on your preference. Fresh herbs like basil or rosemary can also be infused for a unique spin if you're feeling adventurous.

    Honey Lemonade With Chamomile

    chamomile infused honey drink

    Honey Lemonade with Chamomile is a revitalizing, soothing drink that's perfect for any occasion. This delightful concoction combines the zesty brightness of fresh lemons with the calming effects of chamomile, while honey sweetens the mix naturally.

    Whether you're serving it at a summer gathering or just enjoying a quiet evening at home, this blend offers both flavor and relaxation in each sip.

    To prepare this invigorating drink, start by brewing chamomile tea, which acts as the base for your lemonade. The infusion of chamomile not only imparts a lovely floral note but also provides added health benefits, such as relaxation and aiding digestion.

    Once brewed, this tea will be mixed with fresh lemon juice and honey, creating a harmonious balance of tart, sweet, and soothing flavors. Serve it over ice for a revitalizing twist.

    • 4 cups water
    • 2 chamomile tea bags
    • 1 cup fresh lemon juice (about 4-6 lemons)
    • ½ cup honey (or to taste)
    • Lemon slices for garnish
    • Fresh chamomile flowers for garnish (optional)
    • Ice cubes

    Bring 2 cups of water to a boil, then remove it from heat and steep the chamomile tea bags for about 5 minutes. Remove the tea bags and stir in the honey while the tea is still warm, ensuring it dissolves completely.

    In a large pitcher, combine the brewed chamomile tea with the fresh lemon juice and the remaining 2 cups of cold water. Mix well, adjust sweetness with more honey if needed, and serve over ice with lemon slices and optional fresh chamomile flowers for garnish.

    When making honey lemonade with chamomile, feel free to experiment with the sweetness and acidity to find your perfect balance.

    If you prefer a more intense chamomile flavor, steep the tea bags a bit longer, or infuse additional dried chamomile flowers into your mix. For a fun variation, try adding a splash of sparkling water for a fizzy twist, or concocting a batch in advance to refrigerate and enjoy throughout the week!

  • 12 Keto Seafood Dishes That Are Low-Carb & Delicious

    If you're looking for delicious keto seafood dishes that are low-carb, you're in for a treat! Try the creamy garlic butter shrimp or the lemon herb grilled salmon for a burst of flavor. Low-carb shrimp scampi and spicy tuna poke bowls make for invigorating options, too. Don't forget to check out baked parmesan crusted tilapia and mouthwatering garlic butter crabs. For more enticing recipes and tips to elevate your meals, keep exploring!

    Creamy Garlic Butter Shrimp

    garlic butter shrimp recipe

    Creamy Garlic Butter Shrimp is a delicious keto-friendly dish that can elevate any weeknight dinner. This rich and flavorful dish combines succulent shrimp with a creamy garlic butter sauce that isn't only satisfying but also low in carbs, making it perfect for those following a ketogenic diet. The combination of garlic, butter, and herbs enhances the natural sweetness of the shrimp, creating a meal that's comforting yet elegant.

    Preparing this dish is quick and easy, perfect for those busy days when you still want to enjoy a gourmet meal at home. You can serve this creamy garlic butter shrimp over zucchini noodles or cauliflower rice for an even more satisfying experience. With just a few simple ingredients, you can have a restaurant-quality dish in your own kitchen.

    • 1 pound large shrimp, peeled and deveined
    • 4 tablespoons unsalted butter
    • 4 cloves garlic, minced
    • 1/2 cup heavy cream
    • 1/2 teaspoon paprika
    • Salt and pepper to taste
    • Fresh parsley, chopped for garnish
    • Lemon wedges for serving

    In a large skillet, melt the butter over medium heat, then add the minced garlic and cook until fragrant, about 1-2 minutes. Add the shrimp to the skillet, seasoning with paprika, salt, and pepper. Cook for 2-3 minutes on each side, or until the shrimp are pink and opaque.

    Pour in the heavy cream and let the sauce simmer for another 2-3 minutes until it thickens slightly. Remove from heat and garnish with fresh parsley.

    For an added depth of flavor, consider using freshly squeezed lemon juice or zest after cooking to brighten up the dish. To guarantee the shrimp maintain their tenderness, avoid overcooking them, as they can become tough and rubbery.

    If you'd like to introduce some heat, a pinch of red pepper flakes can be added along with the garlic for a spicy kick. Serve immediately with a fresh green salad for a complete meal.

    Lemon Herb Grilled Salmon

    grilled salmon with herbs

    Lemon Herb Grilled Salmon is a fantastic keto dish that combines the rich, healthy flavors of salmon with a revitalizing citrus herb marinade. This dish isn't only simple to prepare but also packed with nutrients, making it a perfect choice for those following a ketogenic lifestyle.

    The vibrant lemon juice and fragrant fresh herbs enhance the natural flavor of the fish, creating a meal that's both delicious and satisfying. Ideal for a summer cookout or a cozy dinner at home, grilled salmon can be paired with a variety of keto-friendly sides such as roasted vegetables or a fresh salad.

    The key to achieving a perfectly grilled salmon is ensuring the fish is marinated well, allowing the flavors to penetrate deeply. This recipe isn't just a meal; it's a vibrant celebration of flavors that showcases the best of what seafood can offer.

    Ingredients

    • 4 salmon fillets
    • 1/4 cup olive oil
    • 2 tablespoons fresh lemon juice
    • Zest of 1 lemon
    • 2 cloves garlic, minced
    • 1 tablespoon fresh parsley, chopped
    • 1 tablespoon fresh dill, chopped
    • Salt and pepper, to taste
    • Lemon slices, for garnish

    Grill the salmon fillets on medium-high heat for about 4-5 minutes per side, or until the fish flakes easily with a fork. Make sure to preheat the grill and oil it lightly to prevent sticking.

    While grilling, use a brush to apply any remaining marinade onto the salmon for added flavor. Once cooked, remove the salmon from the grill and let it rest for a minute before serving with fresh lemon slices on top.

    For the best flavor, allow the salmon to marinate in the mixture for at least 30 minutes prior to grilling. If you're short on time, even a quick 10-minute marinade can enhance the taste.

    Additionally, consider using wild-caught salmon for a superior taste and texture. Experiment with different herbs based on your preference, such as tarragon or basil, to create your own unique variation of this dish.

    Low-Carb Shrimp Scampi

    low carb shrimp scampi recipe

    Low-Carb Shrimp Scampi is a delightful take on the classic Italian dish, perfect for those following a ketogenic lifestyle. This version replaces traditional high-carb pasta with zucchini noodles or cauliflower rice, allowing you to indulge in the rich flavors of garlic, butter, and shrimp without loading up on carbs. The sweetness of the shrimp combined with the garlic's fragrant aroma and the hint of lemon creates a mouthwatering meal that isn't only simple to prepare but also packed with nutrients.

    Preparing Low-Carb Shrimp Scampi is a quick process that can be accomplished in under 30 minutes, making it an ideal weeknight dinner option. The freshness of the shrimp is essential, so opt for wild-caught if possible. This recipe can easily be adjusted to suit your taste preferences by adding different herbs or spices, ensuring a delightful dish every time you make it.

    Ingredients:

    • 1 pound large shrimp, peeled and deveined
    • 2 tablespoons olive oil
    • 4 tablespoons unsalted butter
    • 4 cloves garlic, minced
    • 1 teaspoon red pepper flakes (optional)
    • Salt and pepper to taste
    • Juice of 1 lemon
    • Zucchini noodles or cauliflower rice (for serving)
    • Fresh parsley, chopped (for garnish)

    In a large skillet, heat the olive oil and butter over medium heat. Add the minced garlic and red pepper flakes, stirring until fragrant (about 1 minute). Toss in the shrimp and season with salt and pepper.

    Cook the shrimp for 2-3 minutes on each side or until they turn pink and opaque. Squeeze the lemon juice over the shrimp, mix well, and serve immediately over zucchini noodles or cauliflower rice, garnished with fresh parsley.

    When preparing this dish, make sure not to overcook the shrimp, as they can become tough and rubbery. For an extra punch of flavor, consider adding a splash of white wine to the skillet after sautéing the garlic, allowing it to reduce and infuse the dish with a rich taste.

    Always remember to taste and adjust the seasoning as needed, ensuring every element of the dish shines. Enjoy your delicious Low-Carb Shrimp Scampi!

    Spicy Tuna Poke Bowl

    spicy tuna sushi bowl

    If you're looking for a fresh and exciting way to enjoy seafood while sticking to your keto lifestyle, a Spicy Tuna Poke Bowl is a perfect choice. This dish combines the luscious flavors of fresh tuna with a spicy kick that awakens the senses. The simplicity of the ingredients makes it quick to prepare, while still offering the satisfying experience of a gourmet meal. This vibrant bowl isn't only delicious but also packed with nutrients, making it ideal for a healthy lunch or dinner.

    To boost the flavor and add some crunch, this poke bowl features a variety of toppings, including avocado and cucumber, which complement the rich tuna. Pairing these ingredients together creates a well-rounded dish that's a feast for the eyes as much as it's for the palate. You can easily customize the toppings according to your preference or what's available in your kitchen, making sure every bowl you make is uniquely yours.

    Let's explore the recipe!

    • 1 lb sushi-grade tuna, diced
    • 2 tbsp soy sauce or tamari (for a gluten-free option)
    • 1 tbsp sesame oil
    • 1 tbsp sriracha (or to taste)
    • 1 tsp rice vinegar
    • 1 avocado, diced
    • 1/2 cucumber, thinly sliced
    • 2 green onions, chopped
    • 1 tbsp sesame seeds
    • Seaweed salad (for garnish)
    • Riced cauliflower (as a base, optional)

    In a mixing bowl, combine the diced tuna, soy sauce, sesame oil, sriracha, and rice vinegar; mix gently to coat evenly. Let the mixture sit for approximately 10-15 minutes to allow the flavors to meld.

    In the meantime, prepare your base by placing a generous scoop of riced cauliflower in a bowl. Top the riced cauliflower with the marinated tuna mixture and arrange the diced avocado, cucumber slices, and chopped green onions on top. Finish with a sprinkle of sesame seeds and a side of seaweed salad, if desired.

    When preparing this dish, it's crucial to use fresh sushi-grade tuna to guarantee both taste and safety. If you're not comfortable with raw fish, consider searing the tuna for a few seconds on each side to give it a warm touch while still retaining some raw texture.

    You can also adjust the spice level to your liking; add less sriracha for a milder flavor, or incorporate additional toppings like radishes or jalapeños for extra heat. Enjoy your Poke Bowl creation!

    Baked Parmesan Crusted Tilapia

    crispy baked fish recipe

    Baked Parmesan Crusted Tilapia is a delightful seafood dish that perfectly aligns with the keto lifestyle while delivering an irresistible flavor.

    The delicate texture of the tilapia fillets pairs beautifully with a crisp, cheesy crust, making this dish both satisfying and healthy. This recipe isn't only easy to prepare but also quick to cook, making it an excellent choice for busy weeknights when you want a wholesome meal without spending hours in the kitchen.

    To keep things keto-friendly, this dish uses almond flour instead of traditional breadcrumbs, which adds a nutty flavor and maintains the necessary low-carb aspect of your keto diet. The combination of parmesan cheese, garlic, and spices enhances the tilapia's natural flavors, creating a dish that's rich in taste but light on carbs.

    Serve it alongside a fresh salad or steamed vegetables for a complete meal that fits seamlessly into your dietary goals.

    Ingredients:

    • 4 tilapia fillets
    • 1/2 cup grated Parmesan cheese
    • 1/2 cup almond flour
    • 2 cloves garlic, minced
    • 1 teaspoon paprika
    • 1 teaspoon dried parsley
    • Salt and pepper to taste
    • 2 tablespoons olive oil
    • Lemon wedges for serving

    Preheat your oven to 400°F (200°C) and line a baking sheet with parchment paper. In a bowl, mix the grated Parmesan cheese, almond flour, minced garlic, paprika, dried parsley, salt, and pepper.

    Dip each tilapia fillet in the olive oil, then coat it with the cheese mixture. Place the fillets on the prepared baking sheet and bake for about 15-20 minutes, or until the tilapia is cooked through and the crust is golden brown.

    When preparing Baked Parmesan Crusted Tilapia, be sure not to overcook the fish, as it can become dry. Keep an eye on it during the last few minutes of baking to achieve that perfect flaky texture.

    You can also experiment with different herbs and spices to customize the flavor to your liking. Serve your tilapia with a squeeze of fresh lemon juice for a zesty finish, and consider adding a side of low-carb vegetables such as zucchini or asparagus for a nutritious complement to the meal.

    Keto Lobster Roll Lettuce Wraps

    lobster roll lettuce wraps

    Keto Lobster Roll Lettuce Wraps offer a delicious and healthy alternative to the traditional lobster roll while sticking to your ketogenic diet. By swapping out the high-carb bread with crisp and invigorating lettuce leaves, you can still enjoy a satisfying and flavorful meal. This dish is packed with protein and healthy fats, making it an ideal choice for those looking to maintain or lose weight while indulging in the fresh, sumptuous taste of lobster.

    These lobster roll lettuce wraps aren't only simple to make but also customizable to suit your preferences. You can add your favorite herbs, spices, and toppings for an extra burst of flavor. Whether you're hosting a summer barbeque, enjoying a light lunch, or simply craving seafood, these wraps are sure to impress your taste buds without compromising your dietary goals.

    Ingredients:

    • 1 pound cooked lobster meat, chopped
    • 1/2 cup mayonnaise (preferably avocado oil-based)
    • 1 tablespoon Dijon mustard
    • 1 tablespoon lemon juice
    • 1/4 cup celery, finely diced
    • 2 tablespoons fresh chives, chopped
    • Salt and pepper to taste
    • Romaine or butter lettuce leaves, to serve

    Combine the chopped lobster meat, mayonnaise, Dijon mustard, lemon juice, celery, chives, salt, and pepper in a large mixing bowl. Stir gently until the ingredients are evenly mixed, ensuring that the lobster is well coated with the creamy dressing.

    Once the mixture is ready, spoon it generously onto the lettuce leaves, folding the leaves over the filling as you'd with a traditional sandwich. Serve immediately while the lettuce is crisp.

    For added flavor and texture, consider incorporating avocado slices, diced cucumber, or even a sprinkle of Old Bay seasoning into your lobster mixture. Additionally, you can use different types of lettuce or even cabbage if you prefer a heartier wrap.

    If you have any leftovers, store the lobster mix in an airtight container in the refrigerator and enjoy it within a couple of days, but note that the lettuce will wilt over time, so it's best to assemble them fresh before serving.

    Cilantro Lime Shrimp Tacos

    cilantro lime shrimp tacos

    Cilantro Lime Shrimp Tacos are a new, zesty, and satisfying dish perfect for those following a keto diet. These tacos swap out traditional tortillas for a low-carb alternative, allowing you to enjoy the vibrant flavors without the added carbs. The combination of fresh cilantro, lime juice, and perfectly seasoned shrimp creates a tasty filling that bursts with flavor, making these tacos a delightful option for lunch or dinner.

    This dish not only provides a healthy dose of protein but also incorporates nutritious ingredients rich in flavor. Whether you're hosting a gathering or just looking to treat yourself, Cilantro Lime Shrimp Tacos are sure to impress.

    Paired with an invigorating avocado salsa or a side of sautéed veggies, these tacos can elevate your meal while keeping you on track with your dietary goals.

    Ingredients:

    • 1 pound of shrimp, peeled and deveined
    • 1 tablespoon olive oil
    • 2 limes (zest and juice)
    • 2 cloves garlic, minced
    • 1 teaspoon ground cumin
    • 1 teaspoon paprika
    • Salt and pepper, to taste
    • 1/4 cup fresh cilantro, chopped
    • Low-carb tortillas or lettuce leaves for wrapping
    • Optional toppings: diced avocado, shredded cabbage, and cilantro

    Season the shrimp with olive oil, lime juice, lime zest, minced garlic, cumin, paprika, salt, and pepper, ensuring they're well coated. Allow them to marinate for about 15 minutes.

    In a skillet over medium heat, cook the marinated shrimp for 2-3 minutes on each side until they're pink and cooked through. Assemble the tacos by placing cooked shrimp on low-carb tortillas or lettuce leaves and topping them with cilantro and any additional toppings of your choice.

    When cooking the shrimp, be careful not to overcook them as they can become rubbery. If you're using lettuce leaves, choose sturdy varieties like romaine or butter lettuce to hold the filling better.

    Experiment with different toppings to suit your taste; adding fresh salsa or jalapeños can bring an extra kick to your tacos.

    Finally, feel free to meal prep by marinating the shrimp in advance, making it easy to cook and assemble tacos for a quick, flavorful meal.

    Seafood Zucchini Noodles

    noodles made from zucchini seafood

    Seafood zucchini noodles are a delightful and nutritious alternative to traditional pasta, making them a perfect fit for those on a keto diet. This dish combines the fresh flavors of seafood with the lightness of zucchini, resulting in a satisfying meal that won't weigh you down. Not only is it low in carbohydrates, but it also packs a punch with high-quality protein and healthy fats from the seafood, making it both flavorful and health-conscious.

    Preparing seafood zucchini noodles is simple and quick, making it an ideal choice for busy weeknights or an impressive meal for guests. With the right blend of spices and fresh ingredients, you can transform ordinary zucchini into a gourmet dish that highlights the natural sweetness of seafood. Whether you prefer shrimp, scallops, or a mix of both, this recipe allows you to customize it according to your seafood preferences.

    Ingredients:

    • 2 medium zucchinis
    • 1 cup shrimp, peeled and deveined
    • 1 cup scallops, rinsed and patted dry
    • 2 tablespoons olive oil
    • 2 cloves garlic, minced
    • 1 teaspoon crushed red pepper flakes (optional)
    • Salt and pepper to taste
    • 1 tablespoon lemon juice
    • Fresh parsley, chopped for garnish
    • Grated Parmesan cheese (optional)

    To prepare the seafood zucchini noodles, start by spiralizing the zucchinis to create noodle-like strands. Heat olive oil in a large skillet over medium heat, then add the minced garlic and sauté for about 1 minute until fragrant.

    Add the shrimp and scallops to the skillet, seasoning them with salt, pepper, and crushed red pepper flakes if desired. Cook for about 3-4 minutes or until the seafood is opaque and cooked through. Toss in the zucchini noodles and lemon juice, cooking for an additional 2-3 minutes until the noodles are tender but still crisp. Serve hot, garnished with chopped parsley and grated Parmesan cheese if using.

    When making seafood zucchini noodles, it's crucial to avoid overcooking the zucchinis. They should remain slightly firm to mimic the texture of traditional pasta, so be mindful of the cooking time.

    If you're using frozen seafood, be sure to thaw and drain it thoroughly to prevent excess water from diluting the dish. Finally, feel free to get creative with the spices and herbs; adding your favorite seasonings can elevate the flavors and make this dish truly your own. Enjoy the freshness and health benefits of this keto-friendly meal!

    Garlic Butter Crabs

    savory garlic butter crabs

    Garlic Butter Crabs are a delightful seafood dish that embodies the rich and savory flavors of the ocean, enhanced by the fragrant warmth of garlic and the creamy texture of butter. This dish isn't only packed with flavor but is also perfect for those following a ketogenic diet, allowing you to indulge without guilt. Crabs are naturally low in carbs and high in healthy fats, making them an excellent option for anyone looking to enjoy a sumptuous meal while adhering to keto principles.

    Cooking Garlic Butter Crabs is a straightforward process that can be both enjoyable and rewarding. The combination of melted butter, fresh garlic, and the sweet, tender meat of the crabs creates a mouthwatering experience that's ideal for a special occasion dinner or a cozy seafood feast at home. With just a few simple ingredients, you can transform fresh crabs into a dish that will impress your family and friends.

    • 2 large crabs (preferably Dungeness or blue crabs)
    • 1 cup unsalted butter
    • 6 cloves garlic, minced
    • 1 tablespoon fresh parsley, chopped
    • 1 teaspoon lemon juice
    • Salt and pepper to taste
    • Lemon wedges, for serving

    In a large pot, bring water to a boil and season it with salt. Add the crabs and cook for about 15-20 minutes until bright orange and cooked through.

    Meanwhile, melt the butter in a skillet over medium heat and add the minced garlic, cooking until fragrant. Stir in the parsley, lemon juice, salt, and pepper.

    Once the crabs are cooked, remove them from the pot and drain. Serve the crabs drizzled with the garlic butter sauce, accompanied by lemon wedges.

    For the best flavor, consider using fresh crabs if available, as frozen varieties may not have the same sweetness. If you want more heat, feel free to add a pinch of red pepper flakes to the garlic butter.

    Serving the dish over a bed of sautéed spinach or zucchini noodles can provide a wonderful low-carb side that complements the crabs beautifully. Enjoy your Garlic Butter Crabs with a side of melted butter for dipping, making each bite a luxurious treat!

    Blackened Mahi-Mahi

    spicy grilled fish fillet

    Blackened Mahi-Mahi is a flavorful and tantalizing dish that perfectly fits into a ketogenic diet. This preparation involves a spicy seasoning blend that creates a delicious crust on the fish, enhancing its natural flavor while adding a vibrant kick. Mahi-mahi, with its firm texture and mild taste, is a fantastic canvas for bold flavors, making it a popular choice among seafood lovers. Cooking this fish is also quite quick, making it an ideal option for busy weeknight dinners.

    To achieve the classic blackened effect, it's important to use high heat while searing the fish, which helps develop the characteristic dark crust. Pairing the blackened mahi-mahi with a fresh salad or sautéed vegetables can complete the meal while keeping it keto-friendly. As you prepare to plunge into this recipe, gather your ingredients and get ready for a culinary adventure that's as satisfying to make as it's to eat.

    • 2 mahi-mahi fillets
    • 2 tablespoons olive oil
    • 1 tablespoon paprika
    • 1 teaspoon cayenne pepper
    • 1 teaspoon garlic powder
    • 1 teaspoon onion powder
    • 1 teaspoon dried thyme
    • 1 teaspoon dried oregano
    • Salt and black pepper to taste
    • Lemon wedges (for serving)

    Heat a large cast-iron skillet over medium-high heat and add the olive oil. While the skillet is heating, mix the paprika, cayenne pepper, garlic powder, onion powder, thyme, oregano, salt, and black pepper in a small bowl.

    Coat each mahi-mahi fillet with the spice blend on both sides, pressing it in slightly. Once the skillet is hot, place the seasoned fillets in the skillet and cook for about 4-5 minutes on each side, or until they're blackened and cooked through. Serve with lemon wedges for a zesty finish.

    When cooking blackened mahi-mahi, don't be afraid to adjust the spice level to your preference; feel free to add more or less cayenne pepper depending on how spicy you like your food.

    Additionally, make certain that your skillet is sufficiently hot before cooking to achieve that perfect char. For a healthier option, consider serving the fish over a bed of leafy greens tossed with a light vinaigrette, which will complement the robust flavors of the blackened mahi-mahi.

    Lemon Dill Baked Cod

    lemon dill flavored cod

    When it comes to creating a delicious and healthy dinner option, Lemon Dill Baked Cod is a fantastic choice that shines with fresh flavors and minimal prep work. This dish is perfect for anyone following a low-carb or keto lifestyle, as cod is a lean white fish rich in protein and omega-3 fatty acids, while the lemon and dill provide a rejuvenating contrast that enhances the natural taste of the fish.

    With its zesty citrus notes and aromatic herbs, this recipe not only elevates your dinner table but also comes together quickly, making it ideal for busy weeknights or serene weekend evenings.

    To prepare Lemon Dill Baked Cod, you'll need just a few fresh ingredients that pack a punch. Pairing the tender cod with freshly squeezed lemon juice and fragrant dill gives you a well-rounded flavor profile that will satisfy even the pickiest eaters.

    This dish can be served alongside a simple green salad or steamed veggies, making it a balanced meal that adheres to your keto goals without sacrificing taste or satisfaction.

    Ingredients:

    • 4 cod fillets
    • 2 tablespoons olive oil
    • 2 tablespoons fresh lemon juice
    • 1 tablespoon fresh dill, chopped (or 1 teaspoon dried dill)
    • 2 cloves garlic, minced
    • Salt and pepper, to taste
    • Lemon slices, for garnish
    • Fresh dill sprigs, for garnish

    Preheat your oven to 400°F (200°C). In a small bowl, mix together the olive oil, lemon juice, chopped dill, minced garlic, salt, and pepper.

    Place the cod fillets on a baking sheet lined with parchment paper or lightly greased. Brush the olive oil mixture over the fillets, ensuring they're well coated, and top them with lemon slices. Bake in the preheated oven for 12-15 minutes or until the fish easily flakes with a fork and is opaque throughout.

    For the best results, make sure not to overcook the cod, as it can become dry and lose its tender texture. Keep an eye on the fillets as they bake; the thickness of the fish may require slight adjustments to the cooking time.

    Additionally, feel free to experiment by adding other herbs or spices to the citrus mixture for a personalized touch, such as parsley or a sprinkle of paprika for added flavor and color.

    Keto Shrimp and Cauliflower Grits

    low carb seafood dish

    Keto Shrimp and Cauliflower Grits is a delightful twist on a classic Southern dish that captures the essence of flavor while keeping it low in carbohydrates. The use of cauliflower as a substitute for traditional grits not only aligns with the keto diet but also adds a creamy texture that pairs perfectly with succulent shrimp.

    This dish isn't only simple to prepare but also a great way to impress family and friends with your culinary skills. Perfect for a cozy dinner or a quick weeknight meal, this dish showcases the delightful flavors of garlic, butter, and fresh herbs. Combined with the juicy and tender shrimp, you'll find that this meal is both satisfying and nutritious.

    Serve it up with a fresh side salad or steamed vegetables for a complete keto-friendly feast!

    • 1 pound shrimp, peeled and deveined
    • 1 medium head cauliflower, cut into florets
    • 4 tablespoons unsalted butter
    • 3 cloves garlic, minced
    • 1 cup chicken broth
    • 1/2 cup heavy cream
    • 1 teaspoon smoked paprika
    • Salt and pepper, to taste
    • Fresh parsley, chopped (for garnish)
    • Lemon wedges (for serving)

    In a large pot, steam the cauliflower florets until tender, about 10 minutes. Meanwhile, in a skillet over medium heat, melt 2 tablespoons of butter and sauté the minced garlic until fragrant.

    Add the shrimp, smoked paprika, salt, and pepper, cooking until the shrimp are pink and opaque, about 4-5 minutes. Once the cauliflower is cooked, blend it with the chicken broth, heavy cream, and remaining butter until smooth.

    Season to taste, then serve the creamy cauliflower grits topped with the garlic shrimp and garnish with fresh parsley and lemon wedges.

    When making Keto Shrimp and Cauliflower Grits, one tip to enhance flavors is to let your shrimp marinate in a bit of lemon juice and seasonings for 15-30 minutes before cooking. This not only adds depth of flavor but can also tenderize the shrimp slightly.

    Additionally, for a touch of heat, consider adding a sprinkle of red pepper flakes to the shrimp while sautéing. Enjoy experimenting with spices to make the dish your own!

  • 12 Keto Chicken Recipes That Are Low-Carb & Tasty

    If you're looking for keto chicken recipes that are low-carb and tasty, you've got plenty of options. Try Creamy Garlic Chicken Skillet for a quick meal, or whip up Keto Chicken Alfredo Bake for a comforting dinner. Lemon Herb Grilled Chicken offers fresh flavors, while Spicy Chicken Thighs with Avocado delivers a bold kick. For something different, consider Cheesy Broccoli Chicken Casserole or BBQ Chicken Cauliflower Pizza. Explore these delicious dishes and discover more exciting ideas ahead.

    Creamy Garlic Chicken Skillet

    creamy garlic chicken recipe

    Creamy Garlic Chicken Skillet is a delightful dish that perfectly exemplifies the richness and flavor of keto cooking. This recipe combines tender chicken breasts with a luscious, creamy garlic sauce, creating a satisfying meal that's both comforting and healthy. The preparation is quite simple, making it ideal for busy weeknights when you want to whip up something delicious without spending hours in the kitchen.

    This dish isn't only low in carbohydrates, making it suitable for those following a keto lifestyle, but it also packs a punch with garlic, which is known for its numerous health benefits. The addition of fresh herbs adds a layer of freshness, complementing the creamy sauce beautifully. With just a few ingredients, you can create a gourmet experience right in your own kitchen.

    • 4 boneless, skinless chicken breasts
    • 4 tablespoons olive oil
    • 4 cloves of garlic, minced
    • 1 cup heavy cream
    • 1 teaspoon garlic powder
    • 1 teaspoon dried Italian herbs (such as basil, oregano, or thyme)
    • Salt and pepper to taste
    • Fresh parsley, chopped (for garnish)

    Start by heating the olive oil in a large skillet over medium-high heat. Season the chicken breasts with salt, pepper, and garlic powder, then add them to the skillet. Cook for about 6-7 minutes on each side, or until they're golden brown and cooked through. Remove the chicken from the skillet and set aside.

    In the same skillet, add the minced garlic and sauté for 1 minute until fragrant. Then, pour in the heavy cream, add the dried herbs, and let it simmer for a couple of minutes until it thickens slightly. Return the chicken to the skillet and coat it well with the sauce before serving.

    To elevate the dish even further, consider adding some sautéed vegetables like spinach, broccoli, or mushrooms in the creamy garlic sauce. This not only adds more flavor but also enhances the nutritional profile of the meal. Additionally, if you want a bit of zing, a splash of lemon juice can brighten the overall taste, making it even more irresistible.

    Always taste the sauce before serving to guarantee the seasoning is perfect for your palate!

    Keto Chicken Alfredo Bake

    creamy low carb chicken dish

    Indulge in the rich and creamy flavors of this Keto Chicken Alfredo Bake, a dish that's perfect for anyone on a low-carb diet but still wants to enjoy hearty comfort food. This recipe combines succulent chicken pieces, a luscious Alfredo sauce, and a cheesy topping that will satisfy any craving.

    It's a delightful way to bring together the classic flavors of Alfredo while keeping the carb count low, making it a perfect weeknight meal or a dish to impress guests.

    Preparing this keto-friendly chicken bake is surprisingly simple and quick. With just a few basic ingredients, you can create a satisfying meal that will leave everyone asking for seconds.

    Plus, it's versatile; you can add your favorite low-carb vegetables or adjust the seasoning to match your family's preferences. This dish is bound to become a staple in your meal rotation!

    • 2 cups cooked chicken, shredded
    • 1 cup heavy cream
    • 1 cup grated Parmesan cheese
    • 1 cup shredded mozzarella cheese
    • 3 cloves garlic, minced
    • 1 teaspoon Italian seasoning
    • Salt and pepper, to taste
    • 1/2 cup cauliflower florets (optional)
    • Chopped parsley, for garnish (optional)

    Preheat your oven to 375°F (190°C). In a large mixing bowl, combine the shredded chicken, heavy cream, minced garlic, Italian seasoning, half of the Parmesan cheese, and salt and pepper.

    If using, stir in the cauliflower florets for added texture. Transfer the mixture to a greased baking dish and top with the remaining mozzarella and Parmesan cheese. Bake in the preheated oven for 25-30 minutes or until the cheese is bubbly and golden brown.

    For the best results, verify that your chicken is thoroughly cooked before mixing it into the batter. Consider letting the baked chicken Alfredo sit for a few minutes after removing it from the oven; this will help it set up nicely for serving.

    You can also experiment with adding different herbs or spices to customize the flavor profile according to your taste. If you want to enhance the creaminess, consider swirling in some cream cheese before baking. Enjoy your delicious Keto Chicken Alfredo Bake!

    Lemon Herb Grilled Chicken

    grilled chicken with lemon herbs

    Lemon Herb Grilled Chicken is a delightful and invigorating dish that perfectly embodies the flavors of summer. This recipe isn't only quick and easy to prepare but also rich in healthy fats and protein, making it ideal for those following a keto lifestyle. The tangy lemon paired with fresh herbs enhances the chicken's natural flavor, creating a succulent meal that can be enjoyed on its own or served alongside a fresh salad.

    Grilling the chicken infuses it with a smoky char while keeping it juicy and tender. The marinade, which features olive oil, garlic, and a variety of herbs, guarantees that each bite is bursting with flavor. Whether you're hosting a barbecue, meal prepping for the week, or simply looking for a quick dinner option, Lemon Herb Grilled Chicken will surely impress.

    • 4 boneless, skinless chicken breasts
    • 1/4 cup olive oil
    • Juice and zest of 1 lemon
    • 3 cloves garlic, minced
    • 2 teaspoons dried oregano
    • 2 teaspoons dried thyme
    • Salt and pepper, to taste
    • Fresh parsley, chopped (for garnish)

    In a bowl, whisk together the olive oil, lemon juice, lemon zest, minced garlic, oregano, thyme, salt, and pepper to create the marinade.

    Place the chicken breasts in a resealable plastic bag or shallow dish and pour the marinade over the chicken, guaranteeing each piece is well coated. Marinate in the refrigerator for at least 30 minutes, or up to 4 hours for an even stronger flavor.

    Preheat the grill to medium-high heat, then grill the chicken for about 6-7 minutes on each side or until the internal temperature reaches 165°F. Let it rest for a few minutes before slicing, and garnish with chopped parsley.

    For an extra burst of flavor, consider adding a few sprigs of fresh herbs like rosemary or basil to the marinade. Allowing the chicken to marinate for longer not only enhances the flavor but also helps to tenderize the meat.

    Keep an eye on the chicken while it grills to avoid overcooking, as this can lead to dryness. Serve with a side of grilled vegetables or a green salad to complement the meal while keeping it keto-friendly.

    Spicy Chicken Thighs With Avocado

    spicy avocado chicken thighs

    Spicy Chicken Thighs with Avocado is an exquisite dish that combines bold flavors with creamy textures, making it a perfect choice for those on a keto diet. The succulent chicken thighs are marinated in a deliciously spicy sauce that infuses them with a rich depth of flavor.

    Paired with fresh, creamy avocado, this dish not only satisfies your taste buds but also keeps your meals keto-friendly, providing a healthy dose of fats while being low in carbohydrates.

    This recipe isn't only quick and easy to prepare, but the combination of spices can also be adjusted to suit your heat preference. Whether you're planning a family dinner or a meal prep for the week, Spicy Chicken Thighs with Avocado will surely become a staple in your kitchen.

    The juicy chicken, combined with the fresh and satisfying avocado, makes for a complete meal that's both nutritious and utterly delicious.

    Ingredients:

    • 4 chicken thighs, skin-on and bone-in
    • 2 tablespoons olive oil
    • 2 tablespoons spicy chili powder
    • 1 teaspoon garlic powder
    • 1 teaspoon onion powder
    • 1 teaspoon smoked paprika
    • Salt and pepper to taste
    • 1 avocado, peeled and diced
    • Fresh cilantro, for garnish
    • Lime wedges, for serving

    To prepare this dish, start by preheating your oven to 400°F (200°C). In a mixing bowl, combine olive oil, chili powder, garlic powder, onion powder, smoked paprika, salt, and pepper to create a marinade.

    Coat the chicken thighs thoroughly in the marinade and place them on a baking tray lined with parchment paper. Bake the chicken for about 25-30 minutes, or until the skin is crispy and the internal temperature reaches 165°F (75°C).

    Once out of the oven, allow the chicken to rest for a few minutes before serving it alongside the diced avocado and garnished with fresh cilantro and lime wedges.

    For the best results, let the chicken marinate for at least 30 minutes (or even overnight) to enhance the flavor. Feel free to adjust the level of spiciness according to your palate by adding more or less chili powder.

    You can also serve this dish with a side of leafy greens or zucchini noodles for an extra boost of nutrients while maintaining a low-carb profile. Enjoy your flavorful and satisfying meal!

    Cheesy Broccoli Chicken Casserole

    cheesy broccoli chicken bake

    If you're looking for a comforting and satisfying dish that aligns with your keto lifestyle, the Cheesy Broccoli Chicken Casserole is the perfect choice. This delicious casserole is packed with protein-rich chicken and nutrient-dense broccoli, all smothered in a creamy, cheesy sauce that makes it irresistible.

    It's not only low in carbs but also gluten-free, so it fits seamlessly into various dietary preferences while still being a crowd-pleaser for all.

    This dish is incredibly versatile; you can easily add other keto-friendly ingredients such as cauliflower rice or mushrooms to enhance the flavors and texture.

    Whether you're meal prepping for the week or looking for a hearty dinner option, this casserole is both simple to prepare and satisfying after a long day. With just a few basic ingredients and minimal prep work, you can enjoy a wholesome, cheesy delight that the whole family will love.

    • 2 cups cooked, shredded chicken
    • 2 cups fresh broccoli florets
    • 1 cup heavy cream
    • 1 cup shredded cheddar cheese
    • 1/2 cup cream cheese, softened
    • 1 teaspoon garlic powder
    • 1 teaspoon onion powder
    • Salt and pepper to taste
    • 1/2 cup grated Parmesan cheese

    Preheat your oven to 350°F (175°C). In a large mixing bowl, combine the shredded chicken, broccoli florets, heavy cream, cream cheese, garlic powder, onion powder, salt, and pepper; mix until well combined.

    Transfer the mixture to a greased 9×13 inch baking dish and spread it evenly. Top the casserole with shredded cheddar cheese and grated Parmesan cheese. Bake in the preheated oven for 25-30 minutes, or until the cheese is melted and bubbly.

    For best results, make sure to thoroughly cook your chicken beforehand to avoid any added moisture during baking, which can make the casserole watery.

    Additionally, you can create a crispy topping by broiling the casserole for an additional 2-3 minutes after baking to give it a golden texture. Feel free to experiment with different cheeses or add in some fresh herbs for extra flavor!

    Buffalo Chicken Lettuce Wraps

    spicy chicken in lettuce

    Buffalo Chicken Lettuce Wraps are a delicious and low-carb alternative to traditional buffalo chicken wings. These wraps offer the perfect balance of spicy and tangy flavors all while keeping with a ketogenic lifestyle. The crispiness of the lettuce and the savory, spicy filling provide a satisfying meal that can be made quickly, making it ideal for busy weeknights or game day gatherings.

    Using simple ingredients, these wraps can be tailored to your taste by adjusting the level of spiciness in the buffalo sauce. The chicken can be shredded or diced, and you can add toppings like blue cheese or ranch dressing for an extra layer of flavor.

    Whether you're hosting a party or just enjoying a casual meal at home, Buffalo Chicken Lettuce Wraps are sure to please everyone while keeping it keto-friendly.

    • 2 cups cooked shredded chicken
    • 1/2 cup buffalo sauce
    • 1 cup celery, diced
    • 1/4 cup green onions, sliced
    • 1 head of romaine lettuce (or butter lettuce)
    • 1/2 cup shredded cheese (cheddar or blue cheese)
    • Optional toppings: ranch dressing, crumbled blue cheese, extra chopped green onions

    In a large mixing bowl, combine the shredded chicken, buffalo sauce, diced celery, and sliced green onions. Mix until all the ingredients are well-coated in the buffalo sauce.

    Wash and separate the lettuce leaves, and spoon the buffalo chicken mixture onto each leaf. Top with shredded cheese and any additional toppings you prefer, then wrap and enjoy!

    For an extra crunch and flavor, consider toasting some almonds or pecans to sprinkle on top before serving. Additionally, for those who appreciate a bit of zest, a drizzle of lemon juice or a dash of hot sauce can elevate the overall taste profile.

    Don't hesitate to mix up the toppings; ingredients like avocado or sliced jalapeños can add a unique twist to these wraps.

    Coconut Curry Chicken

    coconut infused chicken curry

    Coconut Curry Chicken is a delightful keto-friendly dish that combines rich flavors with a creamy texture. This recipe is perfect for those who love the warmth of spices and the comforting taste of coconut milk. The combination of tender chicken, aromatic spices, and creamy coconut creates a satisfying meal that can be served over cauliflower rice or enjoyed on its own.

    Cooking Coconut Curry Chicken isn't only easy, but it also allows you to experiment with spices and adjust the heat level to your preference. This dish is a great way to incorporate healthy fats while keeping your carbohydrate intake low, making it a favorite among those following a ketogenic diet. With a balance of savory and slightly sweet flavors, this dish is sure to become a household staple.

    Ingredients:

    • 1 pound chicken thighs, boneless and skinless, cut into bite-sized pieces
    • 1 can (14 oz) coconut milk
    • 2 tablespoons coconut oil
    • 1 medium onion, chopped
    • 2 cloves garlic, minced
    • 1 tablespoon fresh ginger, minced
    • 2 tablespoons red curry paste
    • 1 cup bell peppers, sliced (any color)
    • 1 cup spinach leaves
    • Salt and pepper to taste
    • Fresh cilantro for garnish (optional)

    In a large skillet or pot, heat the coconut oil over medium heat. Add the chopped onion, garlic, and ginger, sautéing until fragrant and the onion is translucent. Stir in the red curry paste, followed by the chicken pieces, and cook until the chicken is browned on all sides.

    Pour in the coconut milk, bring to a simmer, and cook for about 15-20 minutes, or until the chicken is cooked through and the sauce has thickened. Stir in the bell peppers and spinach, cooking for an additional 2-3 minutes until the peppers are slightly softened.

    When preparing Coconut Curry Chicken, consider your spice level preferences; you can adjust the amount of red curry paste for more or less heat. Additionally, if you prefer a thicker curry, let it simmer longer to reduce the liquid.

    Don't forget to garnish with fresh cilantro for an added burst of freshness, and serve the curry alongside keto-friendly sides like cauliflower rice or steamed broccoli for a complete meal.

    Chicken Parmesan Zucchini Boats

    cheesy stuffed zucchini boats

    Chicken Parmesan Zucchini Boats are a delicious and low-carb twist on the classic Italian dish. These zucchini "boats" are filled with seasoned ground chicken, marinara sauce, and topped with melty mozzarella cheese, all while keeping the carbs in check for a satisfying keto meal.

    This recipe isn't only wholesome but also allows for easy meal prep, making it a great option for busy weeknights or a quirky dinner when you want to impress guests.

    The zucchini acts as a perfect vessel, allowing you to enjoy all the flavors of Chicken Parmesan without the added carbs from traditional pasta. With just a few simple ingredients, you can whip up this healthy and tasty dish in under an hour.

    The combination of fresh herbs and cheese guarantees each bite is packed full of flavor while keeping the dish light and nutritious.

    Ingredients:

    • 2 medium zucchinis
    • 1 pound ground chicken
    • 1 cup marinara sauce (sugar-free for keto)
    • 1 cup shredded mozzarella cheese
    • 1/2 cup grated Parmesan cheese
    • 1 teaspoon garlic powder
    • 1 teaspoon onion powder
    • 1 teaspoon dried Italian herbs (or oregano)
    • Salt and pepper to taste
    • Fresh basil for garnish

    Preheat the oven to 375°F (190°C). Slice the zucchinis in half lengthwise and scoop out the seeds to create boats.

    In a skillet over medium heat, cook the ground chicken until browned, then add the garlic powder, onion powder, Italian herbs, salt, and pepper. Stir in the marinara sauce and remove from heat.

    Fill each zucchini boat with the chicken mixture, top with mozzarella and Parmesan cheese, and place in a baking dish. Bake for 25-30 minutes or until the zucchinis are tender and the cheese is bubbly and golden.

    For the best results, make certain not to overcook the zucchini; they should remain slightly firm to hold the filling well.

    If you want extra flavor, consider adding a sprinkle of red pepper flakes for a spicy kick or swapping out the marinara sauce for a homemade basil pesto for a fresh twist.

    Finally, you can also prepare the filling in advance and assemble the zucchini boats right before baking to simplify the cooking process. Enjoy your delicious and guilt-free Chicken Parmesan Zucchini Boats!

    Garlic Butter Chicken and Asparagus

    garlic butter chicken dish

    Garlic Butter Chicken and Asparagus is a wholesome, low-carb dish that packs a flavor punch while adhering to the ketogenic lifestyle. The succulent chicken breasts are seared in rich, aromatic garlic butter and paired with tender asparagus, making it a perfect option for a quick weeknight dinner or a meal prep staple. This recipe not only keeps you on track with your macros but also delights your taste buds with its savory and buttery goodness.

    The simplicity of this dish allows the natural flavors of the ingredients to shine through. The combination of garlic and butter creates a luscious sauce that complements the chicken perfectly while the asparagus adds a fresh, crisp texture to every bite. Plus, it takes just about 30 minutes from start to finish, making it an easy yet impressive meal that your family will love.

    • 4 boneless, skinless chicken breasts
    • 1 bunch asparagus, ends trimmed
    • 4 tablespoons butter
    • 4 cloves garlic, minced
    • 1 teaspoon salt
    • 1/2 teaspoon pepper
    • 1 teaspoon paprika
    • 1 tablespoon olive oil
    • Fresh parsley, chopped (for garnish, optional)

    Heat a large skillet over medium-high heat and add olive oil. Season the chicken breasts with salt, pepper, and paprika, then place them in the skillet. Cook for about 5-6 minutes on each side until golden brown and cooked through, then remove and set aside.

    In the same skillet, melt the butter and add minced garlic, sautéing for about 30 seconds until fragrant. Add the trimmed asparagus and cook for 3-4 minutes until tender-crisp, then return the chicken to the skillet, spooning the garlic butter sauce over everything, and cook for another minute before serving.

    When preparing Garlic Butter Chicken and Asparagus, consider using fresh, high-quality ingredients to enhance the dish's flavors. You can customize the seasonings according to your preference, adding herbs like thyme or rosemary for an extra herbal note.

    If you prefer, substitute the asparagus with other low-carb vegetables such as green beans or zucchini to keep the dish varied and exciting. Make sure not to overcook the chicken to retain its juiciness, and let it rest for a couple of minutes before slicing, as this will keep it moist and flavorful.

    Mediterranean Chicken With Olives

    savory mediterranean chicken dish

    Mediterranean Chicken with Olives is a delightful dish that combines juicy chicken thighs with the savory flavors of the Mediterranean. This recipe highlights the rich taste of olives, sun-dried tomatoes, and aromatic herbs that give it a distinct character, making it perfect for keto enthusiasts and those looking for a satisfying meal. The vibrant ingredients not only elevate the taste but also provide a dose of healthy fats and nutrients.

    Cooking this dish is simple and requires minimal preparation, making it an ideal choice for busy weeknights or leisurely weekend dinners. Serve it with a side of your favorite low-carb vegetables or a fresh salad to complete the meal, and enjoy the explosion of flavors that this Mediterranean-inspired dish brings to your table.

    Ingredients:

    • 4 chicken thighs (skin-on, bone-in)
    • 1 cup green olives, pitted and halved
    • 1 cup cherry tomatoes, halved
    • 4 cloves garlic, minced
    • 1 teaspoon dried oregano
    • 1 teaspoon dried basil
    • 1 teaspoon paprika
    • Salt and pepper, to taste
    • 2 tablespoons olive oil
    • 1 lemon, juiced
    • Fresh parsley, for garnish

    Sear the chicken thighs in a skillet over medium-high heat with olive oil until golden brown, about 5 minutes per side.

    Once browned, add minced garlic, oregano, basil, paprika, salt, and pepper, and stir in the olives, tomatoes, and lemon juice. Cover the skillet and let the chicken simmer on low for 30-35 minutes, or until cooked through and tender.

    Garnish with fresh parsley before serving.

    When making Mediterranean Chicken with Olives, choosing high-quality olives can really enhance the dish's flavors, so opt for brined or marinated varieties for the best results.

    Additionally, feel free to customize the recipe by adding other vegetables like bell peppers or zucchini, which pair well with the Mediterranean theme. Cooking on low heat allows the flavors to meld beautifully, so don't rush the simmering process.

    Enjoy your culinary adventure!

    One-Pan Chicken Fajitas

    easy one pan fajitas recipe

    One-Pan Chicken Fajitas are the perfect meal for those looking to enjoy bold flavors without the hassle of extensive cleanup. This dish isn't only keto-friendly but also quick to prepare, making it an ideal choice for busy weeknights or a cozy family dinner.

    With tender chicken, colorful bell peppers, and zesty spices, these fajitas deliver all the satisfaction of a classic recipe while keeping your dietary goals in check.

    With everything cooked on a single baking sheet, you can have minimal dishes to wash afterward. This recipe allows the chicken to soak up the flavors of the vegetables and seasonings, enhancing the overall taste. Serve the fajitas with guacamole or a dollop of sour cream to elevate the meal even further without adding carbs.

    Ingredients:

    • 1 lb. boneless, skinless chicken breasts, sliced
    • 2 bell peppers (any color), sliced
    • 1 medium onion, sliced
    • 2 tablespoons olive oil
    • 2 teaspoons chili powder
    • 1 teaspoon cumin
    • 1 teaspoon garlic powder
    • 1 teaspoon onion powder
    • 1/2 teaspoon paprika
    • Salt and pepper to taste
    • Fresh cilantro for garnish (optional)
    • Lime wedges for serving (optional)

    Preheat your oven to 400°F (200°C). In a large bowl, combine the sliced chicken, bell peppers, onion, olive oil, chili powder, cumin, garlic powder, onion powder, paprika, salt, and pepper.

    Toss well until the chicken and vegetables are evenly coated. Spread the mixture evenly onto a lined baking sheet and roast for 20-25 minutes, or until the chicken is cooked through and the vegetables are tender.

    Serve warm, garnished with fresh cilantro and lime wedges if desired. For a personalized touch, feel free to experiment with different seasonings or add other veggies like zucchini or mushrooms to the mix.

    Additionally, you can serve the fajitas in lettuce wraps for a fun, low-carb alternative to traditional tortillas. Leftovers can be stored in an airtight container in the refrigerator for up to three days, making it an excellent option for meal prep.

    Enjoy your colorful and delicious One-Pan Chicken Fajitas!

    BBQ Chicken Cauliflower Pizza

    bbq chicken cauliflower pizza

    BBQ Chicken Cauliflower Pizza is a delicious and satisfying twist on traditional pizza that's perfect for those following a ketogenic diet. This recipe uses a cauliflower crust, which is low in carbohydrates and packed with nutrients. Topped with BBQ sauce, shredded chicken, and a medley of cheese, this pizza isn't only healthy but also bursting with flavor. It's a great way to enjoy a favorite dish while staying aligned with your dietary goals.

    The beauty of this BBQ Chicken Cauliflower Pizza lies in its versatility; you can customize the toppings according to your preferences. Whether you prefer a little extra spice with jalapeños or a drizzle of ranch dressing on top, the possibilities are endless. Plus, it's an excellent way to introduce more vegetables into your diet while enjoying the comfort of pizza night at home.

    Ingredients:

    • 1 medium head of cauliflower
    • 1 cup shredded chicken (cooked)
    • 1/2 cup sugar-free BBQ sauce
    • 1 1/2 cups shredded mozzarella cheese
    • 1/2 cup shredded cheddar cheese
    • 1 egg
    • 1 teaspoon garlic powder
    • 1 teaspoon onion powder
    • 1 teaspoon Italian seasoning
    • Salt and pepper to taste
    • Olive oil (for greasing)

    Preheat your oven to 425°F (220°C). Start by cutting the cauliflower into florets and steaming them until tender.

    Once cooked, allow the cauliflower to cool slightly, then chop it finely or pulse in a food processor. Strain any excess moisture using a clean kitchen towel. In a mixing bowl, combine the cauliflower, shredded chicken, BBQ sauce, 1 cup of mozzarella cheese, egg, garlic powder, onion powder, Italian seasoning, salt, and pepper.

    Form the mixture into a crust shape on a greased baking sheet, then bake for 25-30 minutes or until golden brown. Remove from the oven, add the remaining mozzarella and cheddar cheese on top, and return to the oven until melted and bubbly.

    When making BBQ Chicken Cauliflower Pizza, make sure you thoroughly drain the cauliflower to prevent a soggy crust, as excess moisture can affect the texture. Experiment with different barbecue sauces that fit your dietary needs, and consider adding toppings like red onions, cilantro, or even avocado for additional flavors and textures.

    Let the pizza cool for a few minutes before slicing to help it hold its shape better. Enjoy your healthy, keto-friendly pizza creation!

  • 15 Quick Lunch Recipes for Busy Days

    If you're looking for quick lunch recipes to fit into your busy schedule, try some delicious options like a Veggie Wrap with Hummus, packed with fresh veggies and creamy hummus. Or whip up a Quinoa Salad with Black Beans for a filling, nutritious bite. A Greek Yogurt Parfait's great for a sweet treat, while a Spinach and Feta Omelette offers a savory twist. You'll discover even more tasty ideas that make meal prep a breeze!

    Veggie Wrap With Hummus

    hummus filled veggie wrap

    Veggie wraps with hummus are a delightful and nutritious option for a quick lunch that's both satisfying and packed with flavor. This recipe allows for endless customization, as you can swap out vegetables or add protein according to your preference. Perfect for busy days, these wraps are easy to prepare and can be made in advance, making them an excellent choice for meal prep or picnics.

    With fresh vegetables rolled in a soft tortilla and smeared with creamy hummus, each bite is a burst of freshness. The combination of textures and tastes not only makes it enjoyable but also guarantees you get a healthy dose of vitamins and minerals. Whether you're eating at home, in the office, or on the go, these veggie wraps provide a tasty solution to your lunch cravings.

    Ingredients:

    • 1 large whole wheat tortilla or wrap
    • 1/2 cup hummus
    • 1/2 cup sliced bell peppers (any color)
    • 1/2 cup shredded carrots
    • 1/4 cup cucumber, sliced
    • 1/4 cup spinach or mixed greens
    • 1/4 avocado, sliced (optional)
    • Salt and pepper to taste

    Spread the hummus evenly over the tortilla, leaving a small border around the edges. Layer the sliced bell peppers, shredded carrots, cucumber, spinach, and avocado (if using) on top of the hummus. Season the vegetables with salt and pepper, then carefully roll the tortilla tightly from one end to the other. Slice the wrap in half and enjoy!

    For an extra flavor boost, consider adding a sprinkle of feta cheese or a dash of balsamic glaze before rolling your wrap. Feel free to experiment with different vegetables or even grains, like quinoa or brown rice, for added texture and nutrients.

    These wraps can also be made ahead of time and stored in the refrigerator; just make sure to keep them tightly wrapped to maintain freshness.

    Quinoa Salad With Black Beans

    nutritious quinoa black bean salad

    Quinoa Salad with Black Beans is a delicious and nutritious option for those seeking a quick and healthy lunch. This dish is packed with protein, fiber, and essential nutrients, making it an excellent choice whether you're prepping for a busy week or simply want to enjoy a fresh meal. Not only is it easy to prepare, but it also incorporates a variety of vibrant vegetables and flavorful ingredients, providing a satisfying meal that can be enjoyed on its own or as a side.

    In addition to being tasty, quinoa salad is versatile. You can easily customize it by adding your favorite ingredients, such as avocado, corn, or diced peppers, to enhance both flavor and texture. The great thing about this dish is that it can be served chilled or at room temperature, making it perfect for meal prep or packed lunches. Plus, it can last in the fridge for several days, allowing the flavors to meld perfectly over time.

    Ingredients:

    • 1 cup quinoa
    • 2 cups water or vegetable broth
    • 1 can (15 oz) black beans, rinsed and drained
    • 1 cup cherry tomatoes, halved
    • 1 bell pepper, diced
    • ½ red onion, finely chopped
    • 1 cup corn (fresh, frozen, or canned)
    • ¼ cup fresh cilantro, chopped
    • Juice of 2 limes
    • 3 tablespoons olive oil
    • 1 teaspoon cumin
    • Salt and pepper to taste

    To cook the quinoa, rinse it under cold water, then combine it with water or vegetable broth in a saucepan. Bring it to a boil, then reduce to a simmer, cover, and cook for about 15 minutes or until the liquid is absorbed. Once done, fluff the quinoa with a fork and let it cool slightly.

    In a large bowl, combine the cooked quinoa, black beans, cherry tomatoes, bell pepper, red onion, corn, and cilantro. Drizzle with lime juice and olive oil, then sprinkle with cumin, salt, and pepper. Mix well until all ingredients are combined.

    When making this salad, feel free to adjust the seasoning and ingredients according to your taste. For added flavor, consider marinating the black beans with lime juice and spices beforehand. If you prefer a bit of heat, add some chopped jalapeños or a pinch of cayenne pepper.

    Additionally, this salad can be easily transformed into a meal by adding grilled chicken, shrimp, or tofu, making it suitable for various dietary preferences. Store leftovers in an airtight container in the fridge for up to five days.

    Caprese Sandwich

    fresh mozzarella tomato basil

    The Caprese sandwich is a delightful and invigorating dish that combines the flavors of Italy in a simple yet satisfying way. Originating from the beautiful island of Capri, this sandwich is inspired by the classic Caprese salad, which features fresh mozzarella, tomatoes, basil, and a drizzle of olive oil. Perfect for a quick lunch, it highlights the quality of its ingredients while delivering a burst of flavor with every bite.

    To create a Caprese sandwich, choose the freshest ingredients you can find. The contrast between the creamy mozzarella, juicy tomatoes, and aromatic basil makes for a balanced and delicious meal that's not only easy to prepare but also visually appealing.

    Pair it with a crusty baguette or ciabatta bread for added texture and warmth. This sandwich is ideal for picnic outings, a light lunch at home, or even as a part of a larger spread for gatherings.

    • Fresh mozzarella cheese, sliced
    • Ripe tomatoes, sliced
    • Fresh basil leaves
    • Balsamic glaze or reduction
    • Extra virgin olive oil
    • Salt and pepper
    • Ciabatta or baguette bread

    To assemble the sandwich, slice the ciabatta or baguette in half horizontally. Layer the bottom half with slices of fresh mozzarella and tomatoes, followed by a generous handful of fresh basil leaves. Drizzle with balsamic glaze and olive oil, then season with salt and pepper to taste.

    Finally, place the top half of the bread on the sandwich and press down lightly before slicing it in half for serving.

    For the best Caprese sandwich experience, make sure to use the ripest and freshest tomatoes you can find to enhance the flavor profile. You can also try marinating the mozzarella in olive oil with herbs for added depth.

    If you love a bit of a kick, consider adding some arugula or spinach for an additional layer of flavor. Enjoy the sandwich fresh, as it tends to lose its charm if left to sit for too long; it's best savored soon after assembling.

    Greek Yogurt Parfait

    creamy yogurt fruit layers

    Greek yogurt parfaits are the perfect quick lunch option for those seeking a nutritious and satisfying meal. Packed with protein, calcium, and probiotics, Greek yogurt serves as the base for this delightful dish. Layering the yogurt with fresh fruits, nuts, and a drizzle of honey not only elevates the flavor but also creates a visually appealing presentation, making it a great choice for both adults and kids.

    Preparing a Greek yogurt parfait is incredibly simple and can be customized to suit your taste preferences. Whether you're using berries, bananas, or even granola, the combinations are endless. This healthy yet delicious parfait can be made ahead of time, making it an ideal choice for busy weekdays or a quick nutritious snack any time of the day.

    • 1 cup plain Greek yogurt
    • 1 cup mixed fresh fruits (berries, banana slices, or chopped apples)
    • 1/4 cup granola
    • 1 tablespoon honey (optional)
    • 1 tablespoon nuts (almonds, walnuts, or pecans)

    In a clear glass or bowl, begin by spooning a layer of Greek yogurt at the bottom, followed by a layer of fresh fruits, a sprinkle of granola, and a drizzle of honey if desired. Repeat the layers until the glass is filled, finishing with a layer of fruit on top for garnish. Optionally, you can sprinkle nuts on top for added crunch before serving.

    For ideal freshness, consider preparing individual parfaits in mason jars that can be easily sealed and stored in the refrigerator. This allows for a quick grab-and-go lunch or snack throughout the week.

    Feel free to vary the toppings and flavors—using flavored Greek yogurt or adding a sprinkle of cinnamon can also add unique tastes to your parfait.

    Spinach and Feta Omelette

    spinach and feta omelette recipe

    A Spinach and Feta Omelette is a delightful option for a quick lunch, packed with fresh greens and tangy cheese. This dish not only comes together in just a few minutes, but it also offers a nutritious boost, making it perfect for anyone looking to eat healthy without sacrificing flavor.

    With its vibrant colors and savory taste, this omelette can easily become a go-to recipe in your culinary repertoire. The combination of spinach and feta provides a delicious contrast of textures and tastes, while the eggs serve as a perfect base.

    Whether you're preparing this dish for yourself or for company, the Spinach and Feta Omelette is a crowd-pleaser sure to impress with its simplicity and elegance. Serve it alongside a fresh salad or some whole-grain toast for a complete meal that satisfies your hunger without feeling heavy.

    • 3 large eggs
    • 1 cup fresh spinach, chopped
    • 1/4 cup feta cheese, crumbled
    • 1 tablespoon olive oil or butter
    • Salt and pepper to taste
    • Optional: diced onions or tomatoes for added flavor

    Start by beating the eggs in a bowl and seasoning with salt and pepper. In a non-stick skillet, heat the olive oil or butter over medium heat.

    Add the chopped spinach and any optional ingredients, sautéing until the spinach is wilted. Pour the beaten eggs over the spinach, tilting the pan to evenly distribute. Cook for a few minutes until the edges start to set, then sprinkle the feta cheese on top.

    Carefully fold the omelette in half and let it cook for another minute or until fully set before serving. For the best results, make sure the skillet is preheated before adding the eggs, as this helps create a fluffy texture.

    If you prefer a creamier omelette, you can add a splash of milk or cream to the beaten eggs. Feel free to customize your omelette by adding additional ingredients like herbs or spices to elevate the flavor. Enjoy it fresh off the stove for a satisfying lunch!

    Instant Noodle Stir-Fry

    quick and easy meal

    Instant noodle stir-fry is a quick and delicious way to create a satisfying meal in a matter of minutes. Perfect for those busy days when you need something easy and flavorful, this dish combines the convenience of instant noodles with fresh vegetables and savory sauces.

    Whether you're at home or in a hurry at work, this recipe will keep your lunch exciting and enjoyable.

    With its customizable nature, you can use whatever vegetables and proteins you have on hand. It's a great way to minimize food waste while enjoying a hearty and filling dish. Plus, you can easily adapt the flavors to suit your preferences by changing the sauce or adding spices.

    In just a few simple steps, you can create a delightful stir-fry that's sure to brighten up your lunch routine.

    Ingredients:

    • 1 package of instant noodles
    • 1 cup mixed vegetables (such as bell peppers, broccoli, and carrots)
    • 1 tablespoon vegetable oil
    • 1 clove garlic, minced
    • 1 tablespoon soy sauce
    • 1 teaspoon sesame oil
    • Optional protein (tofu, chicken, shrimp, or beef)
    • Green onions for garnish

    Cook the instant noodles according to the package instructions, then drain and set aside.

    In a large skillet or wok, heat the vegetable oil over medium-high heat. Add the minced garlic and stir-fry for about 30 seconds until fragrant. If using protein, add it now and cook until it's fully cooked.

    Next, toss in the mixed vegetables and stir-fry for 2-3 minutes. Finally, add the cooked noodles, soy sauce, and sesame oil, stirring everything together until well combined and heated through. Garnish with chopped green onions before serving.

    For an extra flavor boost, feel free to experiment with different sauces or spices like chili paste, ginger, or even a splash of lime juice for a zesty twist.

    You can also get creative with the vegetables you choose, incorporating whatever's fresh or leftover in your fridge. Remember, the beauty of stir-frying is that it only takes a few minutes, so have everything prepped and ready to go before you start cooking!

    Chicken Caesar Salad

    grilled chicken romaine dressing

    Chicken Caesar Salad is a classic dish that elegantly combines the flavors of juicy chicken with crisp romaine lettuce and a creamy dressing, making it a perfect quick lunch option. This salad can be enjoyed on its own or paired with a slice of crusty bread for a more filling meal. With its simple yet satisfying ingredients, you can enjoy a restaurant-quality dish right from your kitchen in no time.

    The preparation of Chicken Caesar Salad not only focuses on the mouth-watering taste but also on how effortlessly the ingredients come together. By using grilled chicken, fresh greens, and a rich Caesar dressing, this salad brings a delightful crunch and savory flavor that makes it a favorite among many. It's versatile enough to cater to those who enjoy a light, healthy meal while still feeling indulgent, thanks to the addition of parmesan cheese and croutons.

    Ingredients:

    • 2 boneless, skinless chicken breasts
    • Salt and pepper, to taste
    • 4 cups romaine lettuce, chopped
    • 1/2 cup Caesar dressing
    • 1/4 cup grated Parmesan cheese
    • 1 cup croutons
    • Optional: lemon wedges for serving

    To prepare the Chicken Caesar Salad, begin by seasoning the chicken breasts with salt and pepper, then grill or pan-cook them over medium heat until fully cooked and lightly browned, about 5-7 minutes per side. Once done, let the chicken rest for a few minutes before slicing it into strips.

    In a large bowl, combine the chopped romaine lettuce, Caesar dressing, grated Parmesan, and croutons, tossing everything together well. Finally, add the sliced chicken on top, and optionally garnish with lemon wedges before serving.

    For an enhanced flavor profile, consider marinating the chicken in a mixture of olive oil, garlic, and lemon juice for 30 minutes before cooking. This not only adds an extra layer of taste but can also keep the chicken moist.

    Additionally, feel free to incorporate other ingredients like cherry tomatoes, avocado, or even bacon bits to customize your salad further!

    Pita Pocket With Turkey and Avocado

    turkey avocado pita sandwich

    Creating a quick and delicious lunch is simple with the Pita Pocket with Turkey and Avocado. This delightful dish combines the smoky flavor of turkey with the creamy texture of avocado, all nestled within a soft pita pocket. It's a perfect balance of protein and healthy fats, making it not only satisfying but also nutritious.

    It's an ideal meal for busy weekdays or a relaxed weekend lunch. Pita pockets are versatile and can be filled with a variety of ingredients, but the combination of turkey and avocado elevates it to a whole new level.

    Add in fresh vegetables like lettuce, tomato, or cucumber for extra crunch and flavor. This recipe is quick to prepare and can be customized to fit your taste, so you can enjoy a different twist each time you make it.

    • Whole wheat pita bread
    • Sliced turkey breast
    • Ripe avocado
    • Lettuce leaves
    • Tomato, sliced
    • Cucumber, sliced
    • Salt and pepper, to taste
    • Optional: Mustard or mayonnaise

    To prepare your Pita Pocket with Turkey and Avocado, start by slicing the pita bread in half to create pockets.

    Mash the avocado in a bowl and season it with a pinch of salt and pepper. Spread the mashed avocado inside each pita half. Layer in the sliced turkey, then add the lettuce, tomato, and cucumber slices.

    Finally, if desired, add a thin spread of mustard or mayonnaise before closing the pita and enjoying.

    When making your pita pocket, choose a ripe avocado as it will be creamy and flavorful, enhancing the overall taste.

    If you're preparing this ahead of time, store the ingredients separately to prevent the pita from becoming soggy. You can also experiment with additional fillings, such as cheese or sprouts, for added texture and taste.

    Vegetable Fried Rice

    fried rice with vegetables

    Vegetable Fried Rice is a versatile and quick dish that can be easily customized based on your personal preferences and the vegetables you have on hand. It's a perfect option for a filling lunch that can be made in less than 30 minutes. The combination of colorful vegetables, tender grains, and savory seasonings creates a delightful taste and texture that will satisfy both your hunger and your taste buds.

    This dish isn't only delicious; it's also a great way to use up leftover rice and vegetables from previous meals. Whether it's a mix of frozen peas and carrots, bell peppers, onions, or any other favorites you have in your fridge, vegetable fried rice is a great way to clear out your produce while whipping up a tasty meal. Simple ingredients come together to create a satisfying dish that can serve as a standalone meal or a side dish for your next dinner.

    Ingredients:

    • 2 cups cooked rice (preferably cold)
    • 1 tablespoon vegetable oil
    • 1 small onion, diced
    • 1 cup mixed vegetables (e.g., peas, carrots, corn)
    • 2 cloves garlic, minced
    • 2 tablespoons soy sauce
    • 1 teaspoon sesame oil
    • 2 green onions, chopped
    • Salt and pepper to taste
    • Optional: 1 egg (or tofu for a vegan version)

    Heat the vegetable oil in a large skillet or wok over medium-high heat. Add the diced onion and sauté until softened, then stir in the mixed vegetables and garlic. Cook for an additional 2-3 minutes until the vegetables are tender.

    Add the cold rice, breaking up any clumps, and stir-fry for about 5 minutes, allowing the rice to heat through. Pour in the soy sauce and sesame oil, mixing well, and season with salt and pepper. If using, push the rice to the side, crack an egg into the pan, scramble it, and then mix it into the rice. Finally, fold in the chopped green onions right before serving.

    To enhance the flavor of your vegetable fried rice, consider using day-old rice, as it tends to fry better and prevents sticking. Feel free to add your favorite sauces, like sriracha or hoisin sauce, for an extra kick. Experiment with different vegetables or proteins to keep the recipe fresh and exciting. With just a few simple adjustments, you can make this dish your own!

    BLT Lettuce Wraps

    healthy wrap with bacon

    BLT Lettuce Wraps are a fresh and satisfying alternative to traditional sandwiches, making them a perfect quick lunch option. The crispness of lettuce combined with juicy tomatoes and crispy bacon creates a delightful contrast in textures, while the mayonnaise adds a creamy element that ties everything together.

    These wraps aren't only healthy but customizable, allowing you to add your favorite toppings or ingredients based on your preferences. Preparing BLT Lettuce Wraps is incredibly simple, making them an ideal choice when time is of the essence.

    This recipe allows you to enjoy classic flavors without the heaviness of bread, and they can be made in just a few minutes. Whether you're at home or need a portable lunch for work, these wraps are sure to satisfy your hunger without weighing you down.

    • Romaine or iceberg lettuce leaves
    • Cooked bacon strips
    • Ripe tomatoes, sliced
    • Mayonnaise
    • Salt and pepper to taste

    Start by washing and drying the lettuce leaves to guarantee they're crisp and fresh. Lay the leaves flat and spread a thin layer of mayonnaise on each one, then layer the crispy bacon, tomato slices, and season with salt and pepper.

    Carefully fold the leaf over the fillings, or you can roll it up burrito-style if you have larger leaves. Secure with a toothpick if needed, and enjoy immediately.

    When preparing BLT Lettuce Wraps, choose large, sturdy lettuce leaves to hold the fillings without tearing. If you want to add a twist, consider including avocado slices for creaminess or a drizzle of hot sauce for an extra kick.

    These wraps can be made ahead of time, but for the best taste, assemble them shortly before serving to keep the lettuce fresh and crisp.

    Chickpea Salad Sandwich

    chickpea salad sandwich recipe

    Chickpea salad sandwiches are a delightful and nutritious option for a quick lunch. Packed with protein and flavor, they serve as a fantastic alternative to traditional tuna or chicken salad sandwiches, making them perfect for vegetarians or anyone looking to add some plant-based goodness to their diet. This vibrant salad not only provides variety but also embraces a laid-back approach to cooking—ideal for busy weekdays or casual meals at home.

    The heart of this recipe is canned chickpeas, which are a fantastic source of fiber and protein. Combined with fresh vegetables and creamy elements, this sandwich is both satisfying and invigorating. You can customize it according to your taste preferences, adding in other ingredients like avocado or sprouts for an extra boost. Enjoy it on your favorite type of bread, or even in a lettuce wrap for a low-carb option.

    Ingredients:

    • 1 can (15 ounces) chickpeas, drained and rinsed
    • 1/4 cup celery, finely chopped
    • 1/4 cup red onion, finely chopped
    • 1/4 cup bell pepper, diced
    • 1/4 cup mayonnaise (or vegan alternative)
    • 1 tablespoon Dijon mustard
    • 1 tablespoon lemon juice
    • Salt and pepper, to taste
    • Bread or wraps of choice
    • Lettuce leaves (optional)

    In a medium bowl, mash the chickpeas with a fork until they're mostly smooth but still have some texture. Mix in the chopped celery, red onion, and bell pepper.

    In a separate bowl, whisk together the mayonnaise, Dijon mustard, lemon juice, salt, and pepper. Pour the dressing over the chickpea mixture and mix until well combined. Serve the salad on slices of bread or in wraps, adding lettuce leaves if desired.

    For extra flavor, consider adding herbs such as parsley or dill to the salad mixture. You can also adjust the creaminess by altering the amount of mayonnaise or swapping it for Greek yogurt for a lighter option.

    If you have the time, let the salad chill in the refrigerator for about 30 minutes before assembling the sandwiches—this allows the flavors to meld beautifully. Enjoy this versatile dish as a meal prep option, as it keeps well in the fridge for a few days!

    Three-Bean Chili

    hearty three bean chili

    Three-Bean Chili is a hearty and nutritious dish that can be whipped up in no time, making it perfect for a quick lunch. Packed with protein and fiber from the beans, this chili isn't only satisfying but also provides a well-rounded meal.

    The combination of spices adds depth of flavor, ensuring that each bite is as delicious as the last. This dish is versatile, allowing you to use any beans you have on hand. A mix of kidney beans, black beans, and pinto beans provides a great variety in texture and taste. The robust flavors meld together perfectly, making it a great choice for meal prep or a cozy lunch at home.

    Serve it with some crusty bread or over a bed of rice for a complete meal.

    Ingredients:

    • 1 can kidney beans, rinsed and drained
    • 1 can black beans, rinsed and drained
    • 1 can pinto beans, rinsed and drained
    • 1 can diced tomatoes (with juice)
    • 1 medium onion, diced
    • 2 cloves garlic, minced
    • 1 bell pepper, diced (any color)
    • 2 tablespoons chili powder
    • 1 teaspoon cumin
    • Salt and pepper to taste
    • 2 tablespoons olive oil
    • Optional toppings: shredded cheese, sour cream, chopped cilantro

    In a large pot, heat olive oil over medium heat. Add the diced onion, garlic, and bell pepper; sauté until softened, about 5 minutes. Stir in the chili powder and cumin, cooking for an additional minute to release the spices' flavors.

    Add the rinsed beans and diced tomatoes, mixing well. Bring to a gentle simmer, cover, and let it cook for about 20-30 minutes, stirring occasionally. Season with salt and pepper to taste before serving.

    For added depth of flavor, consider letting the chili sit for a while, as it often tastes even better the next day after the flavors have melded together. You can also customize your chili by adding extra veggies like corn or zucchini or tweaking the spices to match your preference for heat.

    If you like a thicker chili, simmer it uncovered for the last 10 minutes to reduce some of the liquid. Enjoy experimenting with this flexible recipe!

    Shrimp Tacos With Lime Crema

    shrimp tacos with lime

    Shrimp tacos are a delightful and quick meal choice that combines the fresh flavors of seafood with vibrant toppings. These shrimp tacos aren't only incredibly tasty, but they're also versatile, allowing you to add your favorite vegetables or salsa to customize the dish to your liking. The combination of the succulent shrimp with zesty lime crema will have your taste buds dancing in delight.

    This easy-to-prepare recipe takes just a fraction of your day, making it perfect for a quick lunch. Whether you're cooking for yourself or entertaining friends, shrimp tacos can be both satisfying and fun to make. Pair them with a revitalizing side, like a light salad, and you've got yourself a fantastic meal that's sure to impress.

    • 1 pound shrimp, peeled and deveined
    • 1 tablespoon olive oil
    • 1 teaspoon chili powder
    • 1 teaspoon garlic powder
    • Salt and pepper, to taste
    • 8 small corn or flour tortillas
    • 1 cup shredded cabbage
    • 1 avocado, sliced
    • 1/4 cup fresh cilantro, chopped
    • 1 lime, cut into wedges

    In a large pan over medium heat, add olive oil and allow it to warm before adding the shrimp. Sprinkle the shrimp with chili powder, garlic powder, salt, and pepper. Cook for 2-3 minutes on each side, or until they're opaque and cooked through.

    While the shrimp are cooking, prepare the lime crema by mixing sour cream or Greek yogurt with lime juice, salt, and pepper in a small bowl. Once the shrimp are done, warm the tortillas in another pan or directly over an open flame for a few seconds on each side.

    Assemble the tacos by placing shredded cabbage on the tortilla, topped with shrimp, avocado slices, cilantro, and a drizzle of lime crema.

    For the best flavor, make sure not to overcook the shrimp, as they can become rubbery if left too long on the heat. Keep an eye on them and remove them from the pan as soon as they turn pink and opaque.

    Feel free to add toppings such as diced tomatoes or a spicy salsa for an extra kick. You can also prepare the lime crema ahead of time and store it in the refrigerator until you're ready to serve, making these tacos even easier to put together for a quick lunch.

    Rice and Bean Burrito

    rice and bean filling

    Rice and bean burritos are a quick and nutritious option for lunch that can easily be customized to suit your taste. Packed with protein and fiber, these burritos provide a satisfying meal that will keep you energized throughout the day.

    Whether you're a busy professional or managing a family, this recipe is simple enough to whip up in 30 minutes or less. To make rice and bean burritos, you really only need a few staple ingredients and a little creativity. You can use leftover rice and beans from previous meals, or cook fresh ingredients from scratch.

    These burritos aren't only filling but also versatile – feel free to add any additional vegetables or toppings you have on hand such as guacamole, salsa, or cheese. Get ready to enjoy a hearty lunch that's bursting with flavor!

    • 1 cup cooked rice (white or brown)
    • 1 can black beans, rinsed and drained
    • 1 teaspoon cumin
    • 1 teaspoon chili powder
    • Salt and pepper to taste
    • 4 large flour tortillas
    • 1 cup shredded cheese (optional)
    • Salsa and sour cream for serving (optional)

    In a large bowl, combine the cooked rice, black beans, cumin, chili powder, salt, and pepper, mixing until well combined. Lay each flour tortilla flat, then spoon an even amount of the rice and bean mixture onto the center of each tortilla. If desired, sprinkle some shredded cheese on top.

    Fold the sides of the tortilla over the filling, then roll it up tightly from the bottom to the top. Heat a non-stick skillet over medium heat and place the burritos seam-side down, cooking for about 2-3 minutes on each side until golden brown.

    When making rice and bean burritos, consider adding fresh toppings like avocado, diced tomatoes, or chopped cilantro for added flavor and freshness. You can also substitute different types of beans or grains, like quinoa or kidney beans, to mix things up.

    Allow the burritos to cool slightly before serving to avoid the fillings from spilling out, and for a special touch, serve them with a side of homemade guacamole or your favorite dipping sauce. Enjoy your quick and delicious lunch!

    Cucumber and Cream Cheese Sushi Rolls

    cucumber cream cheese sushi

    Cucumber and Cream Cheese Sushi Rolls are a revitalizing and delightful option for a quick lunch.

    These sushi rolls aren't only easy to prepare but also healthy, making them perfect for a light meal or snack. The combination of crisp cucumber, smooth cream cheese, and a hint of seasoning creates a delicious contrast that's satisfying and packed with flavor.

    To make these rolls, you'll need some sushi rice and nori, but you can also enjoy this dish without either if you're looking for a lighter, gluten-free option.

    The versatility of this recipe allows you to add other fillings like avocado or smoked salmon if you desire more variety. However, the classic combination of cucumber and cream cheese offers a perfect balance of textures and tastes that everyone can enjoy.

    • 1 large cucumber
    • 1/2 cup cream cheese (softened)
    • 1 teaspoon soy sauce (optional)
    • 1 teaspoon sesame seeds (optional)
    • Nori sheets (optional, for traditional sushi)

    Cut the cucumber into long, thin strips using a vegetable peeler or a mandoline slicer, making sure not to peel off the skin completely for extra crunch and color.

    Lay a nori sheet on a bamboo sushi mat, spread a thin layer of cream cheese on top, arrange the cucumber strips on one edge of the nori, and roll tightly.

    If you're not using nori, simply spread the cream cheese on the cucumber strips, roll them up, and slice into bite-sized pieces.

    When making these sushi rolls, verify that the cream cheese is at room temperature for easy spreading.

    You can also experiment with additional fillings like fresh herbs or radishes for added flavor and crunch.

    If you want to make them more visually appealing, serve with a drizzle of soy sauce or a sprinkle of sesame seeds on top.

    Enjoy your homemade cucumber and cream cheese sushi as a light lunch or an impressive appetizer for guests!

  • 10 Spicy Korean Dishes for Bold & Fiery Meals

    If you're craving bold and fiery flavors, Korean cuisine has you covered with dishes like Kimchi Jjigae, a hearty stew bursting with fermented goodness. Try Tteokbokki for chewy rice cakes in a spicy sauce, or savor Spicy Pork Bulgogi, marinated to perfection. Don't miss Gochujang Chicken or Dakgalbi for sizzling chicken delights. For a mix, enjoy Bibimbap with gochujang, or warm up with Spicy Seafood Soup. Intrigued? There's so much more to explore!

    Kimchi Jjigae (Kimchi Stew)

    spicy fermented cabbage stew

    Kimchi Jjigae (Kimchi Stew) is a beloved staple in Korean cuisine, bursting with robust flavors that warm the soul. This savory, spicy stew showcases the iconic ingredient, kimchi, which is fermented cabbage seasoned with chili pepper, garlic, and a variety of other spices. The dish has long been a go-to comfort food among Koreans, especially during cold weather, thanks to its hearty nature and rich taste profile.

    Preparing Kimchi Jjigae is both rewarding and simple, making it an accessible dish for anyone to try their hand at Korean cooking. The hearty broth is enlivened with the tanginess of aged kimchi, enriched by the umami flavors of tofu and pork or other proteins. This dish not only makes use of leftover kimchi but also transforms it into something truly special, presenting a flavorful experience that's both spicy and satisfying.

    • 1 cup of aged kimchi (chopped)
    • 200g pork belly or tofu (cubed)
    • 1 medium onion (sliced)
    • 2 green onions (chopped)
    • 2 cloves garlic (minced)
    • 1 tablespoon gochugaru (Korean red pepper flakes)
    • 1 tablespoon soy sauce
    • 2 cups water or vegetable broth
    • 1 tablespoon sesame oil
    • Optional: 1 cup of mushrooms (sliced)

    In a large pot, heat the sesame oil over medium heat and sauté the pork belly or tofu until cooked through. Then, add the onions and garlic, cooking until the onions are translucent.

    Stir in the chopped kimchi and gochugaru, cooking for another few minutes to meld the flavors. Pour in the water or broth, add the soy sauce, and bring it to a boil. Let it simmer for about 20 minutes, allowing the flavors to blend, and just before serving, add the green onions for a fresh touch.

    For the best results when making Kimchi Jjigae, use well-fermented kimchi, as this will provide a deeper flavor to the stew. If you prefer a spicier dish, feel free to increase the amount of gochugaru.

    Additionally, varying the protein can yield different flavor profiles; try adding seafood like clams or shrimp, or experiment with various vegetables like zucchini or radish for added texture and taste.

    Tteokbokki (Spicy Rice Cakes)

    spicy korean rice cakes

    Tteokbokki is a beloved Korean street food that offers a perfect blend of chewy rice cakes, a luscious spicy sauce, and a variety of other ingredients like fish cakes and scallions. Traditionally enjoyed as a snack or light meal, tteokbokki is deeply embedded in Korean culture and is enjoyed by people of all ages.

    The dish is known for its vibrant color and intoxicating flavor, primarily derived from gochujang, the iconic Korean red chili paste.

    Preparing tteokbokki at home is easier than one might think, and it allows you to customize the level of spiciness to match your taste preferences. With a handful of simple ingredients, you can create a delightful dish that captures the essence of Korean cuisine.

    Whether you enjoy it as a hearty snack in the winter months or as a flavorful side dish at a gathering, tteokbokki is sure to impress.

    • 1 pound of tteok (Korean rice cakes)
    • 4 cups of water
    • 2 tablespoons of gochujang (Korean red chili paste)
    • 1 tablespoon of gochugaru (Korean red chili flakes)
    • 2 tablespoons of soy sauce
    • 1 tablespoon of sugar
    • 2 green onions, chopped
    • 4 fish cakes, sliced (optional)
    • 1 hard-boiled egg, halved (optional)
    • Sesame seeds for garnish (optional)

    In a large pot, bring the water to a boil and add the tteok (rice cakes). Softening the rice cakes usually takes about 10-15 minutes. After they become chewy and tender, stir in the gochujang, gochugaru, soy sauce, and sugar.

    Mix thoroughly until everything is evenly coated in the sauce. Then, add the fish cakes and chopped green onions, continuing to stir occasionally for another 5-7 minutes until everything is heated through and the sauce thickens to your desired consistency.

    Serve hot, garnished with sesame seeds and the hard-boiled egg if you like.

    For the best results, verify that you soak the rice cakes in water for about 30 minutes if they're hard or refrigerated before cooking. This step helps to achieve the perfect chewy texture.

    If you prefer a milder version, you can adjust the amount of gochujang and gochugaru to suit your taste. Additionally, make sure not to overcook the dish after adding the sauce, as this can make the rice cakes too soft and mushy.

    Spicy Pork Bulgogi

    deliciously marinated spicy pork

    Spicy Pork Bulgogi is a tantalizing dish that showcases the bold flavors of Korean cuisine. This recipe highlights marinated pork cooked to perfection, combining a mix of spicy and savory elements that dance on the palate. Perfect as a main course for family dinners or casual gatherings with friends, this dish is sure to leave everyone asking for seconds.

    The key to achieving the mouthwatering flavors of Spicy Pork Bulgogi lies in the marinade. It infuses the pork with a rich blend of spices and ingredients that not only tenderize the meat but also create an enticing aroma that fills your kitchen. Served with rice and fresh vegetables, this dish is a delightful way to introduce traditional Korean flavors into your home cooking repertoire.

    • 1 lb pork shoulder, thinly sliced
    • 2 tablespoons gochujang (Korean chili paste)
    • 2 tablespoons soy sauce
    • 1 tablespoon sesame oil
    • 2 tablespoons sugar
    • 2 cloves garlic, minced
    • 1 inch ginger, grated
    • 2 green onions, chopped
    • 1 tablespoon sesame seeds
    • 1 tablespoon vegetable oil for cooking

    To cook the Spicy Pork Bulgogi, combine the sliced pork with gochujang, soy sauce, sesame oil, sugar, minced garlic, grated ginger, chopped green onions, and sesame seeds in a large bowl. Mix well to guarantee the pork is evenly coated in the marinade, then let it marinate for at least 30 minutes (or overnight for deeper flavor).

    Heat vegetable oil in a skillet over medium-high heat, add the marinated pork, and cook for about 5-7 minutes, stirring frequently until the pork is fully cooked and caramelized.

    When preparing Spicy Pork Bulgogi, marinating the meat for a longer period will enhance the flavors notably, making it even more delicious. You can also adjust the level of spiciness by adding more or less gochujang, depending on your taste preference.

    For a more balanced meal, serve the pork with leafy greens, such as lettuce or cabbage, which can act as wraps for an extra crunch and freshness.

    Gochujang Chicken

    spicy korean chicken dish

    Gochujang Chicken is a deliciously spicy and savory dish that showcases the vibrant flavors of Korean cuisine. This dish centers around gochujang, a fermented red chili paste that infuses the chicken with its signature umami and heat. Paired with tender, juicy pieces of chicken, Gochujang Chicken tantalizes the taste buds and offers a satisfying meal that's sure to impress your family and friends.

    Whether served over rice or wrapped in lettuce leaves, this dish makes for an exciting addition to any dinner table.

    The beauty of Gochujang Chicken is its versatility; you can adjust the level of spiciness to suit your taste. Plus, the recipe is straightforward, making it perfect for both novice cooks and seasoned chefs alike.

    With aromatic garlic, fresh ginger, and a touch of sweetness, this dish balances heat and flavor beautifully. Prepare to enjoy the deliciousness of Korean cuisine right in the comfort of your own home.

    Ingredients:

    • 1 lb boneless, skinless chicken thighs
    • 3 tablespoons gochujang
    • 2 tablespoons soy sauce
    • 1 tablespoon honey
    • 1 tablespoon sesame oil
    • 3 cloves garlic, minced
    • 1 tablespoon fresh ginger, grated
    • 1 teaspoon rice vinegar
    • 1 tablespoon vegetable oil
    • Sliced green onions, for garnish
    • Sesame seeds, for garnish

    In a large bowl, combine the gochujang, soy sauce, honey, sesame oil, minced garlic, grated ginger, and rice vinegar to create a marinade. Cut the chicken thighs into bite-sized pieces and add them to the marinade, ensuring they're well coated.

    Let the chicken marinate for at least 30 minutes (or up to overnight in the refrigerator for deeper flavor). Heat vegetable oil in a large skillet over medium-high heat, then add the marinated chicken and cook until browned and cooked through, about 8-10 minutes, stirring frequently.

    Serve hot, garnished with sliced green onions and sesame seeds.

    When cooking Gochujang Chicken, it's important not to overcrowd the pan, as this can lead to steaming rather than browning the chicken. If you're cooking a larger batch, consider cooking the chicken in two separate batches.

    Additionally, feel free to adjust the sweetness and spiciness by varying the amount of honey and gochujang to your liking. Experimenting with vegetables such as bell peppers or broccoli can also enhance the dish and add nutritional value.

    Enjoy your cooking!

    Sundubu Jjigae (Soft Tofu Stew)

    soft tofu stew recipe

    Sundubu Jjigae, or Soft Tofu Stew, is a comforting and spicy dish that hails from Korea. It's known for its unique texture and flavor, making it a staple in many Korean households. The dish features uncurdled tofu, vegetables, and an array of seasonings that come together in a bubbling pot, perfect for warming up on colder days or for a quick meal that's both nutritious and satisfying.

    The comforting warmth, combined with the heat from gochujang (Korean red pepper paste) or gochugaru (Korean red pepper flakes), creates a delightful experience that's celebrated by many.

    This stew is incredibly versatile and can be customized to suit individual tastes. While the traditional recipe typically includes ingredients like seafood or meat, it's just as delicious when made vegetarian. It's usually served with a bowl of rice on the side, allowing diners to scoop the spiced stew over their rice for a wholesome meal.

    The simplicity of this recipe makes it an excellent choice for both novice and experienced cooks!

    • 300g silken tofu
    • 100g shrimp, peeled and deveined (optional)
    • 1 cup of sliced zucchini
    • 1 cup of sliced mushrooms (shiitake or button)
    • 1 small onion, sliced
    • 2-3 green onions, chopped
    • 2 tbsp gochugaru (Korean red pepper flakes)
    • 1 tbsp gochujang (Korean chili paste)
    • 4 cups vegetable or seafood broth
    • 2 tbsp soy sauce
    • 1 tsp minced garlic
    • 1 tsp sesame oil

    In a pot over medium heat, combine the minced garlic, sliced onion, and gochugaru and sauté until fragrant. Add the broth and bring it to a simmer.

    Next, add the zucchini, mushrooms, and any optional proteins like shrimp if using. Cook for about 5-7 minutes until the vegetables are tender. Carefully add the silken tofu by breaking it into chunks into the pot, and then stir in the gochujang and soy sauce.

    Allow everything to simmer for an additional 3-5 minutes, then drizzle with sesame oil and garnish with chopped green onions before serving.

    When preparing Sundubu Jjigae, be mindful of the heat level. Adjust the amount of gochugaru and gochujang to your preferences, and don't hesitate to add other ingredients such as clams, beef, or even different vegetables like carrots or bell peppers.

    This dish is best enjoyed fresh, but if you have leftovers, store them in the refrigerator and reheat gently on the stove. Pairing it with a bowl of warm rice will elevate your meal and make it even more fulfilling!

    Spicy Grilled Mackerel

    grilled mackerel with spices

    Spicy Grilled Mackerel is a delightful dish that embodies the bold flavors of Korean cuisine. Mackerel, known for its rich, oily texture, is a perfect candidate for grilling, as it absorbs marinades beautifully while staying moist. This recipe incorporates a spicy gochujang marinade, giving the fish a delightful kick and an authentic Korean flavor. When grilled, the mackerel develops a smoky char that enhances the overall taste, making it a favorite among seafood lovers.

    This dish isn't only flavorful but also nutritious, as mackerel is packed with omega-3 fatty acids and ranks as one of the best fish for your health. Grilling it allows for a quick and simple cooking method that retains the fish's natural moisture. Serve it alongside steamed rice and pickled vegetables for a complete meal that's sure to impress.

    Ingredients:

    • 2 whole mackerels, cleaned and scaled
    • 3 tablespoons gochujang (Korean red chili paste)
    • 2 tablespoons soy sauce
    • 1 tablespoon sesame oil
    • 1 tablespoon rice vinegar
    • 1 tablespoon honey or sugar
    • 3 cloves garlic, minced
    • 1 teaspoon ginger, minced
    • 1 tablespoon sesame seeds
    • Chopped green onions for garnish

    To prepare the mackerel, first make the marinade by mixing gochujang, soy sauce, sesame oil, rice vinegar, honey (or sugar), garlic, and ginger in a bowl. Coat the cleaned mackerels thoroughly with the marinade, guaranteeing that it penetrates inside the cavity as well.

    Allow the fish to marinate for at least 30 minutes (or up to 2 hours in the refrigerator for even deeper flavor) before grilling. Preheat your grill to medium-high heat, then grill the mackerel for about 4-5 minutes per side, or until the skin is crispy and the fish is cooked through.

    When grilling mackerel, verify that the grill is properly preheated to avoid sticking, and use oil or non-stick spray to enhance the grilling process. You can also add various vegetables, such as zucchini or bell peppers, to the grill alongside the fish for a fully rounded meal.

    If you prefer a less intense flavor, reduce the amount of gochujang in the marinade, or balance it with more honey for sweetness. Enjoy the dish hot, garnished with sesame seeds and chopped green onions for added texture and taste.

    Dakgalbi (Spicy Stir-Fried Chicken)

    spicy stir fried chicken dish

    Dakgalbi, or spicy stir-fried chicken, is a popular South Korean dish that delights with its bold flavors and enchanting aroma. This dish is typically made with tender chunks of chicken marinated in a spicy gochujang (Korean chili paste) sauce, combined with a vibrant mix of vegetables.

    Dakgalbi is often cooked on a hot plate or skillet, allowing the ingredients to sizzle and meld together, delivering a satisfying blend of heat and umami. It's not just a meal; it's an experience that brings friends and family together around the table.

    Traditionally, dakgalbi is served with a side of rice, and many enjoy adding cheese on top, creating a creamy contrast to the spiciness. You can find dakgalbi easily in restaurants across Korea, but making it at home allows you to customize the heat level and tweak the ingredients to your liking.

    With a little preparation and the right ingredients, you can create a delicious dakgalbi that will transport you straight to the bustling streets of Seoul.

    Ingredients:

    • 500g boneless chicken thighs, cut into bite-sized pieces
    • 2 tablespoons gochujang (Korean chili paste)
    • 1 tablespoon gochugaru (Korean chili flakes)
    • 1 tablespoon soy sauce
    • 1 tablespoon sesame oil
    • 1 tablespoon honey or sugar
    • 3 cloves garlic, minced
    • 1 onion, sliced
    • 1 carrot, julienned
    • 1 cup cabbage, chopped
    • 2 spring onions, chopped
    • 1 tablespoon vegetable oil
    • Optional: cheese slices or shredded cheese (for topping)

    In a large bowl, combine the chicken pieces with gochujang, gochugaru, soy sauce, sesame oil, honey, and minced garlic. Mix well and let the chicken marinate for at least 30 minutes.

    Heat vegetable oil in a skillet or wok over medium-high heat, then add the marinated chicken along with the onion and carrots. Stir-fry for about 5-7 minutes until the chicken is cooked through and slightly caramelized.

    Add the cabbage and spring onions, and cook for an additional 2-3 minutes. If desired, place cheese on top and cover until melted. Serve hot with rice.

    One important tip for making dakgalbi is to customize the spice level according to your taste. If you prefer less heat, reduce the amount of gochujang and gochugaru, or add extra honey to balance the flavors.

    Additionally, feel free to include other vegetables such as bell peppers or mushrooms, which can enhance the dish's texture and nutritional value. Cooking on high heat will give you a nice char without overcooking the chicken, so keep an eye on it for the perfect stir-fry experience.

    Bibimbap With Gochujang

    spicy mixed rice bowl

    Bibimbap is a classic Korean dish that beautifully combines textures and flavors, creating a vibrant meal that's as healthy as it's delicious. The name "bibimbap" means "mixed rice," reflecting the way the various ingredients come together harmoniously in a bowl.

    The dish features a medley of sautéed vegetables, marinated meat (usually beef), a fried egg, and a generous dollop of gochujang, which is a fermented red chili paste that adds depth, spice, and a hint of sweetness. This dish isn't only visually appealing but also nutrient-packed, making it a favorite among those who enjoy hearty meals.

    To prepare bibimbap, you'll want to showcase a range of colorful vegetables, each contributing its unique flavor and texture. The beauty of this dish lies in its versatility, allowing you to use whichever ingredients you have on hand. While the traditional version may include ingredients like shredded carrots, spinach, and bean sprouts, feel free to improvise with seasonal vegetables or your own favorites.

    The use of gochujang gives bibimbap its signature spicy kick, but you can adjust the amount to suit your taste.

    Ingredients:

    • 2 cups cooked rice (preferably short-grain or sushi rice)
    • 1 cup spinach, blanched and squeezed dry
    • 1 cup carrots, julienned and lightly sautéed
    • 1 cup bean sprouts, blanched
    • 1 cup zucchini, julienned and toasted
    • 1 cup shiitake mushrooms, sautéed
    • 1/2 pound beef (ground or sliced thin), marinated in soy sauce and sesame oil
    • 4 eggs
    • 4 tablespoons gochujang
    • 2 tablespoons sesame oil
    • 1 tablespoon vegetable oil
    • Salt to taste
    • Sesame seeds for garnish
    • Sliced green onions for garnish

    In a large skillet, heat the vegetable oil over medium heat and cook the beef until browned, seasoning with salt. In a separate skillet, fry each egg sunny-side up.

    To assemble the bibimbap, take a bowl and add a scoop of cooked rice as the base. Arrange the blanched spinach, sautéed carrots, blanched bean sprouts, sautéed shiitake mushrooms, and toasted zucchini on top of the rice decoratively. Place the cooked beef in the center and finally, top it with a fried egg. Add a generous spoonful of gochujang and drizzle with sesame oil before serving.

    When preparing bibimbap, feel free to customize the toppings to cater to your preferences. You can also switch up the protein by using chicken, tofu, or even seafood.

    Be sure to serve the gochujang on the side if you're uncertain about the spice level, allowing everyone to adjust to their liking. Another tip is to use a hot stone bowl if available, as it will keep the rice warm and create a delightful, crispy bottom layer known as "nurungji."

    Spicy Seafood Soup (Jjampong)

    spicy korean seafood soup

    Spicy Seafood Soup, known as Jjampong, is a beloved and aromatic Korean dish that combines an array of fresh seafood with a spicy broth. Its satisfying flair comes from the balance of spiciness and umami flavors, making it a perfect meal for seafood lovers.

    Jjampong is renowned for its vibrant red color, which is achieved through the use of chili paste and powder, giving it that distinctive kick that warms you from the inside out. It's typically served with chewy noodles, making it both hearty and comforting.

    While the soup is mostly associated with coastal regions, it has become a staple in Korean cuisine worldwide. Jjampong not only highlights the freshness of seafood but also incorporates vegetables such as carrots, cabbage, and onions, creating a symphony of textures and flavors.

    Whether enjoyed as a comforting dinner during cold winter nights or a vibrant meal any time of the year, this dish is sure to impress anyone who takes a bite.

    Ingredients:

    • 200g squid, cleaned and sliced
    • 200g shrimp, peeled and deveined
    • 200g mussels, cleaned
    • 150g clams, cleaned
    • 1 onion, sliced
    • 1 carrot, julienned
    • 100g napa cabbage, chopped
    • 3-4 green onions, chopped
    • 4 cups seafood stock
    • 2 tablespoons gochugaru (Korean red pepper flakes)
    • 1 tablespoon gochujang (Korean red pepper paste)
    • 2 tablespoons soy sauce
    • 2 tablespoons sesame oil
    • 200g fresh wheat noodles (or any desired noodles)
    • Salt and pepper to taste

    In a large pot, heat sesame oil over medium heat and sauté the onion and garlic until fragrant. Add the carrots and napa cabbage, stirring until the vegetables are slightly softened.

    Next, add the seafood stock, gochugaru, gochujang, and soy sauce; bring to a boil. Once boiling, reduce the heat and add the squid, shrimp, mussels, and clams, allowing them to cook for about 5-7 minutes until the seafood is cooked through.

    Meanwhile, prepare the noodles according to package instructions. Once the seafood is ready, adjust the seasoning with salt and pepper as needed. Serve hot, placing a portion of noodles in each bowl and ladling the soup over the top, garnished with green onions.

    When making Jjampong, try to use the freshest seafood possible for the best flavor, and feel free to customize the ingredients according to your preferences. If you like even more heat, increase the amount of gochugaru or add a splash of chili oil.

    Pair your soup with a side of kimchi or pickled vegetables to balance the spiciness, enhancing the overall dining experience. Enjoy experimenting with the proportions and ingredients to create your perfect bowl of this delicious seafood soup!

    Hotteok (Spicy Sweet Pancakes)

    spicy sweet korean pancakes

    Hotteok, or spicy sweet pancakes, are a beloved Korean street food that balances the perfect mix of sweetness and heat. Traditionally enjoyed during the winter months, these tasty treats are filled with a warm, gooey mixture that tantalizes the taste buds. The dough is soft and chewy, creating a delightful contrast to the spicy filling, making each bite an exciting culinary experience.

    Creating hotteok at home may seem intimidating, but the process is straightforward and highly rewarding. The inclusion of spices in the filling gives these pancakes their signature kick, while the brown sugar adds a hint of sweetness. The best part is that they're versatile, so you can adjust the level of spiciness to match your palate, making them suitable for everyone to enjoy.

    Ingredients:

    • 2 cups all-purpose flour
    • 1/2 cup warm water
    • 1/4 cup sugar
    • 1/2 teaspoon salt
    • 1 teaspoon instant yeast
    • 1 tablespoon vegetable oil
    • 1/4 cup chopped green onions
    • 1/4 cup chopped jalapeños (or your preferred spicy pepper)
    • 1/4 cup brown sugar
    • 1 teaspoon cinnamon

    Mixing the dough is the first step, where you'll combine the flour, warm water, sugar, salt, yeast, and vegetable oil together until a sticky dough forms. Knead the dough for a few minutes until it's smooth and elastic, then cover and let it rise in a warm place for about an hour.

    While the dough is rising, prepare the filling by combining the chopped green onions, jalapeños, brown sugar, and cinnamon in a bowl. Once the dough has risen, punch it down and divide it into small balls. Flatten each ball, add a generous spoonful of the filling mixture, and seal it closed before cooking them on a hot pan until golden brown and crispy.

    For the best results, make sure to let the dough rise properly; this helps create a fluffier pancake. Feel free to experiment with various fillers, such as nuts or seeds, for added texture. Adjust the spice level by using milder or hotter peppers based on your taste preference.

    Finally, serve them immediately while they're still warm to enjoy the gooey filling and crispy exterior at their best!